Pi Stage
Welcome
Pi Stage by Saharty is a stage plot, patch list and technical rider designer for macOS and Windows. You draw the stage once, and the rest of the advance builds itself from that drawing: input list, monitor mixes, stage box patch, power plan, RF list, gear and pick list, and a multi-page PDF rider that venues, promoters and crews can read straight away.
Who it is for. Front-of-house and monitor engineers, production and tour managers, stage managers, backline techs, bands advancing their own shows, orchestras, and venues preparing house plots. If you write riders, read riders or patch stages, Pi Stage is built for you.
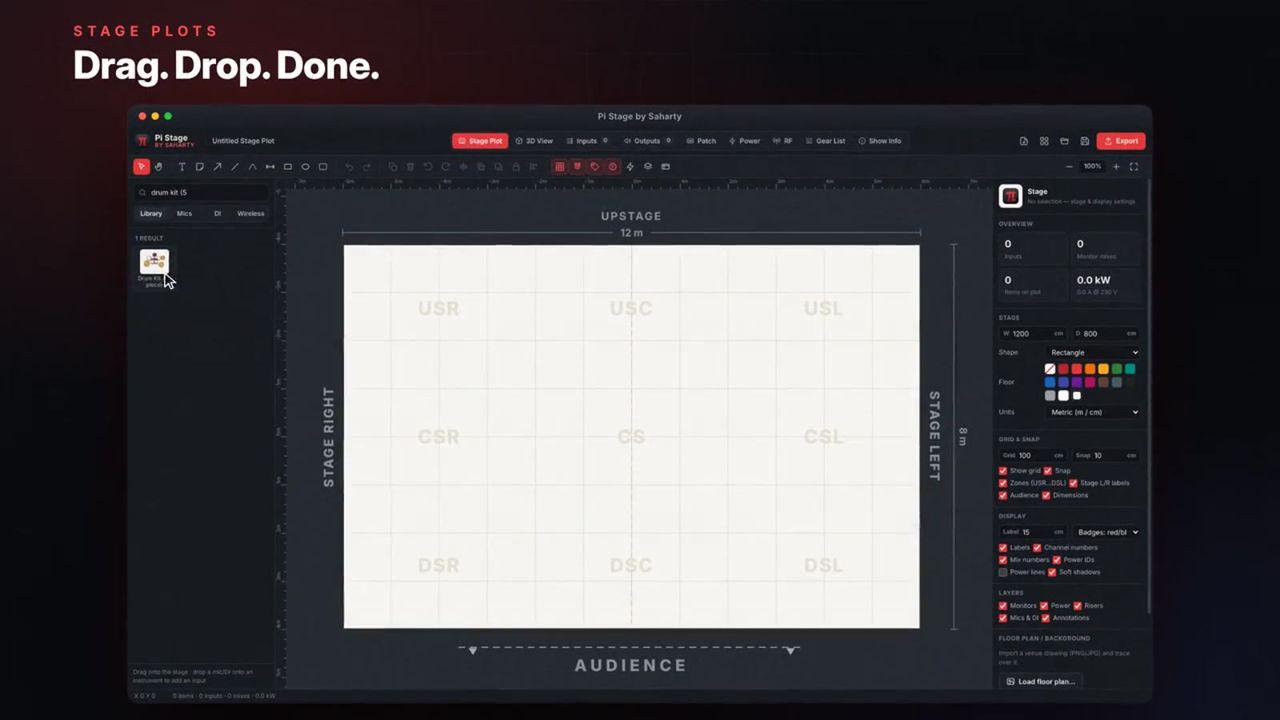
What it does, in one paragraph. Drag instruments, people, microphones, monitors, risers, power drops and stage boxes from a library onto a stage drawn to scale. When you place an instrument, Pi Stage creates its inputs with suitable microphones, stands and phantom power. When you place a monitor, it creates the monitor mix. Smart Patch assigns every source to the nearest stage box with free ports, the power plan calculates the load on every drop, the RF page checks spacing and intermodulation, and the gear list counts everything you need, down to estimated XLR cable lengths. Then you export: PDF, JPG, PNG, SVG, XML, CSV, a 3D image or 3D model, or channel names, colours and patch for a Yamaha console.
Version 1.1.1 at a glance
- Stage plot editor with drag and drop, snap, smart alignment guides, rulers, layers, undo/redo, text, notes, arrows, lines, cable runs, dimensions, zones and images.
- 316 library items, from rock backline to a full orchestra, Arabic and oriental instruments, DJ gear, PA, risers, power, furniture and lighting.
- Gear database with hundreds of microphones, DI boxes, wireless systems, stage boxes, consoles and power connectors.
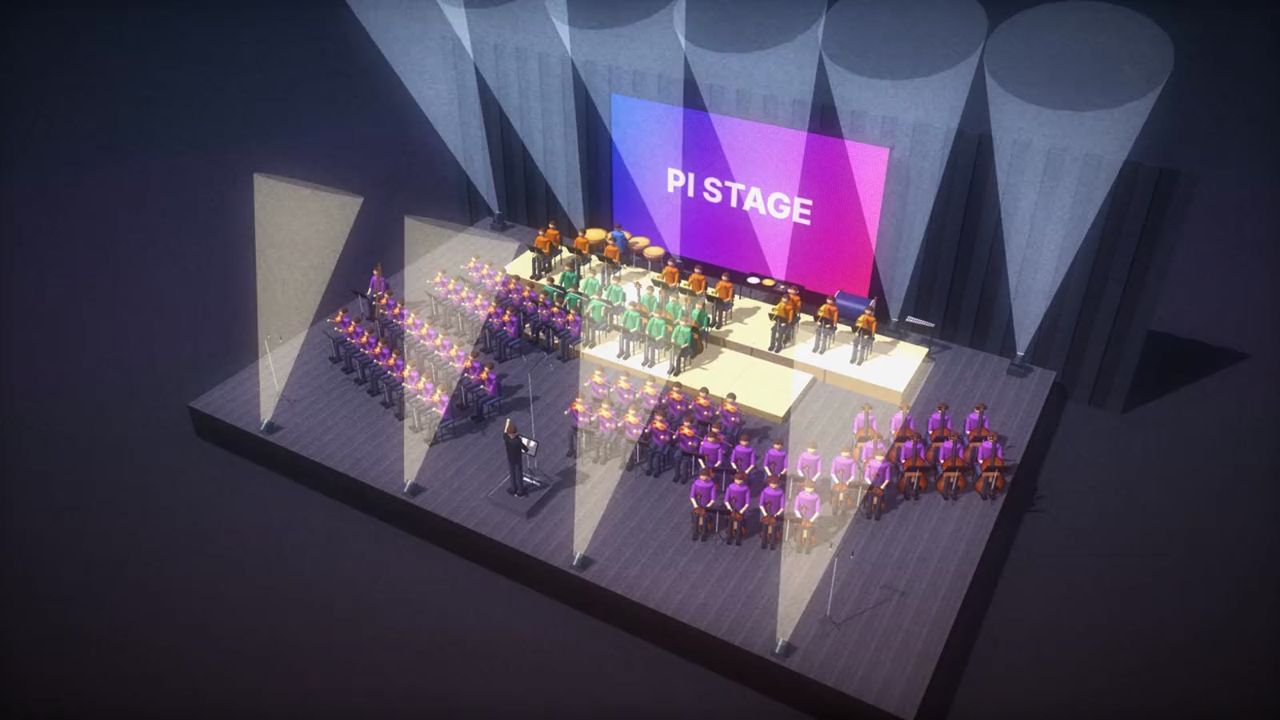
- 3D view with lighting, shadows, people, risers, backline, truss, LED walls and venue, exportable as an image up to 4K or as a GLB / OBJ model.
- Yamaha console export for CL, QL, DM7, DM3, TF and RIVAGE PM, either as a CSV set or sent straight to the console over the network.
- Autosave with crash recovery, dark and light interface, metric and imperial units.
- Pi by Saharty licensing with a 15-day free trial and offline activation.
Quick start
- Install Pi Stage (see Installation) and open it. If the licence window appears, click Start 15-day free trial or enter your licence key and click Activate.
- Choose File › New from Template… (Ctrl/Cmd+Shift+N) and pick the template closest to your act, or keep the blank stage.
- With nothing selected, set the stage W (width), D (depth) and Shape in the inspector on the right, or use Arrange › Stage Settings….
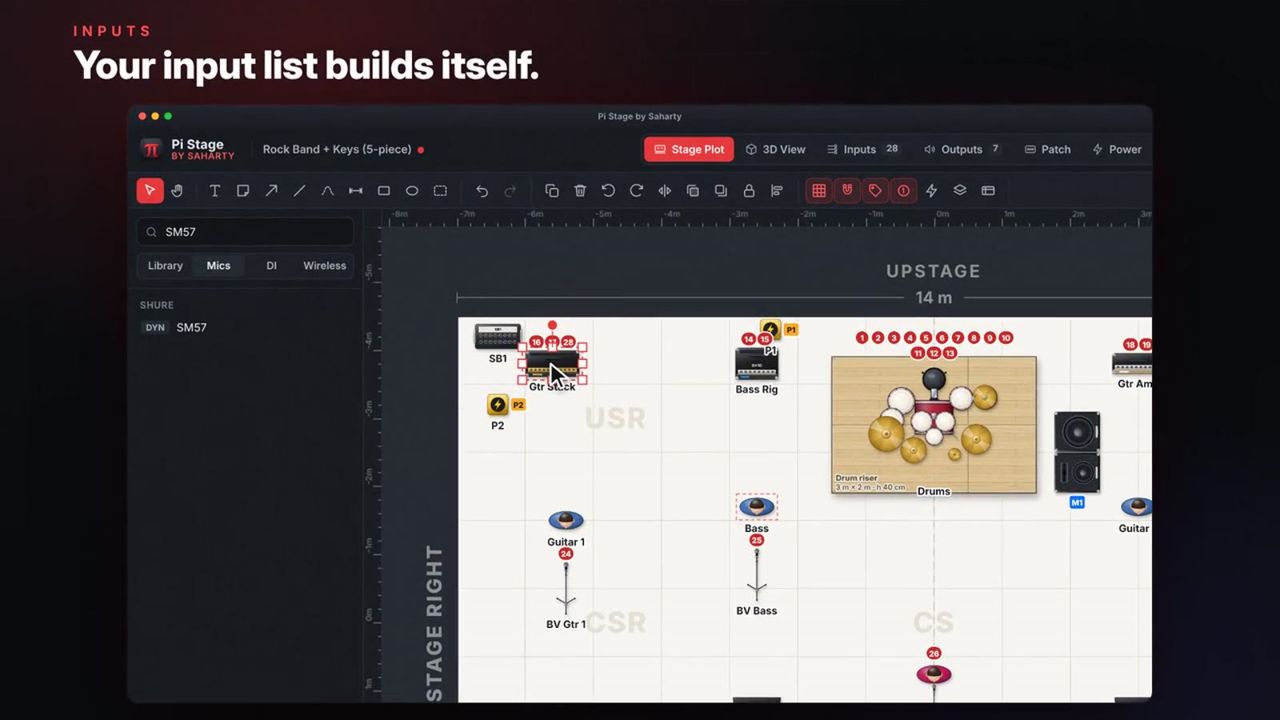
- Drag instruments, vocalists and players from the Library on the left onto the stage. Their inputs appear automatically. Watch the Inputs counter in the tab bar go up.
- Drag wedges, side fills or IEMs onto the stage. Each one creates a monitor mix.
- Place at least one stage box (library category DI, Stage Boxes & RF) where it will sit on stage, then run Tools › Smart Patch (assign stage boxes).
- Place a power drop (category Power) and check the Power tab.
- Fill in the Show Info tab: artist, show, venue, date, logo and contacts.
- Run Tools › Validate Plot (find problems) and fix anything it reports.
- Click Export in the top bar, choose PDF rider, tick the pages you want and click Export. Save the project with File › Save (Ctrl/Cmd+S) as a
.pistagefile.
Installation
Pi Stage is a standalone application. It is not a plug-in, and it needs no other runtime: everything it uses is inside the installer.
macOS
There are two disk images:
| Installer | For |
|---|---|
Pi Stage by Saharty-1.1.1-arm64.dmg |
Macs with Apple silicon |
Pi Stage by Saharty-1.1.1-x64.dmg |
Macs with an Intel processor |
- Open the
.dmg. - Drag Pi Stage by Saharty onto the Applications folder shown in the window.
- Eject the disk image and open Pi Stage from Applications or Launchpad.
Signed and notarised builds open without any warning. If your copy shows a warning on first launch:
- macOS 15 or later: try to open the app once, then go to System Settings › Privacy & Security and click Open Anyway.
- Earlier macOS versions: right-click (or Control-click) the app, choose Open, then confirm with Open.
Windows
- Run
Pi Stage by Saharty Setup 1.1.1.exe. - Read and accept the licence agreement.
- Choose whether to install for your user account and, if you like, change the installation folder.
- The installer creates a desktop shortcut and a Start menu shortcut called Pi Stage by Saharty, and can launch the app when it finishes.
Note: If Windows SmartScreen warns about an unknown publisher, click More info › Run anyway.
File association
Installing Pi Stage registers the .pistage file type (Pi Stage Project). Double-click a .pistage file to open it in Pi Stage. If Pi Stage is already running, the file opens in the existing window rather than starting a second copy.
First launch
On first launch Pi Stage opens with an empty 12 × 8 m stage and a Start your stage plot card with two buttons: Start from a template and Open a file. Pi Stage then checks the licence. If the computer has no licence or trial yet, the licence window opens once so you can start the trial or activate.
The window remembers its size, position and maximised state between sessions.
Activation & licensing
Pi Stage uses the Pi by Saharty licensing system. One licence activates one computer.
Buying and receiving a key
Buy Pi Stage at pi-ware.com. Your licence key arrives by email after purchase, in the form XXXXX-XXXXX-XXXXX-XXXXX. You can also find your licences in your account at pi-ware.com/account.
Opening the licence window
Open the Pi Stage — licence window from Help › Licence… (or Pi Stage by Saharty › Licence… on macOS), from the licence button at the right of the top bar, or from the banner. Any save, export or print command opens it too while saving is off.
The window shows the current status, the licence owner and This computer: with the computer's name.
Free trial
Click Start 15-day free trial. No payment details are needed, and every feature is on for the 15 days. The banner and status bar show the trial message while it runs.
Online activation
- Paste your key into the Licence key field.
- Click Activate (or press Enter).
- When the status line says Activated … Every feature is on., you are done.
If the key is already active on another computer, Pi Stage asks whether to Move it here. The other computer receives a 24-hour notice and then switches to limited features. Where a yearly limit applies, the dialog shows Moves left this year.
Offline activation
Use this when the computer has no internet connection.
- Enter your licence key in the Licence key field.
- Click Offline activation. A request code appears.
- Click Copy code and take the code to any device with internet access.
- Paste the code at pi-ware.com/activate and download the licence file you are given.
- Back in Pi Stage, click Load licence file… and choose that file (
.pilicor.txt).
Moving to a new computer
- From the old computer: open the licence window and click Deactivate this computer, confirm, then activate on the new computer.
- If the old computer is not available: deactivate or reset machines from your account at pi-ware.com/account, or simply activate on the new computer and confirm Move it here.
Licence checks and the 24-hour rule
Pi Stage checks the licence whenever it finds an internet connection: at launch, then every 60 minutes (every 2 minutes while offline). Offline, it keeps working with no time limit.
Features are never limited without at least 24 hours of notice on that computer, whatever the reason (licence moved, trial ended, deactivated from the account). During the notice everything keeps working, and a banner shows the message with a countdown.
Limited mode
When Pi Stage is not activated, or after a notice runs out:
- Every project still opens and can be viewed and edited.
- Saving, exporting (PDF, JPG, PNG, SVG, XML, CSV, 3D, Yamaha) and printing are off. The buttons and menu items stay visible, read Activate to save and open the licence window.
- Crash-recovery autosave keeps working, so no work is lost.
The licence file
| Platform | Location |
|---|---|
| macOS | ~/Library/Application Support/Pi by Saharty/Licences/pi-stage.pilic |
| Windows | %APPDATA%\Pi by Saharty\Licences\pi-stage.pilic |
Warning: Do not edit the licence file. Any change makes the licence invalid.
Note: Pi Stage connects only to the Pi licence server, to activate and check the licence. It sends the licence key, product, app version, computer name, operating system and a one-way machine ID. Your documents are never sent.
Interface tour
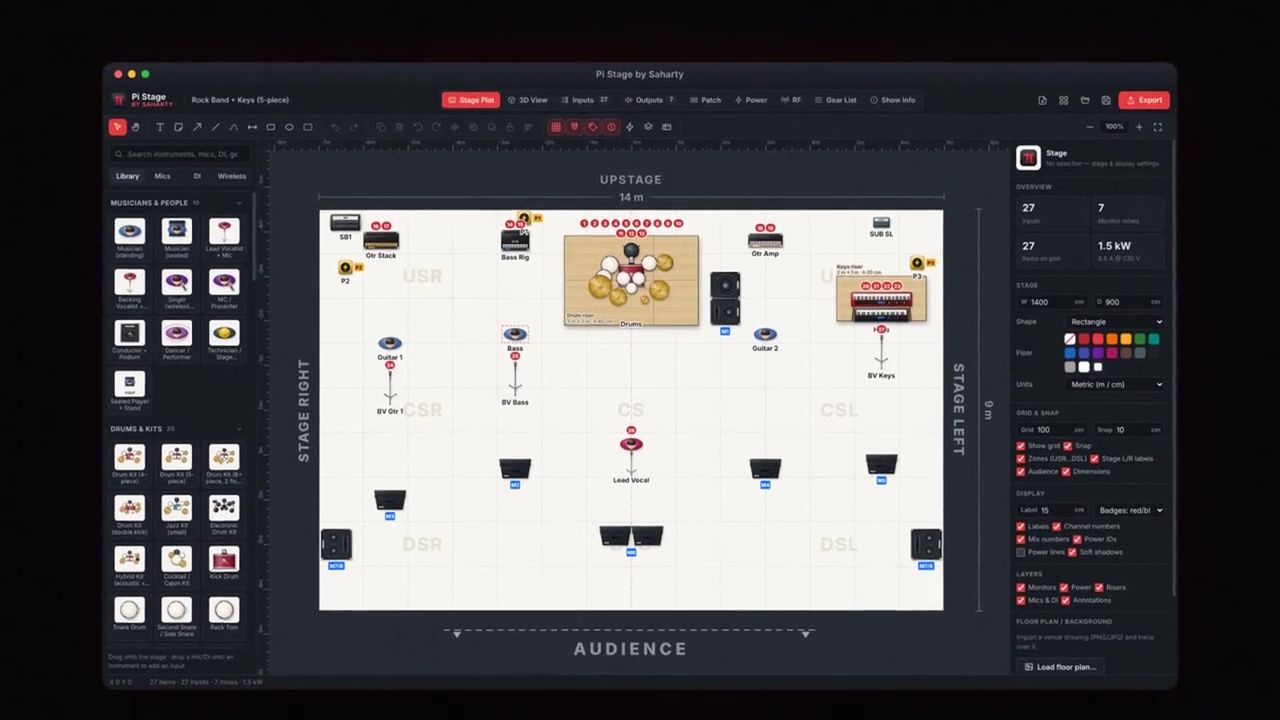
The main window has six areas, from top to bottom and left to right.
Top bar
| Control | What it does |
|---|---|
| Pi Stage logo | Opens the About box (version, licence status, legal links). |
| Document title | The file name, or the Document title from Show Info if unsaved. A dot (●) means unsaved changes. |
| Tabs | Stage Plot, 3D View, Inputs (with count), Outputs (with count), Patch, Power, RF, Gear List, Show Info. |
| New | New stage plot (Ctrl/Cmd+N). |
| Template | New from template. |
| Open | Open a .pistage or Pi Stage XML file (Ctrl/Cmd+O). |
| Save | Save (Ctrl/Cmd+S). |
| Export | Opens the Export dialog (PDF, JPG, PNG, SVG, XML, CSV, 3D, Yamaha). |
| Licence button | Opens the licence window and shows the licence state. |
Toolbar (Stage Plot tab)
| Control | What it does | Key |
|---|---|---|
| Select / Move | Select, move, resize and rotate items. | V |
| Pan | Drag to move the view. | H, or hold Space |
| Text | Click or drag to place text. | T |
| Sticky note | Place a note. | N |
| Arrow | Draw an arrow. | A |
| Line | Draw a line. | L |
| Cable run / snake | Draw a cable run. | C |
| Dimension / measure | Draw a dimension line that shows its length. | M |
| Rectangle | Draw a rectangle. | R |
| Ellipse | Draw an ellipse. | E |
| Zone / area | Draw a zone or area. | Z |
| Undo / Redo | Step back or forward through your changes (up to 250 steps). | Ctrl/Cmd+Z, Cmd+Shift+Z / Ctrl+Y |
| Duplicate, Delete, Rotate 90° left/right, Flip horizontally, Bring to front, Send to back, Lock / unlock, Align & distribute | Act on the selection. They are greyed out when nothing is selected. | |
| Show grid | Grid on/off. | Ctrl/Cmd+' |
| Snap to grid | Snap on/off. | Ctrl/Cmd+; |
| Show labels | Item labels on/off. | |
| Show channel numbers | Channel badges on/off. | |
| Show power connections | Lines from each powered item to its drop. | |
| Show / hide layers | Layers and overlays pop-up (see below). | |
| Stage size & shape | Opens the stage dialog. | |
| Zoom out / percentage / Zoom in / Fit to window | Zoom controls. Click the percentage to fit the stage. | Ctrl/Cmd+−, Ctrl/Cmd+=, Ctrl/Cmd+0 |
When you open any tab other than Stage Plot, the toolbar shows the page title instead.
Library (left)
- Search field: Search instruments, mics, DI, gear… Press Enter to add the first result, Esc to clear.
- Four modes: Library (stage items in collapsible categories), Mics, DI and Wireless (model lists from the gear database).
- Drag an item onto the stage, or click it to add it near the centre of the view.
The library categories are: Musicians & People; Drums & Kits; Percussion; Guitars & Bass; Amps & Backline; Keyboards & Pianos; Vocals & Speech; Orchestral Strings; Woodwinds; Brass; Orchestral Percussion; Orchestra Sections & Ensembles; Arabic / Oriental & World; DJ, Playback & Electronic; Microphones & Stands; DI, Stage Boxes & RF; Monitors & IEM; PA & Production; Risers & Staging; Power; Furniture & Props; Lighting & Effects; Text, Lines & Shapes.
Stage plot (centre)
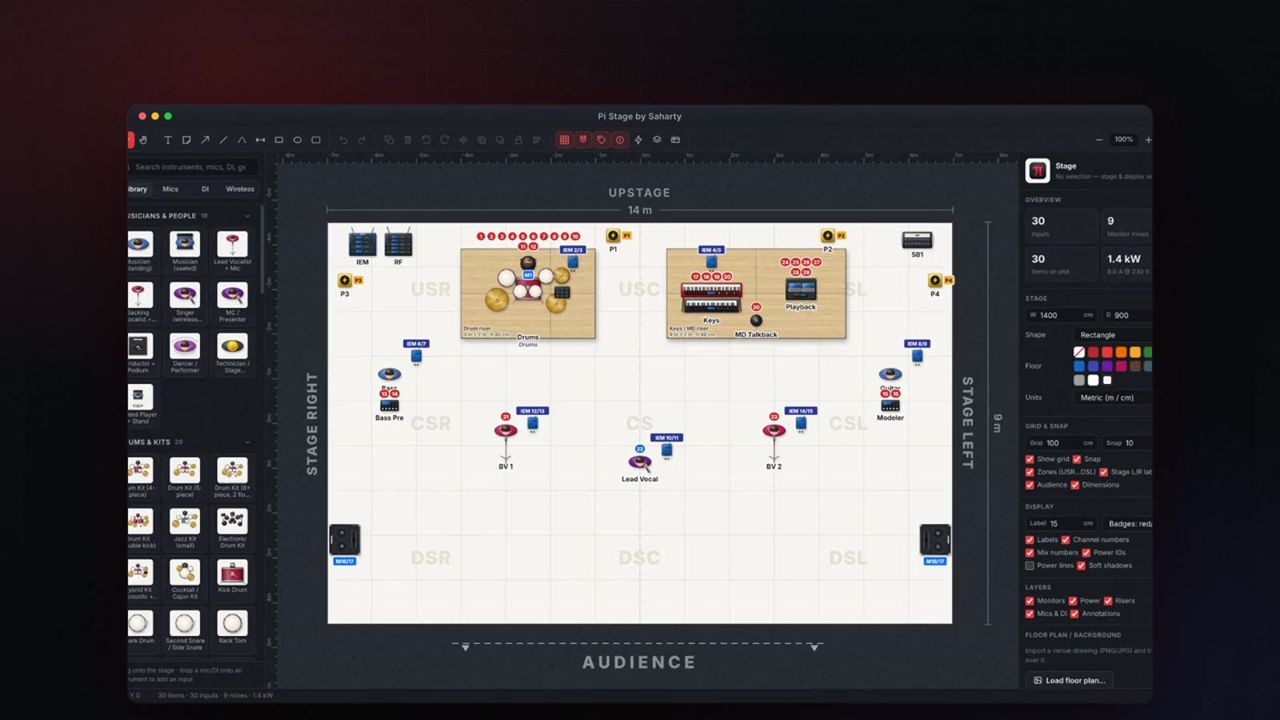
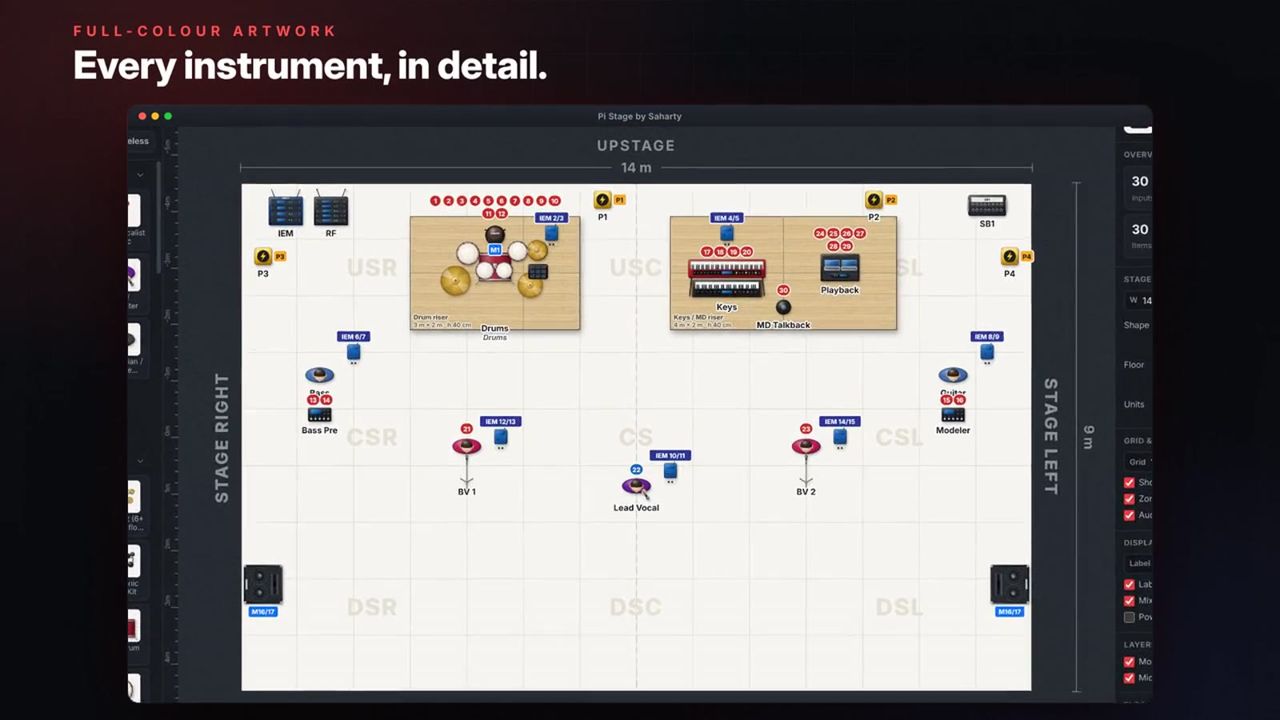
The stage drawing with rulers along the top and left edge. Upstage is at the top, the audience at the bottom. Stage right and stage left labels, the zone grid (USR…DSL), dimensions and the audience marker can all be switched on and off in the inspector.
Inspector (right)
The inspector changes with the selection:
- Nothing selected: stage, grid, display, layer and floor plan settings, plus an overview of inputs, mixes, items and total power.
- One item: its label, colour, position and size, plus sections for its type (riser, ensemble, power drop, stage box, monitor mix), its inputs, power and notes.
- Several items: align and distribute, colour, rotation, label size, Provided by, lock and mirror.
Hide or show the library and inspector with View › Toggle Library Panel (Ctrl/Cmd+[) and View › Toggle Inspector Panel (Ctrl/Cmd+]).
Status bar (bottom)
Shows the cursor position, the selection, project totals (items · inputs · mixes · kW), export progress and the licence status.
Stage panel (inspector, nothing selected)
| Control | What it does | Range / default |
|---|---|---|
| W / D | Stage width and depth. | Minimum 1 m; default 12 × 8 m |
| Shape | Rectangle, Thrust (T-stage), Catwalk (rounded), Curved apron, Round / Oval. | Rectangle |
| Thrust W / Thrust D | Size of the thrust or catwalk (Thrust and Catwalk shapes only). | 3 × 2 m |
| Apron | Depth of the curved apron (Curved apron only). | 1.2 m |
| Floor | Floor colour swatches plus a custom colour picker. | Off-white |
| Units | Metric (m / cm) or Imperial (ft / in). | Metric |
| Grid | Grid spacing. | 1 m |
| Snap (size) | Snap step. | 10 cm |
| Show grid, Snap, Zones (USR…DSL), Stage L/R labels, Audience, Dimensions | Display options for the stage. | All on |
| Label | Label text size. | 15 cm |
| Badges | Badges: red/blue or Badges: group colours. | Red/blue |
| Labels, Channel numbers, Mix numbers, Power IDs, Power lines, Soft shadows | Overlays. | All on except Power lines |
| Monitors, Power, Risers, Mics & DI, Annotations | Layer visibility. | All on |
| Floor plan / background | Load floor plan…, then Scale W, Opacity, X, Y, Replace image, Remove. | Opacity 50 % |
Tip: Every length field accepts units as you type:
12m,40ft,8'6"all work. In any number field, the Up and Down arrow keys step the value by 1, or by 10 with Shift.
Item panel (inspector, one item selected)
| Section | Controls |
|---|---|
| Label | Label, Performer (for instruments, people, mics, sections and monitors), Show label, Lock, label Size (cm, blank = auto) and Offset (cm). |
| Text (text and notes) | Text box, Size, alignment (Centre, Left, Right), Bold, Border, Lock, Background colour. |
| Line (lines and dimensions) | Width, Length, Dashed, Arrow end, Arrow start, Lock; dimension Text. |
| Shape | Stroke, Radius (rectangles), Dashed, Lock, Fill. |
| Colour | Swatches and custom colour. |
| Position & Size | X, Y, W, H, Rot (°), Flip, Reset size, ⟲ 90°, ⟳ 90°. |
| Riser | Height, deck size (2 × 1 m, 2 × 2 m, 1 × 1 m, 8 × 4 ft, 6 × 4 ft, 4 × 4 ft, Custom), Deck W / Deck D for custom decks, Skirt, Stairs, Wheels (rolling), Show deck seams. Shows the deck count, area and height. |
| Ensemble | Players and Per desk for orchestra sections; Players and Rows for choirs. |
| Power drop | Connector, Outlets, Circuit (e.g. L1 / C3), and a Load bar with percentage and capacity. |
| Stage box | Model (with input/output counts) or Custom, Inputs, Outputs, and how many ports are patched. |
| Monitor mix | Mix (choose an existing mix, — none — or + New mix…), Mix name, Type, For, Device, Stereo. |
| Inputs | The item's inputs with channel number, name and mic/DI model; Add and remove buttons. |
| Power & backline | Power (W), drop (Nearest drop or a named drop), Provided by (Artist / Band, Venue / House, Rental Company, Local Backline, Promoter). |
| Notes | Notes for crew or rider. |
| Buttons | Duplicate, Front, Back, Delete. |
Layers pop-up
The Show / hide layers button opens the same layer and overlay switches as the stage panel, grouped under Show layers, Overlays and Look (Soft shadows).
Drawing the stage plot
How to set up the stage
- Click an empty part of the stage so nothing is selected.
- In the inspector, type the W and D, and choose a Shape.
- Or open Arrange › Stage Settings… for the Stage size & shape dialog, which adds a Preset list: Small club 6 × 4 m, Club 8 × 6 m, Theatre 10 × 8 m, Medium 12 × 8 m, Large 14 × 10 m, Concert hall 16 × 12 m, Festival 18 × 14 m, Festival main 20 × 16 m, Arena 24 × 16 m, 24 × 16 ft, 32 × 24 ft and 40 × 32 ft. Click Apply.
- Set Grid and Snap sizes, and turn on the zones, L/R labels, audience marker and dimensions you want to print.
How to trace a venue floor plan
- Choose File › Import Floor Plan / Background Image… (PNG, JPG, GIF, WebP, SVG or BMP).
- The image is placed under the stage at 50 % opacity, about 1.4 times the stage width.
- With nothing selected, use Scale W, X, Y and Opacity in the Floor plan / background section to line it up with the stage.
- Draw over it. Use Replace image or Remove when you are done.
How to place instruments, people and gear
- Find the item in the library (browse a category or type in Search).
- Drag it onto the stage, or click it to drop it near the centre of the view.
- A message confirms what was added, for example the number of inputs and the mix number created.
When you place a drum kit, amp, keyboard, singer or orchestral player, Pi Stage creates its inputs with sensible microphones, stands and phantom power. Turn this off with Create inputs when placing instruments in Preferences.
How to add a specific microphone or DI
- Switch the library to Mics, DI or Wireless.
- Drag a model onto an instrument to add it as an extra input on that instrument. Stereo models (and two-channel DIs) add an L and R input.
- Drag a model onto empty stage to place it on its own stand (the stand type comes from the model) with its own input.
- Drag an IEM system onto a monitor to make it that mix's device, or onto empty stage to create a new IEM mix.
- Wireless comms systems go straight into the RF list.
You can also select an instrument first and then click a model in the Mics, DI or Wireless list; it is added to that instrument.
Selecting, moving and editing
| Action | How |
|---|---|
| Select | Click an item. Shift, Ctrl or Cmd-click to add to the selection. |
| Box select | Drag on empty stage. Hold Shift to add to the current selection. |
| Select all | Ctrl/Cmd+A. |
| Move | Drag. Hold Shift to move along one axis only. |
| Duplicate while dragging | Hold Alt (Option) as you drag. |
| Nudge | Arrow keys. With snap on, one snap step (10 cm by default); with snap off, 1 cm. Shift moves 10 snap steps; Alt moves 1 cm. |
| Resize | Drag a handle. Hold Shift to keep proportions. |
| Rotate | Drag the rotation handle. Hold Shift to step in 15°. Or Ctrl/Cmd+R (90° clockwise), Ctrl/Cmd+Shift+R (counter-clockwise). |
| Flip | Ctrl/Cmd+Shift+H. |
| Edit a label or text | Double-click the item and type; Enter to finish, Esc to cancel. |
| Lock / unlock | Ctrl/Cmd+L. Locked items cannot be moved. |
| Delete | Delete or Backspace. Deleting an item also deletes its inputs; Ctrl/Cmd+Z brings them back. |
| Copy / cut / paste | Ctrl/Cmd+C, X, V. Pasted items keep their inputs and mixes, with new channel and mix numbers. Repeated pastes cascade. |
Tip: Smart alignment guides appear while you drag, so items line up with each other. You can turn them off in Preferences.
Right-click menus
Right-click an item for Edit label…, Duplicate, Delete, rotate 90° right/left or 180°, Flip horizontally, Bring to front, Send to back, plus Add input to this item, New mix for this monitor, and Channel numbers, which moves the item's channel badges between top, bottom and hidden. With several items selected you also get align and distribute.
Right-click empty stage for Paste, Select all, Add text here, Add power drop here, Add wedge here, Insert image / logo…, Stage size & shape… and Fit to window.
Arranging
Use Arrange or the Align & distribute button for Align Left / Center / Right / Top / Middle / Bottom, Distribute Horizontally / Vertically (three or more items) and Mirror Layout Left/Right. Mirror works on the selection, or on the whole plot when nothing is selected.
Annotations and images
Use the drawing tools for text, sticky notes, arrows, lines, cable runs, dimensions, rectangles, ellipses and zones. A dimension line shows its measured length automatically; you can type your own Text. To add a band logo or a photo, use File › Insert Image / Logo on Plot…, or drag an image file from your desktop onto the stage.
Channel and mix badges
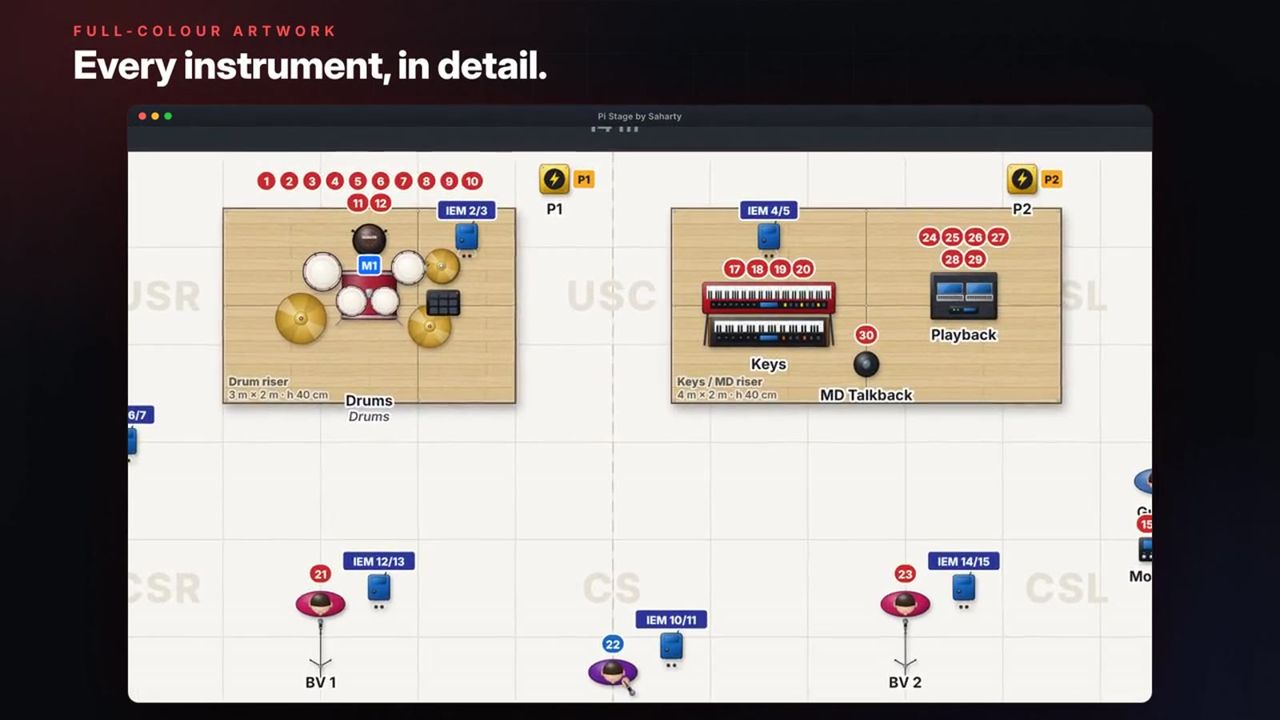
Each item shows its channel numbers (red) and monitor mix numbers (blue) as badges. In the stage panel you can change badges to group colours, or switch any badge type off.
Starting from a template
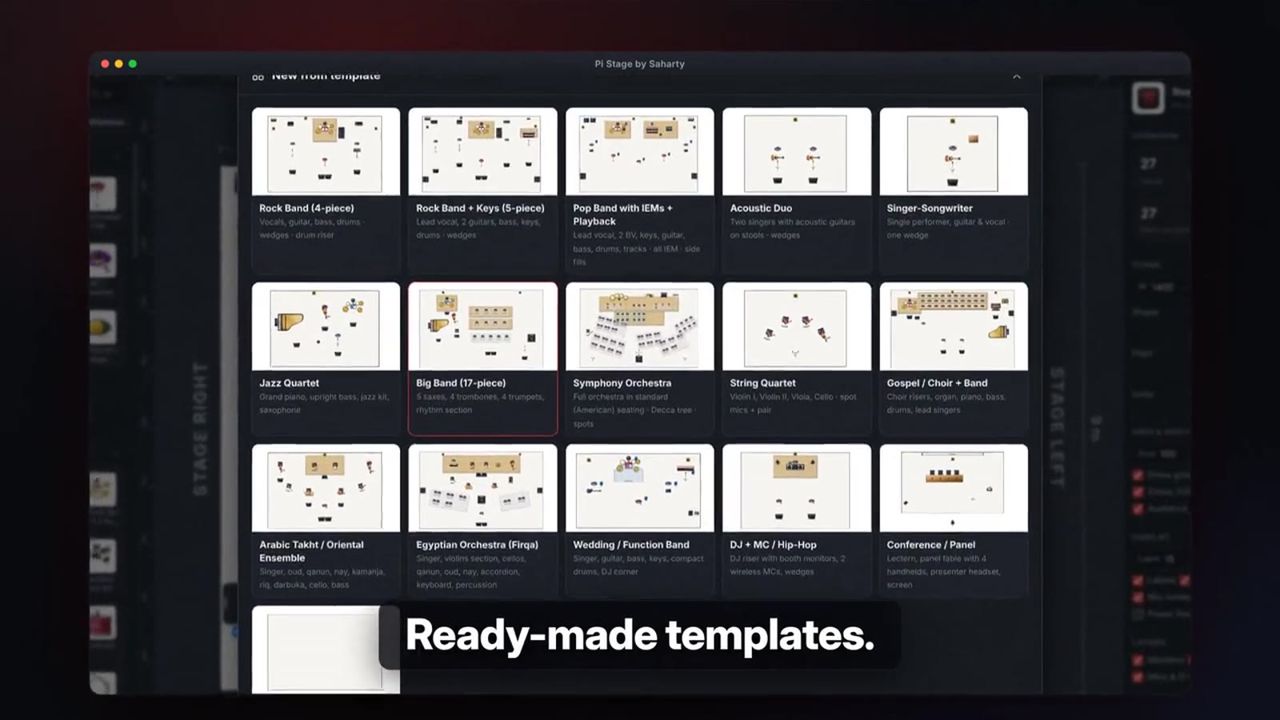
Choose File › New from Template… or click Start from a template on the empty stage. Each template is a complete starting plot with inputs and mixes:
| Template | Contents |
|---|---|
| Rock Band (4-piece) | Vocals, guitar, bass, drums · wedges · drum riser |
| Rock Band + Keys (5-piece) | Lead vocal, 2 guitars, bass, keys, drums · wedges |
| Pop Band with IEMs + Playback | Lead vocal, 2 BV, keys, guitar, bass, drums, tracks · all IEM · side fills |
| Acoustic Duo | Two singers with acoustic guitars on stools · wedges |
| Singer-Songwriter | Single performer, guitar & vocal · one wedge |
| Jazz Quartet | Grand piano, upright bass, jazz kit, saxophone |
| Big Band (17-piece) | 5 saxes, 4 trombones, 4 trumpets, rhythm section |
| Symphony Orchestra | Full orchestra · Decca tree · spots |
| String Quartet | Violin I, Violin II, Viola, Cello · spot mics + pair |
| Gospel / Choir + Band | Choir risers, organ, piano, bass, drums, lead singers |
| Arabic Takht / Oriental Ensemble | Singer, oud, qanun, nay, kamanja, riq, darbuka, cello, bass |
| Firqa orchestra | Singer, violin section, cellos, qanun, oud, nay, accordion, keyboard, percussion |
| Wedding / Function Band | Singer, guitar, bass, keys, compact drums, DJ corner |
| DJ + MC / Hip-Hop | DJ riser with booth monitors, 2 wireless MCs, wedges |
| Conference / Panel | Lectern, panel table with 4 handhelds, presenter headset, screen |
| Blank Stage | Empty stage, 12 × 8 m |
New projects use the units and paper size set in Preferences.
Building the input list
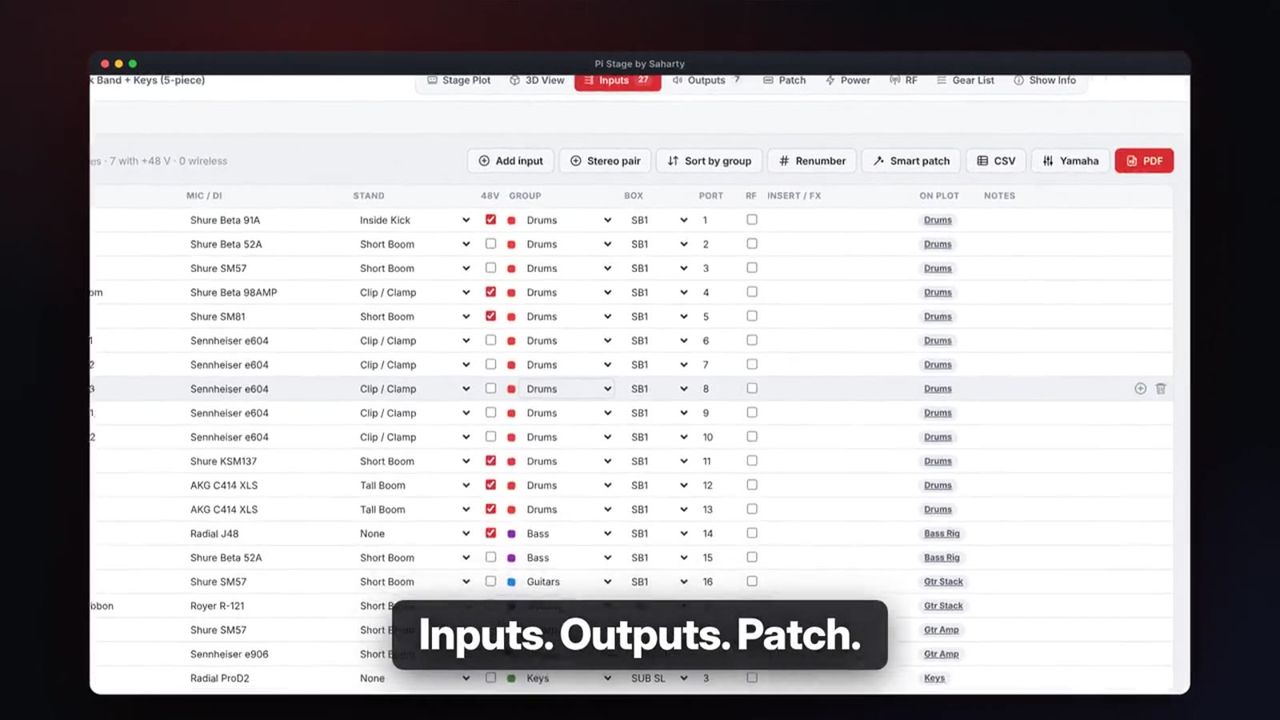
Open the Inputs tab (Ctrl/Cmd+2). Every input from the plot is listed in channel order.
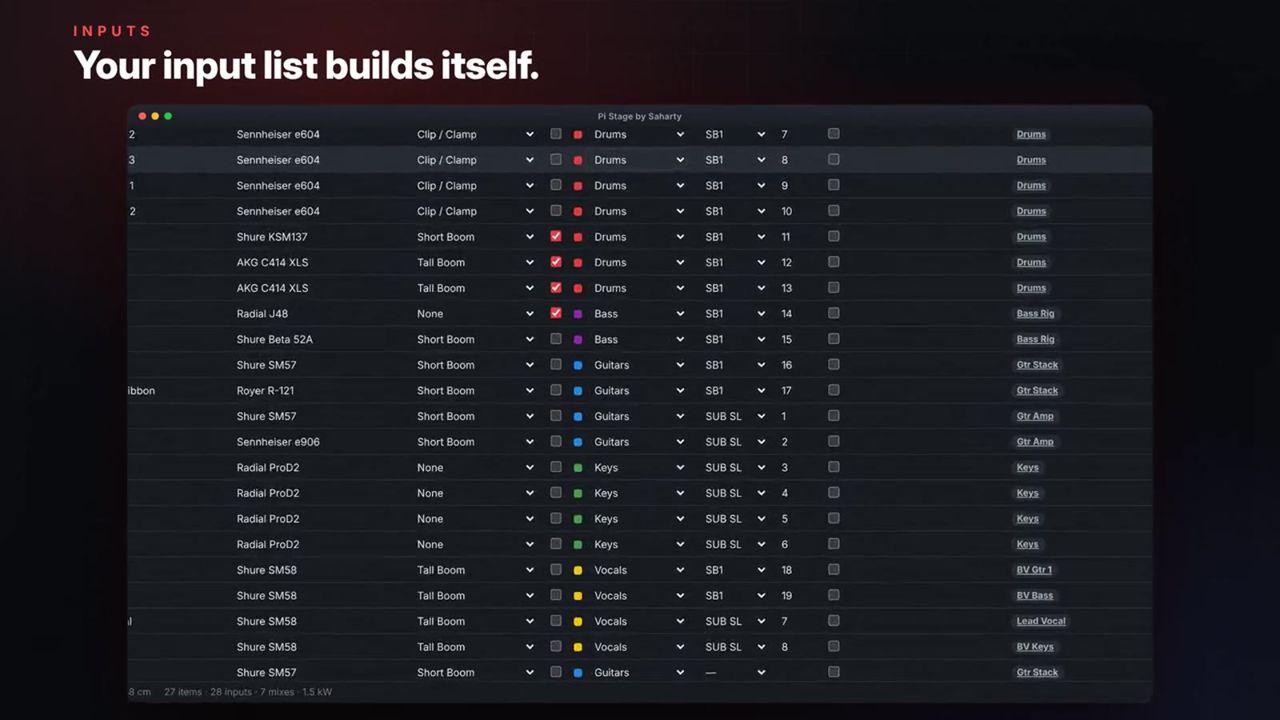
| Column | What it holds |
|---|---|
| ⋮⋮ | Drag handle for reordering. |
| Ch | Channel number. Duplicates are shown in red. |
| Source | Channel name. |
| Mic / DI | Model, with suggestions from the gear database. |
| Stand | Stand type, from Tall Boom and Short Boom to Inside Kick, Gooseneck, Decca Tree, Headset, Lavalier and Pickup. |
| 48V | Phantom power. |
| Group | Instrument group with its colour (Drums, Percussion, Bass, Guitars, Keys, Vocals, Brass, Woodwinds, Strings, Orch. Percussion, Oriental / World, Choir, Playback, Speech / MC, FX Returns, Ambience, Talkback / Comms, Other). |
| Box / Port | Stage box and port. |
| RF | Wireless input. |
| Insert / FX | Inserts or effects. |
| On plot | The item the input belongs to; click to jump to it on the plot. |
| Notes | Free text. |
How to edit inputs
- Type in any cell. Press Enter to jump to the same column in the next row.
- Choose a Mic / DI model and Pi Stage sets 48V and the Stand for you. Choosing a wireless model ticks RF and sets the stand to Handheld.
- Use the row buttons to Insert below or Delete an input.
How to reorder, sort and renumber
- Drag the ⋮⋮ handle to move a row. The channel numbers stay in sequence and follow the new order.
- Sort by group sorts by instrument group and renumbers.
- Renumber numbers the channels 1 to N in their current order.
The page header buttons are Add input, Stereo pair (adds Input L and Input R), Sort by group, Renumber, Smart patch, CSV, Yamaha and PDF.
Monitor mixes and the monitor matrix
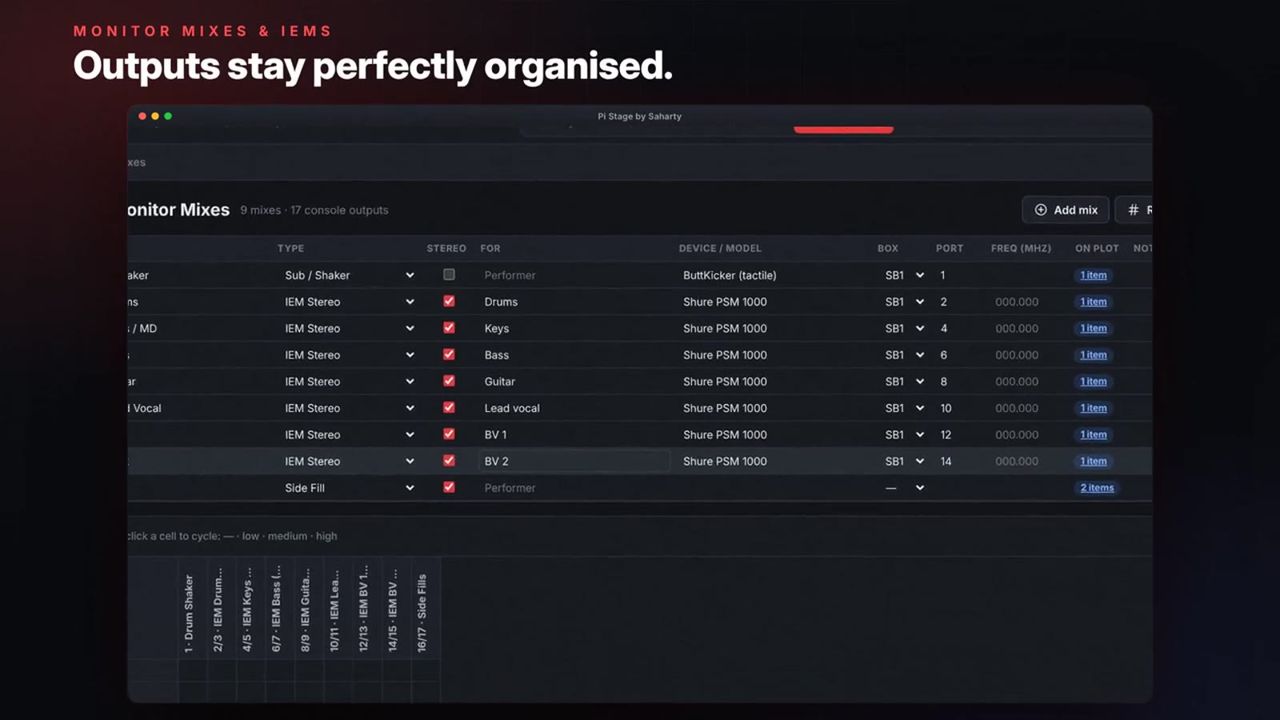
Open the Outputs tab (Ctrl/Cmd+3). Every wedge, side fill, drum fill or IEM you place creates a mix here. Several monitors can share one mix: select a monitor and choose an existing mix under Monitor mix › Mix in the inspector.
| Column | What it holds |
|---|---|
| Mix | Mix number. A stereo mix uses two numbers (e.g. 5/6). |
| Name | Mix name. |
| Type | Wedge, Double Wedge, IEM Stereo, IEM Mono, Side Fill, Drum Fill, Sub / Shaker, Speaker on Stand, Personal Mixer Feed, Headphones, FX Send, Matrix / Delay, Recording, Broadcast / Video, Main L/R, Front Fill, Other. |
| Stereo | Stereo mix. IEM Stereo and Side Fill are set to stereo automatically. |
| For | Performer. |
| Device / model | Wedge or IEM model. |
| Box / Port | Stage box output. |
| Freq (MHz) | IEM transmitter frequency. |
| On plot | How many items use the mix; click to select them. |
| Notes / requests | What the performer wants to hear. |
Buttons: Add mix, Renumber, CSV, PDF, and a delete button on each row.
How to fill in the monitor matrix
The Monitor Matrix card lists every input down the side and every mix across the top.
- Click a cell to cycle its level: — · low (•) · medium (••) · high (•••).
- Click again to move to the next level, or back to empty.
- Clear removes all entries after confirmation.
Patching stage boxes
Open the Patch tab (Ctrl/Cmd+4).
Consoles & system
Record the FOH console, Monitor console (both with suggestions from the console list), Split / network (Digital split, Analog split passive or active, FOH only, Dante network, MADI, AES50, Optocore) and PA system. These details print on the rider.
How to patch with Smart Patch
- Place one or more stage boxes or sub-snakes from DI, Stage Boxes & RF where they will sit on stage, or click Add stage box.
- Select each box and choose its Model in the inspector (or Custom with your own Inputs and Outputs). Give it a clear label.
- Click Smart patch (nearest box), or choose Tools › Smart Patch (assign stage boxes).
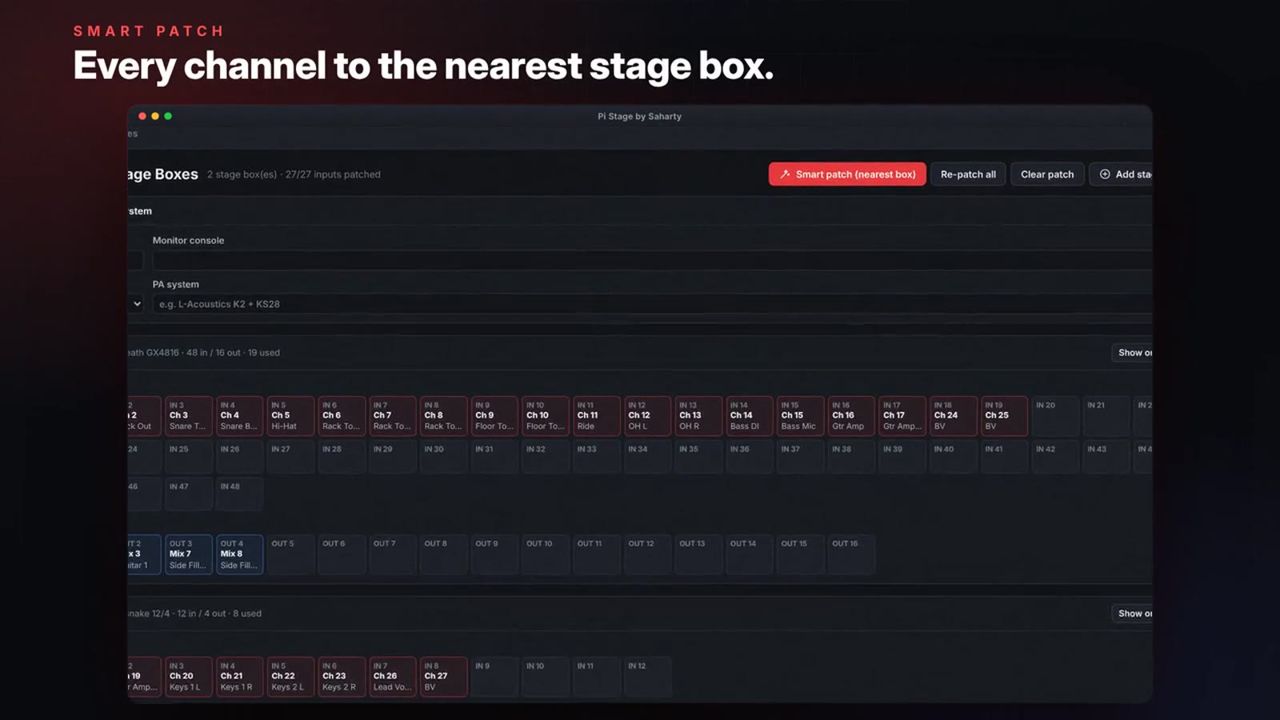
Smart Patch sends each source to the nearest box that has free ports. It keeps all inputs of one instrument on the same box where they fit, serves the sources closest to a box first, and numbers ports in channel order. Mixes are patched to box outputs the same way; stereo mixes take two adjacent outputs. Existing assignments are kept. A message reports how many inputs and outputs were patched, and how many did not fit.
| Button | What it does |
|---|---|
| Smart patch (nearest box) | Patches everything that is not yet patched. |
| Re-patch all | Clears and redoes every assignment. |
| Clear patch | Removes all stage box assignments (after confirmation). |
| Add stage box | Places a 32-channel box on the plot. |
| Show on plot | Selects that box on the stage. |
Each box shows a grid of IN and OUT ports with the channel or mix on each. A port used twice gets a red border. Anything left over appears under Not patched. You can always edit Box and Port by hand in the Inputs and Outputs tabs.
Planning power
Open the Power tab (Ctrl/Cmd+5).
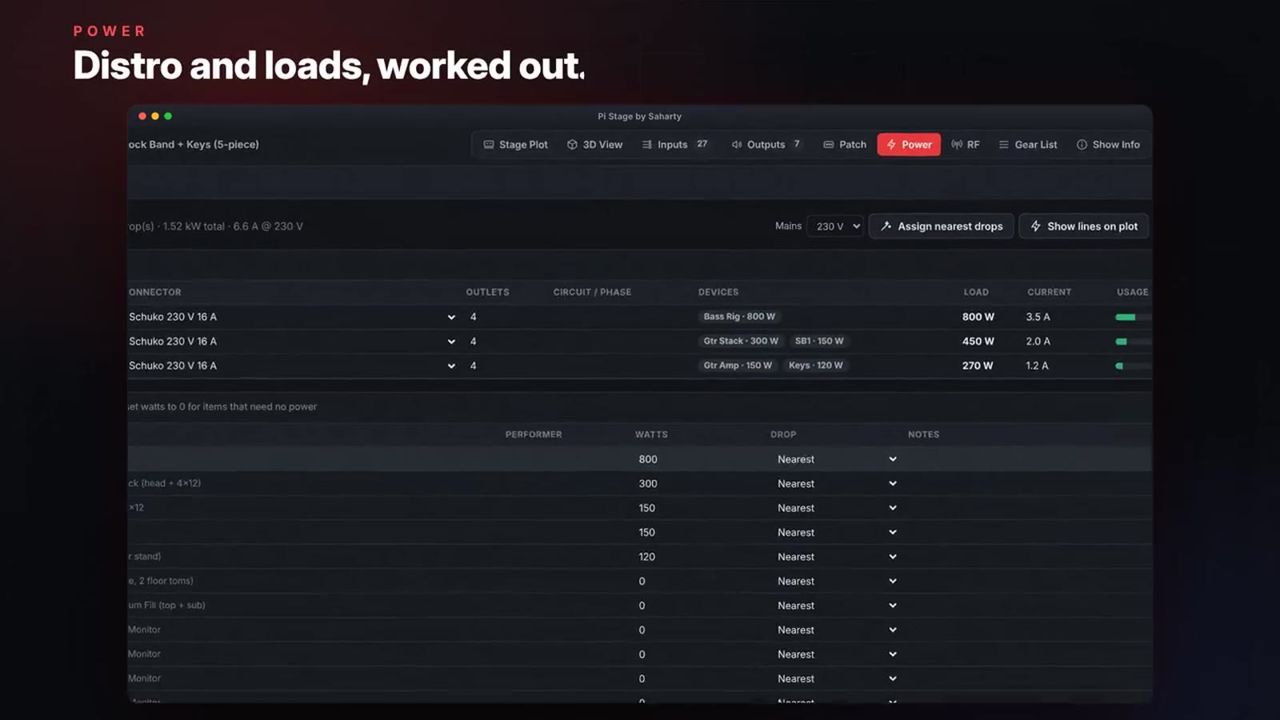
How to plan power
- Choose the Mains voltage: 230, 220, 240, 120, 110 or 100 V.
- Place power drops on the plot (category Power, Add drop, or right-click Add power drop here). Drops are numbered P1, P2 and so on.
- For each drop, set the Connector, Outlets and Circuit / phase.
- Check the Watts of each consumer. Set 0 for items that need no power.
- Click Assign nearest drops (or Tools › Auto-Assign Power Drops), or choose a specific drop for an item.
The Power drops table shows the devices, total Load, Current and a Usage bar for each drop. The bar turns amber above 80 % of the connector rating and red above 100 %. If a drop has more devices than outlets, it shows needs N sockets.
Pi Stage offers 22 connector types, including Schuko, blue single-phase and red three-phase CEE (16 A to 125 A), BS1363, NEMA and twist-lock types, powerCON and powerCON TRUE1, Socapex and Camlock. Capacity is volts × amps, and × √3 for three-phase connectors.
Show lines on plot draws a line from every powered item to its drop.
RF and wireless coordination
Open the RF tab (Ctrl/Cmd+6). It collects every wireless input (inputs with RF ticked), every IEM mix, and any extra RF devices you add with Add RF device (such as comms).
Each row shows the Type, Channel / name, System / model, Band (filled in from the model where known), Frequency (MHz) and Notes.
How to check your frequencies
- Enter a frequency for every channel.
- Click Check intermodulation (or Tools › Check RF Intermodulation).
- Read the Frequency coordination check card. It flags any two carriers closer than 350 kHz, and any third-order product (2f₁ − f₂) that lands within 150 kHz of another carrier.
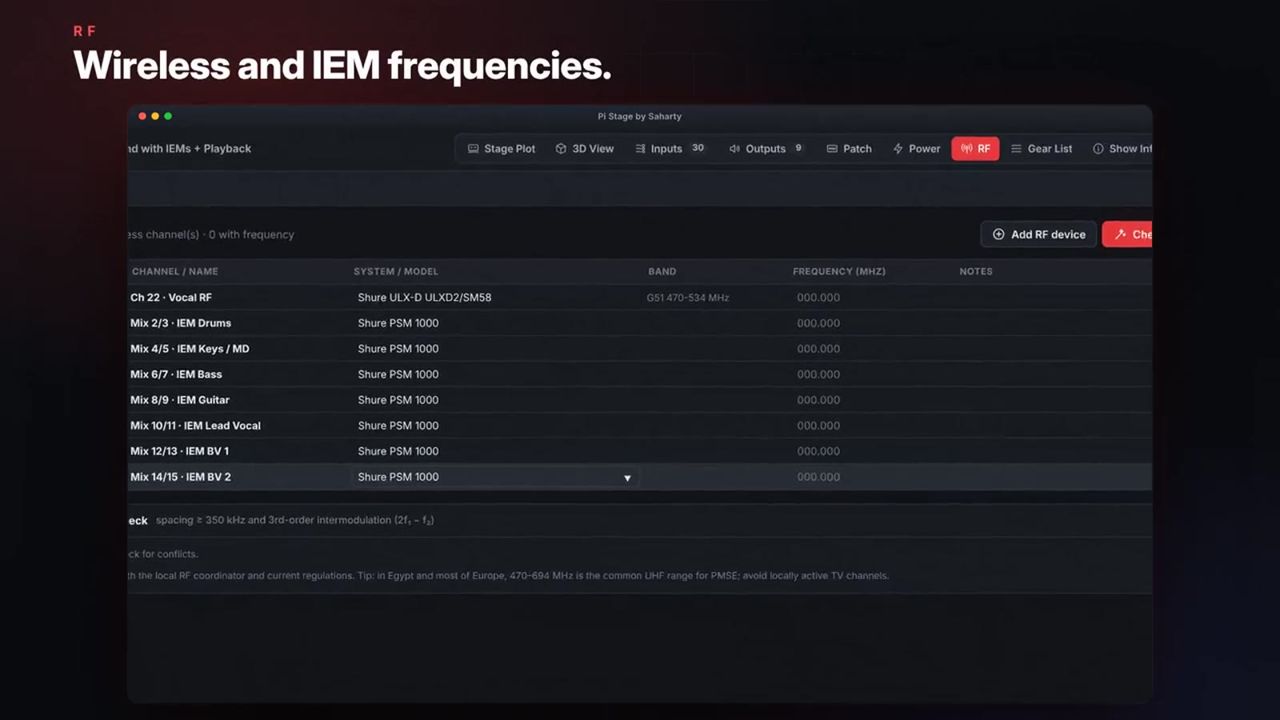
Note: The check is a planning aid. Always confirm frequencies with the local RF coordinator and current regulations, and avoid locally active TV channels.
Gear list and plot validation
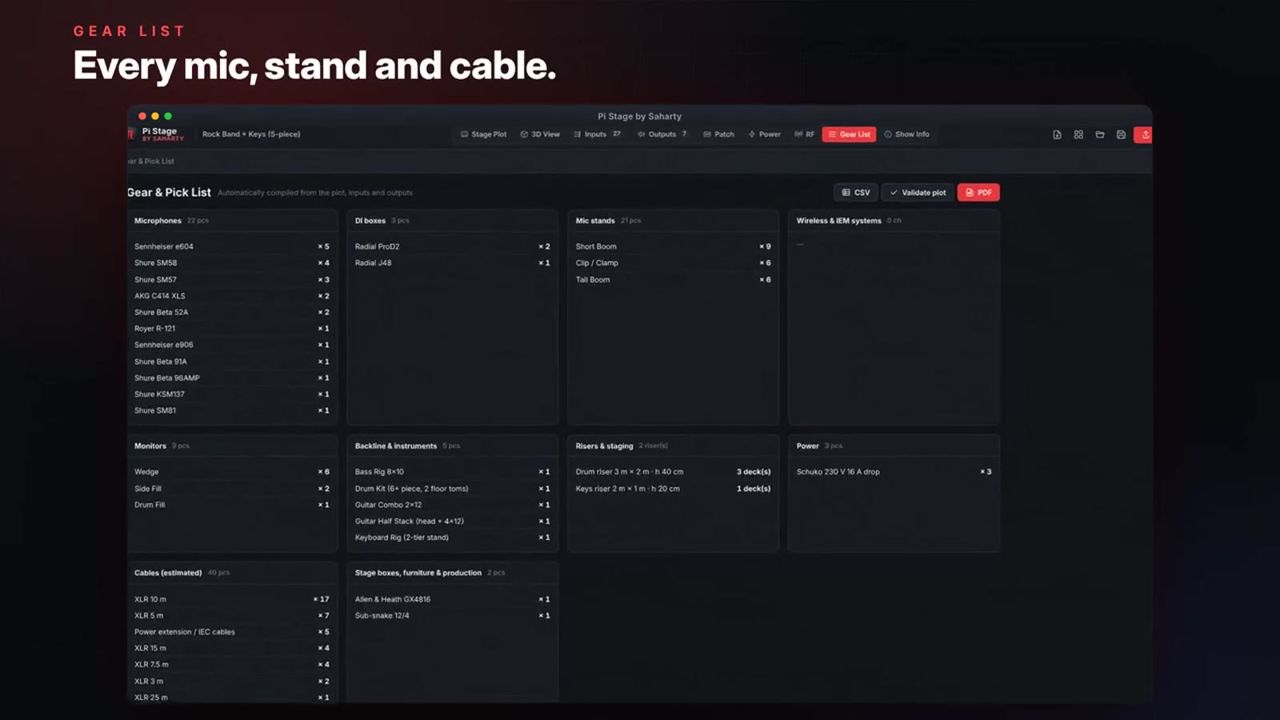
Open the Gear List tab (Ctrl/Cmd+7). Pi Stage compiles a pick list from the plot, inputs and outputs:
- Microphones, DI boxes, Mic stands, Wireless & IEM systems, Monitors, Backline & instruments
- Risers & staging, with size, height, rolling/skirt and the number of decks per riser
- Power and Cables (estimated)
- Stage boxes, furniture & production
XLR cable lengths are estimated from the distance between each source and its stage box, plus a 35 % routing allowance, rounded up to standard lengths (1.5, 3, 5, 7.5, 10, 15, 20, 25, 30, 40 and 50 m). Run Smart Patch first so every source has a box.
Buttons: CSV (the whole gear list as a spreadsheet), Validate plot and PDF.
How to validate the plot
Choose Tools › Validate Plot (find problems) or click Validate plot. The Plot check lists:
- Channel numbers used by more than one input
- Passive ribbon mics with +48 V switched on
- Mics that need +48 V but do not have it
- Inputs with no mic or DI specified
- Power drops loaded above 80 % of capacity, and powered items with no drop on stage
- Items far outside the stage area
- Stage box port conflicts
- RF spacing and intermodulation problems
- Wedge, fill and IEM mixes that are not placed on the plot
When all is well you see No problems found — your plot looks good.
Show info and rider notes
Open Show Info (Ctrl/Cmd+8). Everything here appears in the header or notes of the exported rider.
- Artist & event: Load logo… / Remove, Document title, Artist / band, Show / event, Venue, Date, Tour, Revision, Prepared by.
- Contacts: Add contact, then Role (with suggestions such as Tour Manager, Production Manager, FOH Engineer, Monitor Engineer, Stage Manager), Name, Phone, E-mail.
- Rider notes: General notes, Backline requirements, FOH requirements, Monitor requirements, Lighting, Video / LED, Hospitality / other. Each section prints on the notes page.
Export rider PDF opens the export dialog.
The 3D view
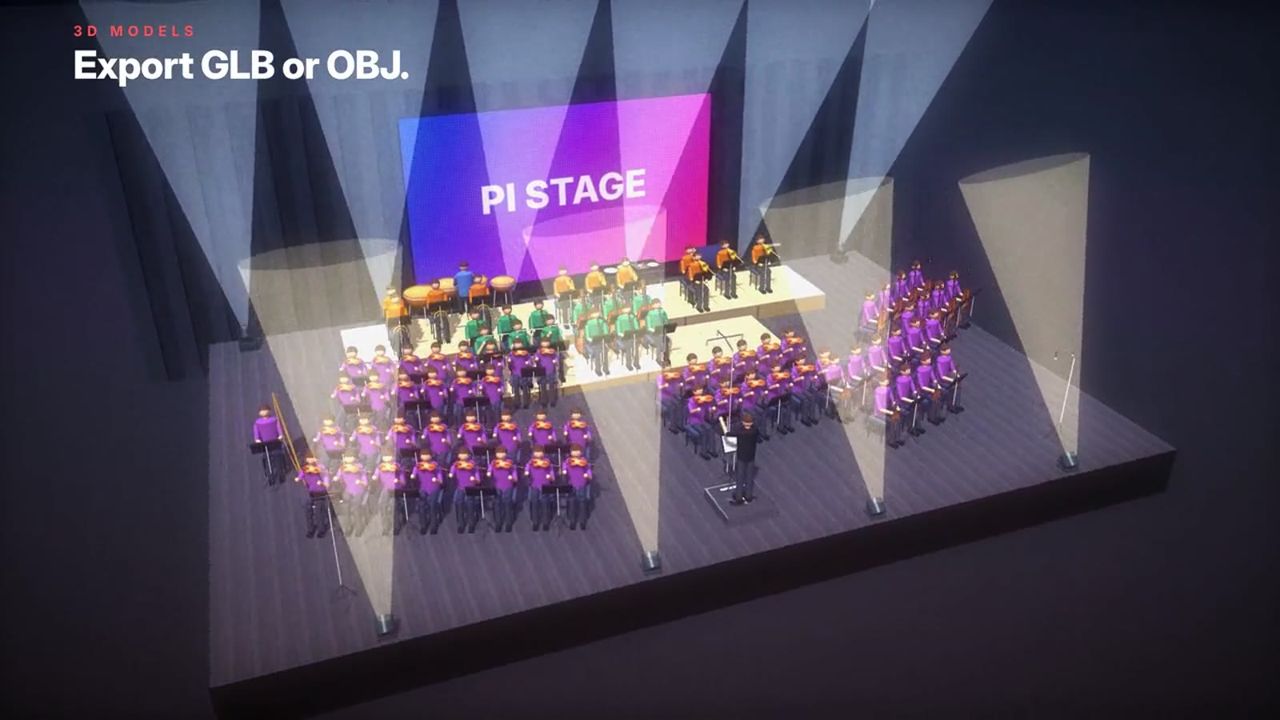
Open the 3D View tab (Ctrl/Cmd+9). Pi Stage builds a lit 3D model of your stage from the plot: people, risers, backline, monitors, truss, LED walls and the venue.
Navigating
- Drag to orbit.
- Right-drag or Shift-drag to pan.
- Scroll to zoom.
- Double-click to reset the view.
- The auto-rotate button turns the stage slowly.
3D toolbar
| Control | What it does | Range / default |
|---|---|---|
| Camera presets | Audience, FOH, 3/4 view, Top, Stage right, Stage left, Upstage, Performer. | |
| People | Show performers. | On |
| Labels | Show item labels. | Off |
| Shadows | Soft shadows. | On |
| Venue | Show the room. | On |
| Light beams | Visible beams from lighting. | Off |
| Floor marks | Floor markings. | Off |
| Grid | Floor grid. | Off |
| Stage h | Stage height. | 0–400 cm; 100 cm |
| Truss | Height of flown truss. | 200–2000 cm; 650 cm |
| Floor | Black deck, Wood deck, Grey deck, Plot colour. | Black deck |
| Save image… | Save the view as PNG or JPG. | |
| 3D model… | Export the stage as a 3D model. |
How to save a 3D image
- Click Save image… (or File › Export 3D Image…).
- Choose a Size: Full HD 1920 × 1080, QHD 2560 × 1440, 4K 3840 × 2160, A4 @ 300 dpi (landscape), or Current window size.
- Choose Format (PNG or JPG) and Camera (Current view or any preset).
- Click Save.
How to export a 3D model
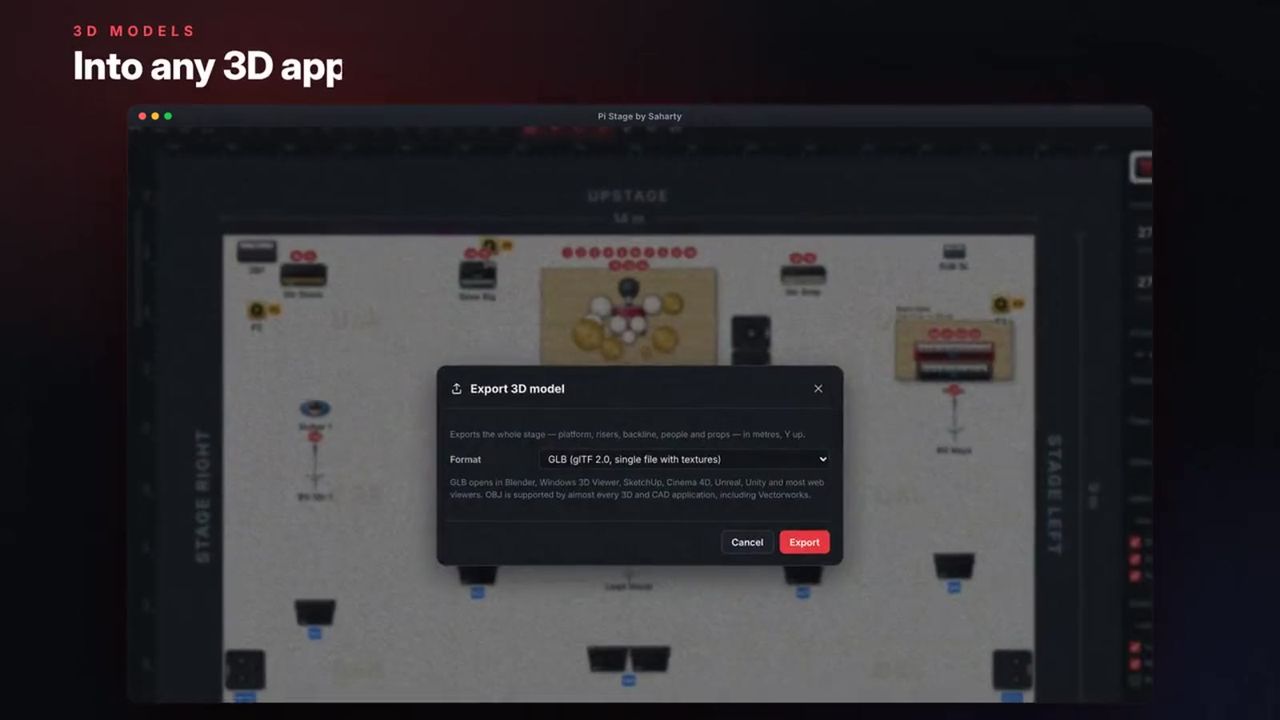
- Click 3D model… (or File › Export 3D Model (GLB / OBJ)…).
- Choose GLB (glTF 2.0, single file with textures) or OBJ + MTL + texture (3 files).
- Click Export and choose a name. For OBJ, the three files are saved side by side.
GLB opens in Blender, SketchUp, Cinema 4D, Unreal, Unity and most web viewers. OBJ is supported by almost every 3D and CAD application, including Vectorworks.
To include the 3D view in your rider, tick 3D stage view in the PDF export.
Exporting, printing and sharing
Click Export in the top bar. The dialog has a tab for each format: PDF rider, JPG, PNG, SVG, XML, CSV, 3D and Yamaha console.
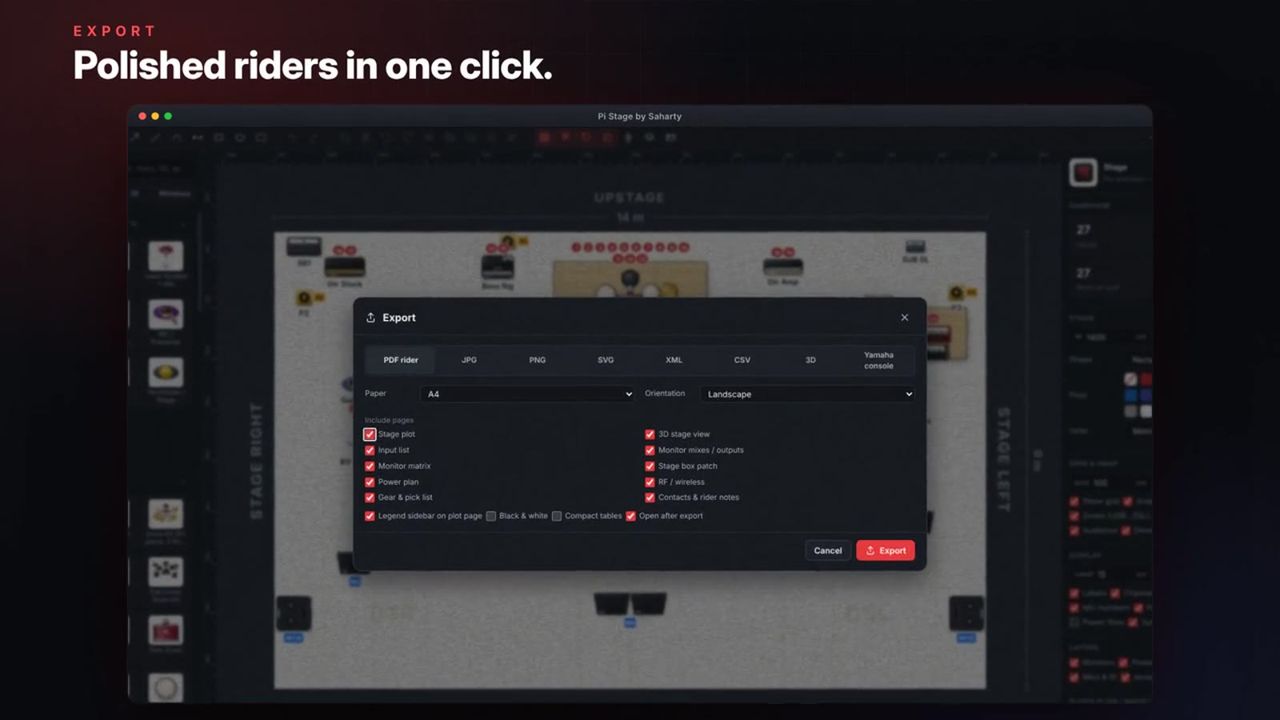
How to export the PDF tech rider
- Click Export (or File › Export PDF (Tech Rider)…, Ctrl/Cmd+E).
- Choose Paper (A4, A3, A5, Letter, Legal, Tabloid) and Orientation (Landscape or Portrait).
- Under Include pages, tick the pages you want: Stage plot, 3D stage view, Input list, Monitor mixes / outputs, Monitor matrix, Stage box patch, Power plan, RF / wireless, Gear & pick list, Contacts & rider notes.
- Set the options: Legend sidebar on plot page, Black & white, Compact tables, Open after export.
- Click Export and choose where to save. Pi Stage suggests
Artist - Title - Tech Rider.pdf.
Every page has a header with your logo, artist, document title and show details. Pi Stage remembers your choices for the next export.
JPG and PNG
Choose Content:
- Stage plot image only: one image of the plot.
- Rider pages (one image per page): each rider page as its own image, numbered and named after the page.
Then choose Resolution: 150 dpi (screen / e-mail), 200 dpi, or 300 dpi (print). The page options are the same as for PDF.
Other formats
| Format | What you get |
|---|---|
| SVG | The stage plot as a scalable vector graphic for Illustrator, Inkscape, Affinity or a browser. |
| XML | The complete project (stage, items, inputs, outputs, patch, power, RF, notes). Re-import it with File › Import XML…. |
| CSV | Input list or Output list, for Excel, Numbers, Google Sheets and many consoles' offline editors. |
| 3D | Opens the 3D image dialog. |
| Yamaha console | Opens the Yamaha export (next chapter). |
Printing
File › Print… (Ctrl/Cmd+P) prints the rider with your last export page selection, using the project's paper size and orientation.
Exporting to a Yamaha console
Pi Stage can send channel names, colours, icons, input patch and mix bus names to Yamaha CL5, CL3, CL1, QL5, QL1, DM7, DM7 Compact, DM3 / DM3 Standard, TF5, TF3, TF1 and RIVAGE PM10, PM7, PM5 and PM3.
Open it with File › Export to Yamaha Console… (Ctrl/Cmd+Shift+Y), the Yamaha button on the Inputs tab, or the Yamaha console tab in the Export dialog.
Common settings
| Control | What it does | Options / default |
|---|---|---|
| Method | CSV for CL/QL Editor or Send to console (network). | CSV |
| Console | Console model. | CL5 |
| Name length | Maximum console name length. | 6, 8, 10, 12, 16 characters; 8 |
| Input patch (CSV only) | Channel n → DANTE n, By stage box & port (Rio / Dante), Channel n → OMNI n, Channel n → INPUT n (QL local), Don't change the patch. | DANTE n |
| Output patch (CSV only) | Don't change the patch, MIX n → OMNI OUT n, MIX n → DANTE OUT n, By stage box & port. | Don't change |
| Channel colours / Channel icons / Mix bus names | What to include. | All on |
The table below the settings shows each channel's Pi Stage name, the shortened Console name, Colour and Icon, plus the Patch in CSV mode. Edit any of them; your edits are kept in the project. Reset edits goes back to the automatic values.
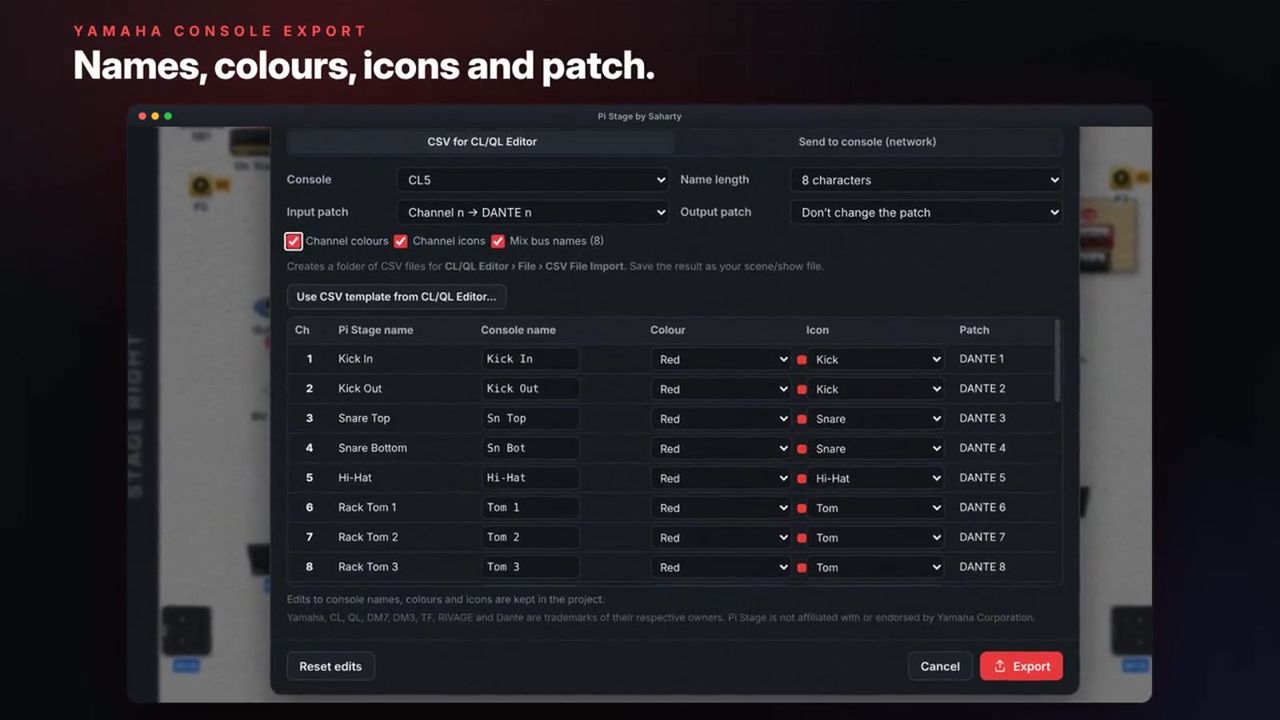
How to create a CSV set for CL/QL Editor
- Choose CSV for CL/QL Editor and your console.
- Optional: click Use CSV template from CL/QL Editor… and choose a folder of CSV files you exported from your own copy of CL/QL Editor (File › CSV File Export). Pi Stage then fills that exact layout, so it always matches your editor version.
- Click Export and name the new folder.
- In CL/QL Editor (offline, same console model), choose File › CSV File Import and select that folder.
- Check names, colours, icons and patch, then File › Save As to create the console file and load it on the console.
DM7 and RIVAGE PM editors cannot read CSV. Either send over the network (below), or import the CSV set into CL/QL Editor, save a CL file, and convert it with Yamaha Console File Converter.
How to send directly to the console
- Connect your computer to the console network, on the same subnet.
- Choose Send to console (network).
- Enter the Console IP (default 192.168.0.128) and port (default 49280), then click Test. Pi Stage reports the console model if it answers.
- Click Export. A progress window shows the transfer, then how many settings the console accepted.
- Store the scene on the console to keep the new names.
Rejected commands are usually colours or icons the console model does not offer; names are unaffected.
Warning: Network transfer writes into the console's current scene. Do it before the show, and store the scene afterwards.
Working with files
Use File › New Stage Plot, Open…, Open Recent (the last 12 projects), Save, Save As… and Import XML…. Projects are saved as .pistage files, in Documents by default.
You can also drag a .pistage or .xml file from your desktop onto the window to open it. If you have unsaved changes, Pi Stage asks Save changes? with Don't save, Cancel and Save. The same question appears when you close the window.
A .pistage file holds the whole project, including the logo, floor plan and inserted images, so you can send one file to a colleague.
Autosave and crash recovery
While you have unsaved changes, Pi Stage writes a recovery copy every minute (adjustable in Preferences). If Pi Stage did not close normally, the next launch offers Recover unsaved work? with Recover and Discard. Recovery works in limited mode too. Recovered work is marked as unsaved, so save it straight away.
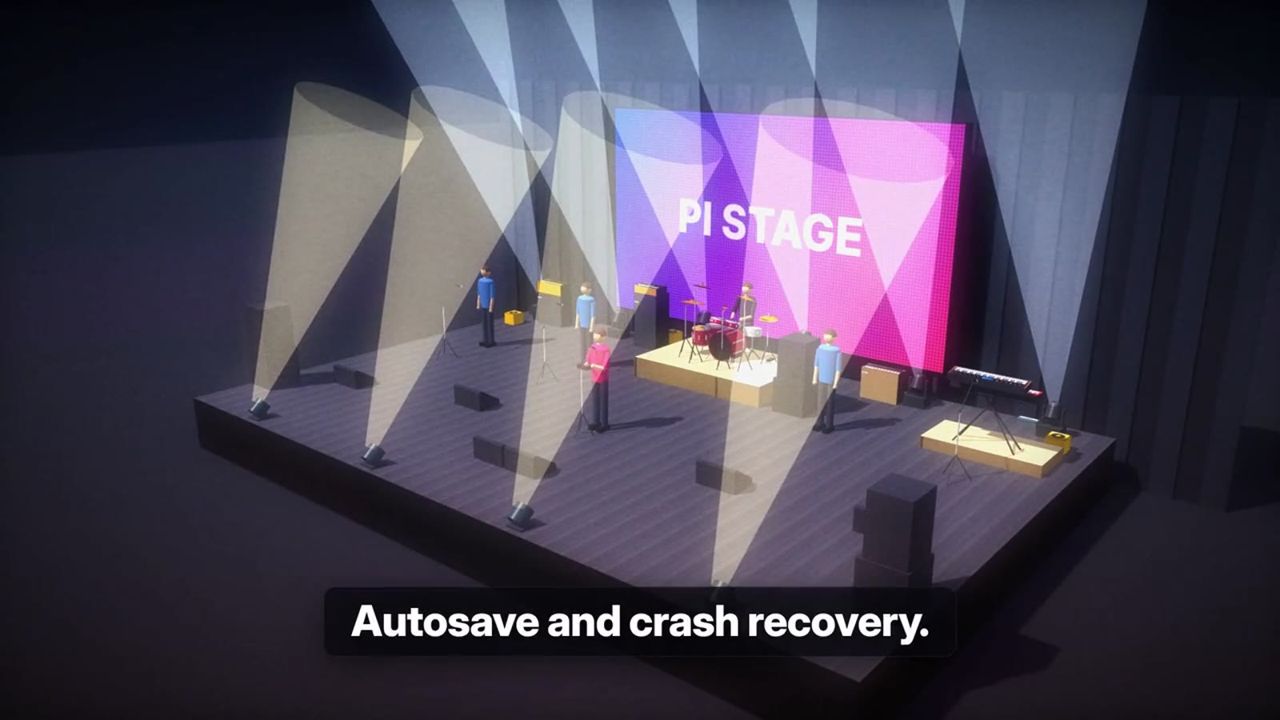
Note: The recovery copy is a safety net, not a substitute for saving. Save your project with Ctrl/Cmd+S.
Settings & preferences
Open Pi Stage by Saharty › Preferences… (Cmd+, on macOS) or File › Preferences… (Ctrl+, on Windows).
| Setting | What it does | Options / default |
|---|---|---|
| Interface | Dark or light colour scheme. Also View › Light / Dark Interface. | Dark |
| Mouse wheel | Auto (mouse zooms, trackpad pans), Always zoom, Always pan. | Auto |
| Units (new) | Units for new projects. | Metric |
| Paper (new) | Paper size for new projects. | A4 |
| Autosave | Recovery copy interval. | Every 30 s, Every minute, Every 3 minutes, Off; every minute |
| Smart alignment guides | Guides while dragging. | On |
| Keep proportions when resizing corners | Corner handles keep the aspect ratio. | Off |
| Create inputs when placing instruments | Automatic inputs (saved with the project). | On |
| Create mixes when placing monitors | Automatic mixes (saved with the project). | On |
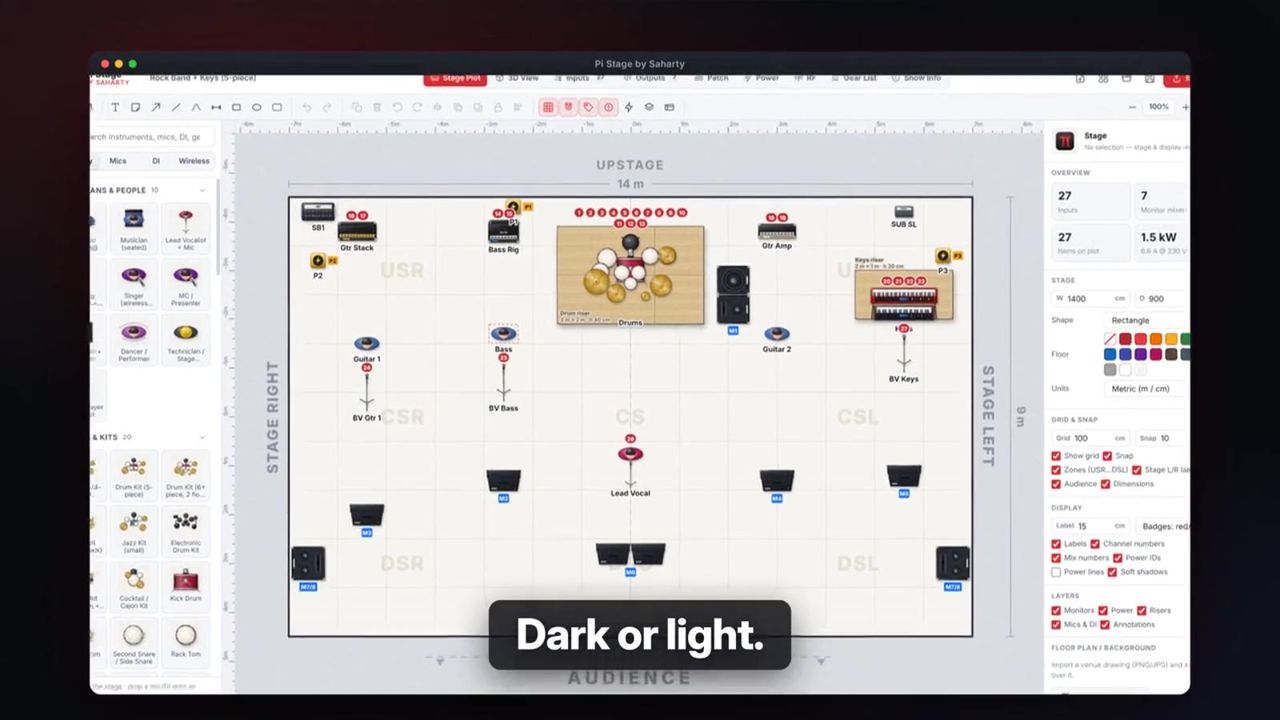
The plot itself always prints on white paper, whatever the interface colour.
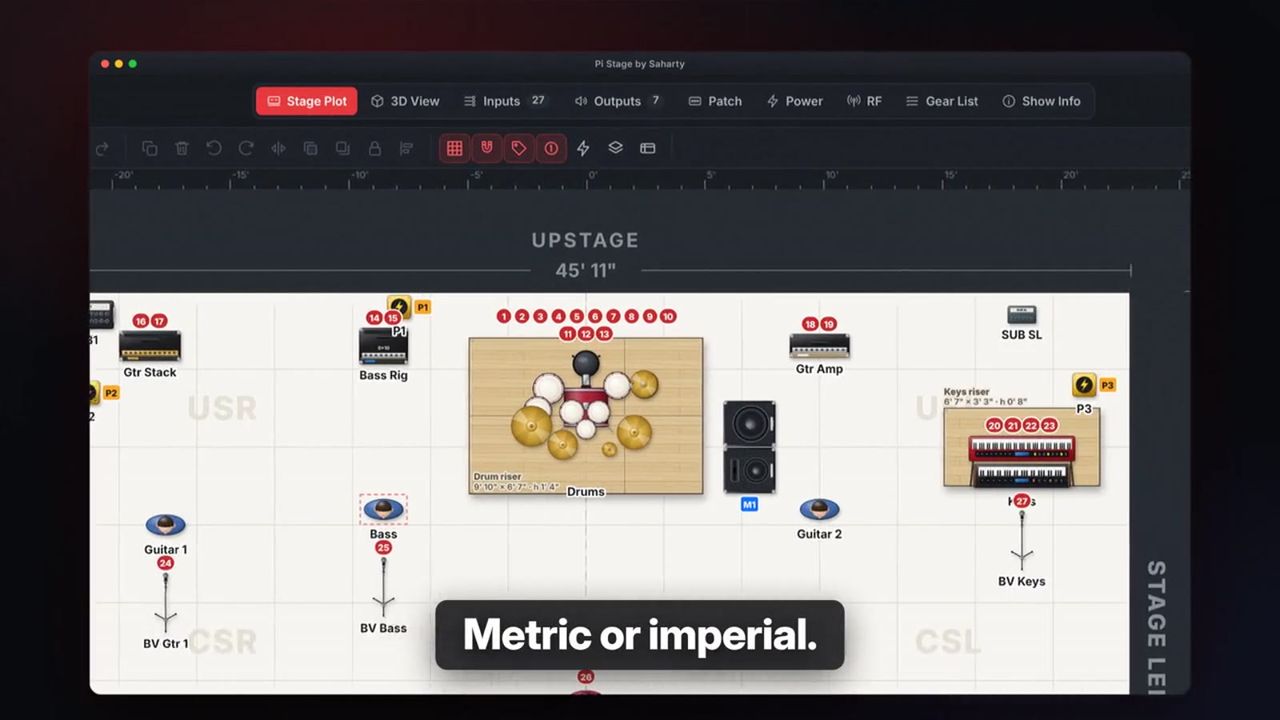
Units for the current project are set in the stage panel (Units). Switching changes rulers, fields and lists between metric and imperial.
Preferences, the recent file list and the window position are stored in your user folder (~/Library/Application Support/Pi Stage by Saharty/ on macOS, %APPDATA%\Pi Stage by Saharty\ on Windows).
Keyboard shortcuts
Ctrl on Windows corresponds to Cmd on macOS. Help › Keyboard Shortcuts shows the main shortcuts inside the app.
Files and export
| Shortcut | Action |
|---|---|
| Ctrl/Cmd+N | New stage plot |
| Ctrl/Cmd+Shift+N | New from template |
| Ctrl/Cmd+O | Open |
| Ctrl/Cmd+S | Save |
| Ctrl/Cmd+Shift+S | Save As |
| Ctrl/Cmd+E | Export PDF (tech rider) |
| Ctrl/Cmd+Shift+E | Export JPG |
| Ctrl/Cmd+Shift+Y | Export to Yamaha console |
| Ctrl/Cmd+P | |
| F1 | Quick start guide |
Editing
| Shortcut | Action |
|---|---|
| Ctrl/Cmd+Z | Cmd+Shift+Z (macOS) / Ctrl+Y (Windows) |
| Ctrl/Cmd+C / X / V | Copy / cut / paste items |
| Ctrl/Cmd+D | Duplicate |
| Delete / Backspace | Delete selection |
| Ctrl/Cmd+F | Search the library |
| Arrow keys | Nudge (see Selecting, moving and editing) |
| Ctrl/Cmd+R / Ctrl/Cmd+Shift+R | Rotate 90° clockwise / counter-clockwise |
| Ctrl/Cmd+Shift+H | Flip horizontal |
| Ctrl/Cmd+Shift+] / [ | Bring to front / send to back |
| Ctrl/Cmd+L | Lock / unlock |
| Double-click | Edit label or text (on empty stage: fit to window) |
| Esc | Back to the Select tool, or deselect |
Tools
The single-key tool shortcuts (V, H, T, N, A, L, C, M, R, E, Z) are listed in the toolbar table in Interface tour.
View
| Shortcut | Action |
|---|---|
| Ctrl/Cmd+1 | Stage Plot |
| Ctrl/Cmd+2 | Input List |
| Ctrl/Cmd+3 | Outputs & Monitors |
| Ctrl/Cmd+4 | Patch & Stage Boxes |
| Ctrl/Cmd+5 | Power Plan |
| Ctrl/Cmd+6 | RF / Wireless |
| Ctrl/Cmd+7 | Gear Summary |
| Ctrl/Cmd+8 | Show Info & Rider |
| Ctrl/Cmd+9 | 3D View |
| Ctrl/Cmd+= / + | Zoom in |
| Ctrl/Cmd+− / − | Zoom out |
| Ctrl/Cmd+0 / 0 | Fit stage |
| Ctrl/Cmd+wheel, pinch | Zoom |
| Space + drag, middle mouse | Pan |
| Ctrl/Cmd+' | Toggle grid |
| Ctrl/Cmd+; | Toggle snap |
| Ctrl/Cmd+[ / ] | Toggle library / inspector panel |
Note: Single-key tool shortcuts and the arrow keys work on the Stage Plot tab when you are not typing in a field.
Tips for live/studio use
- Draw once, advance everything. Build the plot first: inputs, mixes, patch, power and the gear list all follow from it. Edits on the plot update the lists, and the On plot links take you back to the item.
- Name performers. Fill in Performer on players and For on mixes. The rider then reads "Mix 3 · Wedge (Lead vocal)" rather than a bare number, and the monitor matrix becomes self-explanatory.
- Place stage boxes where they will really sit. Smart Patch and the cable length estimates depend on box positions. Move a box and click Re-patch all to see the new patch and cable list.
- Check phantom power. Pi Stage sets +48 V from the mic model and Validate Plot catches passive ribbon mics with phantom on. Run it before every export.
- Watch the 80 % line. A drop shown amber is legal but near its rating. Split loads across drops, especially for amps, keyboards and lighting.
- Send the right format. PDF for venues and promoters, JPG at 150 dpi for messaging apps, XML for crews who import into their own tools, CSV for console offline editors.
Troubleshooting
| Symptom | Cause | Fix |
|---|---|---|
| Save, Export and Print say Activate to save | Pi Stage is not activated, the trial has ended, or a licence notice has run out. | Open the licence window; start the trial or activate. Your work is safe and editable in the meantime. |
| Banner says the licence system is unavailable | The licence helper inside the app could not start. | Reinstall Pi Stage from the original installer. |
| Placing an instrument creates no inputs | Create inputs when placing instruments is off. | Turn it on in Preferences, or add inputs with Add in the inspector. |
| Items will not move | They are locked. | Select and press Ctrl/Cmd+L. |
| Smart Patch says to place a stage box first | No stage box on the plot. | Add one from DI, Stage Boxes & RF or click Add stage box. |
| Smart Patch reports inputs that did not fit | Not enough free ports. | Add another stage box, or choose a bigger Model. |
| Power drop bar is red | Load exceeds the connector rating. | Add a drop, move items to another drop, or choose a bigger connector. |
| Could not reach the console | Wrong IP, different subnet, or port blocked. | Check the IP and network settings, and that TCP port 49280 is open. |
| CL/QL Editor rejects the CSV files | Your editor version expects a different layout. | Export an empty CSV set from CL/QL Editor and choose it with Use CSV template from CL/QL Editor…. |
| 3D view stays on "Building 3D view…" or shows an error | The graphics driver could not start the 3D renderer. | Update the graphics driver and restart Pi Stage. |
Specifications & system requirements
Specifications
| Item | Detail |
|---|---|
| Version | 1.1.1 |
| Type | Standalone application for macOS and Windows |
| Library | 316 items in 23 categories |
| Gear database | 509 microphones, 90 DI boxes and direct sources, 80 wireless / IEM systems, 54 stage boxes, 73 consoles, 22 power connector types |
| Templates | 16 starting plots, editable |
| Project file | .pistage (includes images); XML import and export |
| Export | PDF (A4, A3, A5, Letter, Legal, Tabloid; portrait or landscape), JPG and PNG (150–300 dpi), SVG, XML, CSV, 3D image (up to 4K), 3D model (GLB, OBJ + MTL + texture), Yamaha CSV set and network transfer, print |
| Yamaha consoles | CL5, CL3, CL1, QL5, QL1, DM7, DM7 Compact, DM3, TF5, TF3, TF1, RIVAGE PM10, PM7, PM5, PM3 |
| Undo | Up to 250 steps |
| Licensing | Pi by Saharty; one computer per licence; 15-day free trial; offline activation |
System requirements
| macOS minimum | macOS recommended | Windows minimum | Windows recommended | |
|---|---|---|---|---|
| Operating system | macOS 13 Ventura | Latest macOS | Windows 10 64-bit | Windows 11 64-bit |
| Processor | Apple silicon or Intel | Apple silicon or recent Intel | Intel / AMD, 64-bit, 2 cores | Intel Core i5 / AMD Ryzen 5 |
| Memory | 4 GB | 8 GB | 4 GB | 8 GB |
| Disk | 500 MB | 500 MB | 500 MB | 500 MB |
| Display | 1280 × 800 | 1920 × 1080 or larger | 1280 × 800 | 1920 × 1080 or larger |
Mouse, trackpad and touch screens are supported. Linux is not supported. An internet connection is needed only for online activation and licence checks; offline activation is available.
Support
- Email: support@pi-ware.com
- Website: www.pi-ware.com, for downloads, free updates, your account and licences
- Tutorials: youtube.com/@pibysaharty
- In the app: Help › Quick Start Guide (F1) and Help › Keyboard Shortcuts
When you write to support, include your Pi Stage version (shown in About), your operating system, and if possible the .pistage file that shows the problem.
Product names mentioned in Pi Stage and in this manual, including Yamaha and its console names, are trademarks of their respective owners and are used only to identify equipment and file formats. Pi Stage is not affiliated with or endorsed by them.
© 2026 Pi by Saharty. All rights reserved.