Pi Media Server
Welcome
Pi Media Server by Saharty is a real-time media server for live shows. One application runs your visuals deck, projection and 3D mapping, LED pixel mapping and LED-wall design, LED processor control, lasers, immersive audio, AI-generated looks and complete show control over MIDI, OSC, DMX, SMPTE timecode, TCP/UDP and a web remote.
It is built for the person at the media desk: VJs, video and LED technicians, projection designers, show programmers, corporate and conference operators, and venues that need one dependable machine to drive several screens, LED walls and lasers in sync with the music or the timecode.
Version 1.4.4 includes the full feature set described in this manual, including:
- A GPU clip deck up to 12K with DXV3 and HAP decoded on the graphics card, 51 GPU effects, 24 generators, and Preview / TAKE to build the next look privately.
- Smart LED tools: a calculator for raster, viewing distance, ports, power and weight; curved walls snapped to real cabinet curve locks; sweet-spot correction; and direct control of NovaStar COEX, Megapixel HELIOS and Brompton Tessera processors.
- Laser cues on tracks with direct output to Ether Dream, LaserCube and IDN devices, live auto-trace and timecode lock.
- Immersive audio with speaker layouts up to 9.1.6, ADM BWF object-based masters, 3D audio objects and binaural headphone monitoring.
- Finger Paint clips and painted masks that you can draw with a mouse, a pen, a touch screen or several phones at once.
- AI Studio: an offline engine that turns a prompt into a live generative look, plus optional cloud models for photoreal video and images.
Tip: The 12-part tutorial series on youtube.com/@pibysaharty follows the same order as this manual. The figures in this manual are taken from it.
Quick start
- Install the app: open the
.dmgand drag the app to Applications (macOS), or run the.exeinstaller (Windows). - Launch Pi Media Server. In the licence window, enter your licence key and click Activate, or click Start 15-day free trial.
- In the Compose workspace, click the Layers / Columns corner of the deck to open the composition settings and pick a Resolution that matches your screen, LED wall or projector setup.
- Drag video, images or audio files from your computer onto empty cells in the deck, or choose File → Import Media… (Cmd/Ctrl+I).
- In the Browser, open the Generators tab and drag a generator (for example Plasma or AI Synth) onto another cell.
- Click a clip to play it. Click a column header, or press 1–9, to trigger a whole column.
- Open the Mapping workspace, select Output 1, choose your projector or LED processor in Display, and click Open Output.
- Use the layer faders, the Master fader and BLACK in the top bar to shape the show.
- Save with File → Save Show (Cmd/Ctrl+S). Shows are saved as
.pimsfiles.
Installation
macOS
- Open
PiMediaServer-1.4.4-mac-arm64.dmg(Apple silicon) orPiMediaServer-1.4.4-mac-x64.dmg(Intel Mac). - Drag Pi Media Server by Saharty onto the Applications folder shown in the window.
- Eject the disk image and start the app from Applications or Launchpad.
On first use, macOS asks for permission to use:
- the microphone / audio inputs, used for SMPTE LTC timecode and audio-reactive visuals;
- the camera, used for live camera sources and for LED / projector auto-calibration;
- the local network, used for OSC, Art-Net, sACN and laser DACs (Ether Dream, LaserCube, IDN).
Allow each one you plan to use. You can change them later in System Settings → Privacy & Security.
Windows
- Run
PiMediaServer-1.4.4-win-x64.exe. - Accept the licence agreement, choose the installation folder (you can change it) and finish the installer.
- The installer creates a desktop shortcut and a Start-menu entry named Pi Media Server by Saharty.
If Windows Firewall asks, allow Pi Media Server on the network you use for show control, LED output and sync.
What is included
Everything the app needs ships inside the installer, including FFmpeg and the NDI runtime. You do not need to install any other software.
Show files use the .pims extension and open in Pi Media Server when you double-click them.
First launch
The splash screen shows Starting GPU engine… while the graphics engine starts. A new show contains a 1920 × 1080 composition at 120 BPM, 3 layers and 8 columns.
Activation & licensing
Pi Media Server uses the Pi by Saharty licensing system. One licence activates one computer, and you can move it to another computer at any time.
Buying and receiving your key
Buy Pi Media Server at pi-ware.com/products/pi-media-server. Your licence key arrives by email after purchase and has the form XXXXX-XXXXX-XXXXX-XXXXX. Your licences, downloads and orders are listed in your account at pi-ware.com/account.
Opening the licence window
- macOS: Pi Media Server → Licence…
- Windows: Help → Licence…
- On either system: click the licence banner below the top bar, or the licence entry in the status bar.
Online activation
- Open the licence window.
- Paste your key into Licence key and click Activate (or press Enter).
- The status line changes to Activated and every feature is on.
If the key is already active on another computer, the app asks whether to move it to this one. Click Move it here to confirm. The other computer gets a 24-hour notice, then Pi Media Server stops starting there.
Free trial
Click Start 15-day free trial. No payment details are needed. During the trial every feature works, with two limits:
- every picture (outputs, monitors, LED, streams, recordings and encoded files) carries a watermark;
- shows cannot be saved.
The licence window shows how much of the trial is left. A notice appears 3 days before the trial ends.
Offline activation
Use this when the media computer has no internet connection.
- Enter your licence key in the licence window.
- Click Offline activation. A request code appears.
- Click Copy code and take the code to any device that is online.
- Paste the code at pi-ware.com/activate. You receive a licence file.
- Bring the file back to the media computer and click Load licence file….
Moving to a new computer
- In the app: click Deactivate this computer in the licence window. Pi Media Server keeps running until you quit, and then does not start on that computer until it is activated again. You can then activate the key on the new computer.
- If the old computer is lost or broken: deactivate or reset its machine from your account at pi-ware.com/account, or simply activate on the new computer and confirm Move it here.
Licence checks and show safety
- The app checks the licence whenever it has an internet connection: at launch, then every 60 minutes, and every 2 minutes while offline. Offline, it keeps working with no time limit.
- The 24-hour rule: features are never limited without at least 24 hours of notice on that computer, whatever the reason (licence moved, trial ended, refund, deactivated from the account). During the notice everything works, and a banner shows the message and a countdown.
- A running show is never cut. A session that started with a valid licence or trial keeps running until you quit the app.
- Without an activation or running trial, the app opens only the licence window: you can activate, start the trial, buy a licence or quit.
The licence file is stored at ~/Library/Application Support/Pi by Saharty/Licences/pi-media-server.pilic (macOS) or %APPDATA%\Pi by Saharty\Licences\pi-media-server.pilic (Windows). Do not edit it. An edited file is no longer valid.
Interface tour
The top bar
The top bar is visible in every workspace.
| Control | What it does | Range / default |
|---|---|---|
| Workspace tabs | Compose, Mapping, LED, 3D Stage, Laser, Audio, Show, Control, AI Studio, Encode | Compose |
| Beat lights | Show the four beats of the bar | — |
| BPM | Show tempo | 20–300, default 120 |
| TAP | Tap tempo (key T) | — |
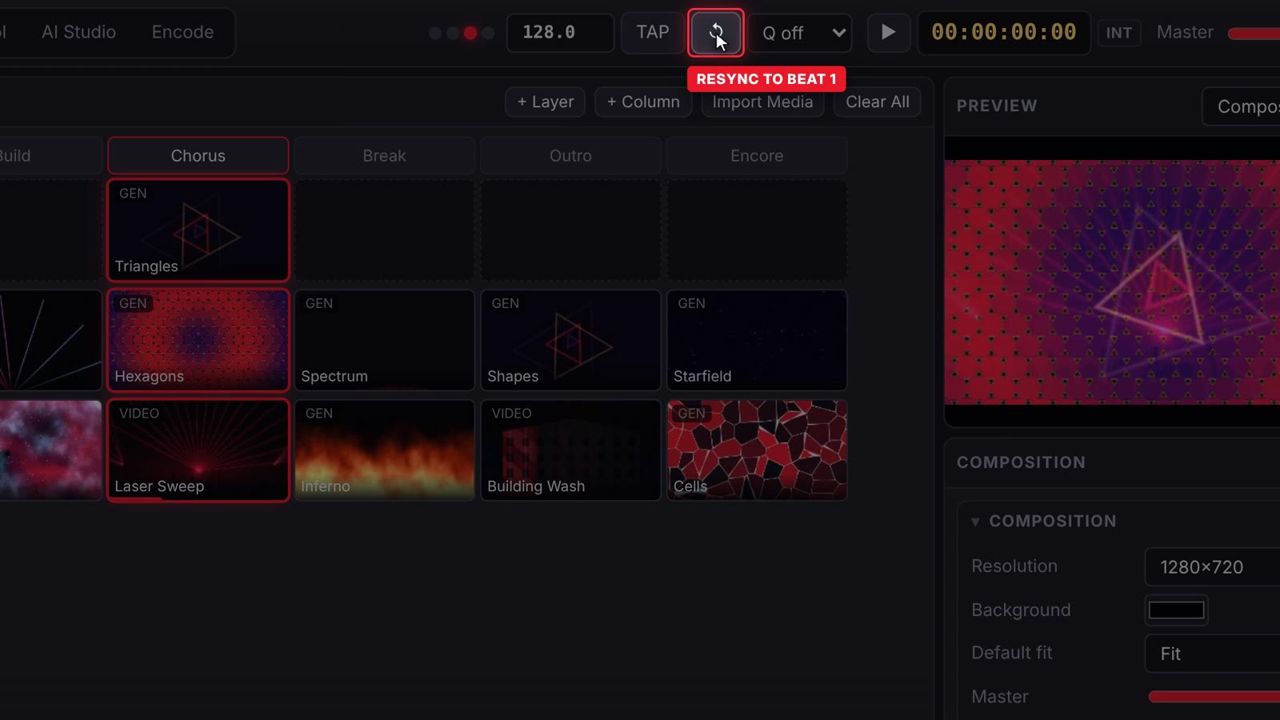
| ↺ (resync) | Resets the beat to beat 1 | — |
| Quantise | Delays clip triggers to the next beat or bar | Q off, Q beat, Q bar |
| Timecode display | Shows the show timecode. Click it to choose the source, frame rate and locate point | 00:00:00:00 |
| ▶ (timecode play) | Plays / stops the internal timecode generator (Shift+Space) | — |
| Master | Composition master opacity | 0–1 |
| PREVIEW | Preview mode: edit and trigger without touching the live output (Cmd/Ctrl+P) | Off |
| TAKE | Sends the preview to the live output (Cmd/Ctrl+Enter) | — |
| LEARN | Learn mode for MIDI, OSC and DMX mapping | Off |
| OUTPUTS | Opens or closes all outputs | — |
| BLACK | Blackout (key B) | Off |
The status bar
The status bar at the bottom shows messages, MIDI / OSC / DMX activity lights, the graphics card name and the licence state. Click the GPU name to open GPU & Performance.
The Compose workspace
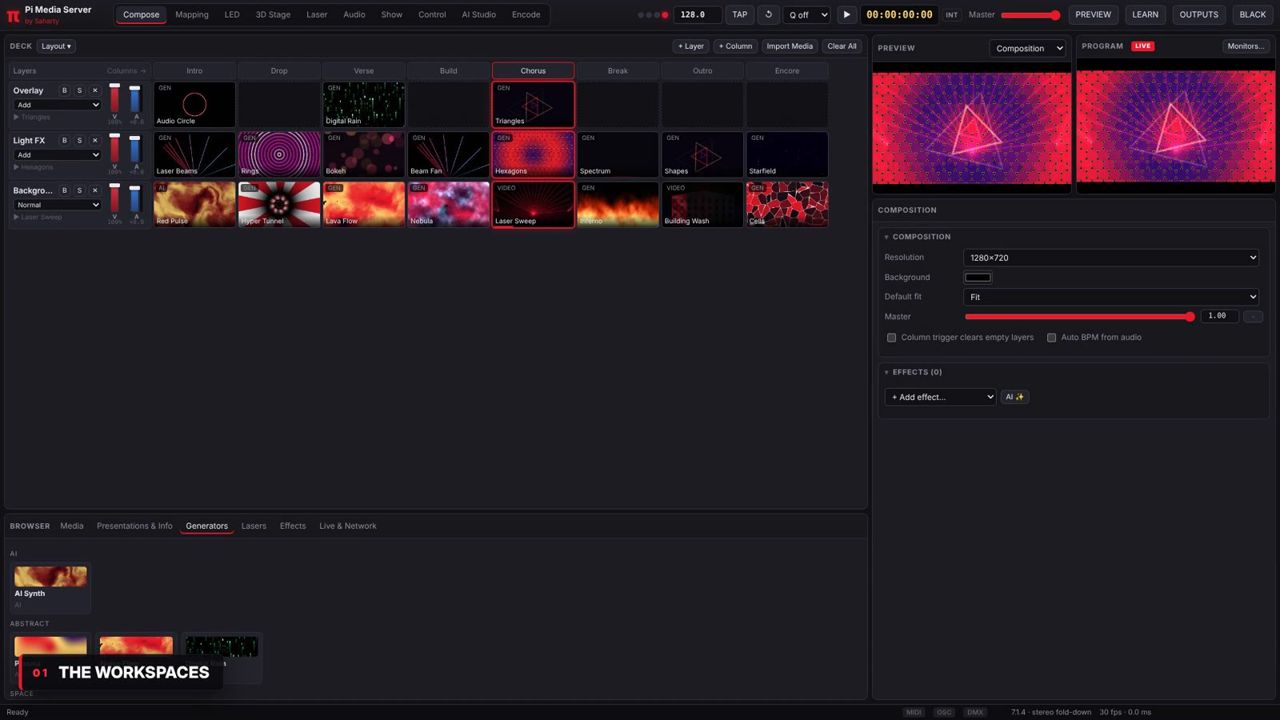
Compose is where you build and play the show. It has five panels:
- Deck: the grid of layers (rows) and columns. Top layers are drawn over lower layers.
- Browser: tabs for Media, Presentations & Info, Generators, Lasers, Effects and Live & Network sources.
- Preview: a monitor that can show the composition, the selected layer, any layer or any output.
- Program: always shows the live composition, with a LIVE or BLACK tag. Monitors… opens external monitor windows.
- Inspector: the settings of whatever you selected (a clip, a layer or the composition).
Arranging the panels
- Drag the gap between two panels to resize them.
- Drag a panel's title bar onto another panel to swap them.
- Double-click a panel title to maximise it.
- Layout ▾ in the deck header offers presets (Standard — Preview + Program, Monitors on top, Big deck, Monitors left, Classic — Preview only), Hide / Show Program monitor, Lock panels and External monitors…. Layouts are saved on each computer.
Other workspaces at a glance
| Workspace | What you do there |
|---|---|
| Mapping | Outputs, slices, corner pin, mesh warp, masks, edge blending, colour matching |
| LED | Pixel-mapped fixtures, Art-Net / sACN / DDP output, LED wall designer, smart calculator, curved walls, LED processors |
| 3D Stage | Models, build-to-scale objects, virtual projectors, projector catalogue, calibration |
| Laser | Laser cues on tracks, drawing, ILDA, laser projectors, external laser software, safety |
| Audio | Output device, speaker layout, monitoring mode, speaker management, analysis for visuals |
| Show | Cue List, Timeline, Plan (conference), Schedule and timecode |
| Control | MIDI, OSC, DMX input, web remote, TCP/UDP, multi-server, NDI and stream outputs |
| AI Studio | Prompt-driven looks, effects, Auto-VJ and cloud generation |
| Encode | Batch conversion to DXV3, HAP, H.264, H.265, AV1 and WAV |
Building a show in the deck
Adding clips
- Drag files from your computer onto a cell (that cell) or onto a layer header (the next free cell of that layer). Video, images and audio files (WAV, BWF, AIFF, MP3, FLAC and more) are all clips.
- Use Import Media in the deck header, File → Import Media… (Cmd/Ctrl+I), or right-click an empty cell and choose Import Media Here….
- Right-click an empty cell for New Text Clip or New AI Synth Clip.
- Drag anything from the Browser onto a cell.
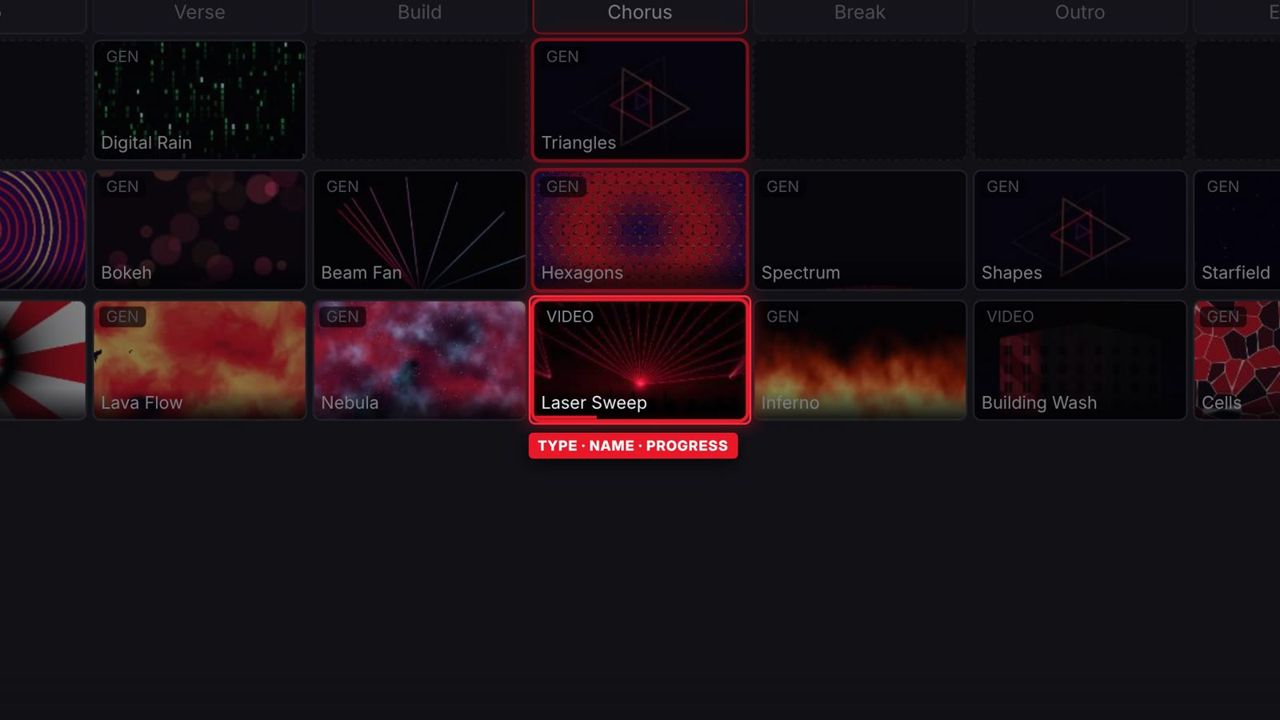
Each filled cell shows a thumbnail, the clip name and a type tag. GPU-decoded clips show their codec (for example DXV3 or HAP); other tags are GEN, AI, SLIDES, LIST, INFO, STREAM and NDI. Video and audio clips show a progress bar while they play.
Playing clips and columns
- Click a clip to play it on its layer. A layer plays one clip at a time.
- Click a column header, or press 1–9, to trigger every clip in that column.
- ✕ on a layer header clears that layer. Clear All in the deck header clears every layer.
- With Column trigger clears empty layers on (composition settings), a column also clears the layers that have no clip in it.
Organising the deck
- + Layer and + Column add rows and columns.
- Right-click a layer header: Rename Layer, Add Layer Above, Move Up, Move Down, Delete Layer.
- Right-click a column header: Rename Column, Insert Column Before, Delete Column.
- Right-click a clip: Rename, Duplicate to Next Empty, Refresh Thumbnail, Show in Folder, Encode to DXV3 / HAP…, Timecode: Lock to Current TC, Timecode Settings… and Remove Clip.
- Drag a clip to move it. Alt-drag to copy it. Press Delete to remove the selected clip.
Layer strips
Each layer header has:
| Control | What it does | Range / default |
|---|---|---|
| Layer name | Click to select the layer and show it in the inspector | — |
| B | Bypass: hides the layer | Off |
| S | Solo: shows only this layer | Off |
| ✕ | Clears the layer | — |
| Blend mode | How the layer combines with the layers below | Normal, Add, Screen, Multiply, Overlay, Lighten, Darken, Difference, Subtract, Exclusion, Hard Light, Soft Light, Color Dodge, Color Burn, Luma Key, Alpha Mask |
| V fader | Video opacity | 0–1, default 1 |
| A fader | Audio level in dB, with a live level meter | up to +6 dB, default 0 dB |
Drag a fader, use the mouse wheel, or Shift-drag for fine moves. Double-click a fader to reset it. Both faders can be learned from MIDI, OSC and DMX.
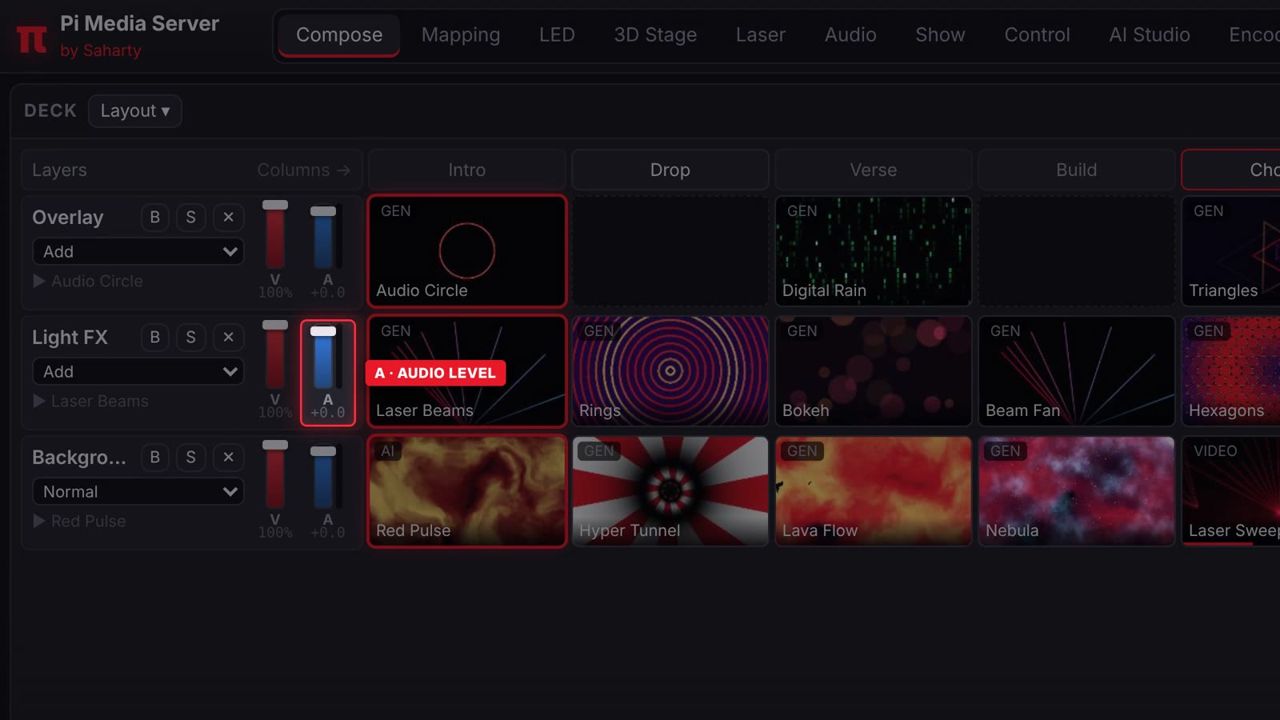
Tip: Alpha Mask uses the layer as a cut-out for the layers below, and Luma Key removes the dark parts of the layer. Both are useful for logos and shapes over moving backgrounds.
Clip settings (inspector)
Select a clip to see its settings in the inspector.
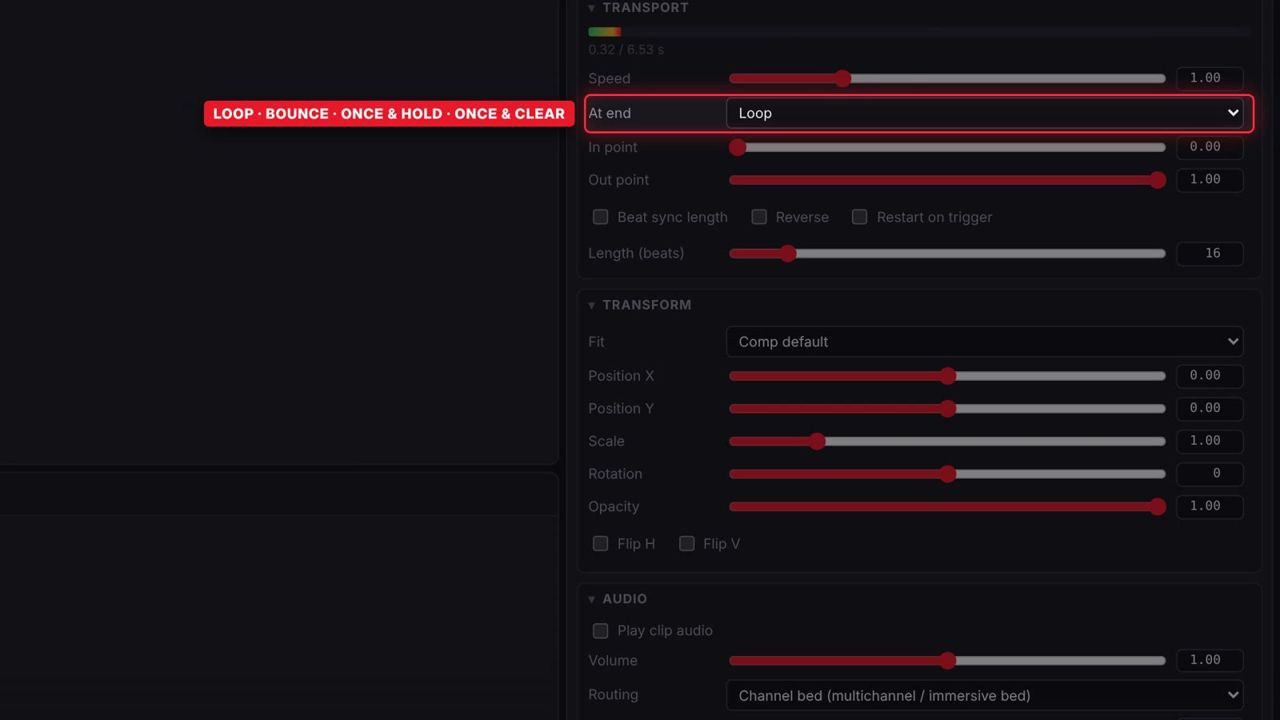
Transport (video and audio clips)
| Control | What it does | Range / default |
|---|---|---|
| Speed | Playback speed | 0–4, default 1 |
| At end | What happens at the end | Loop, Bounce, Play once & hold, Play once & clear |
| In point / Out point | Part of the clip that plays | 0–1, default 0 / 1 |
| Reverse | Plays backwards | Off |
| Beat sync length | Stretches the clip to a number of beats | Off |
| Length (beats) | Length when beat sync is on | 1–128, default 16 |
Transform
| Control | What it does | Range / default |
|---|---|---|
| Fit | How the clip fills the composition | Comp default, Fit, Fill, Stretch, Native pixels |
| Position X / Y | Offset | −2 to 2, default 0 |
| Scale | Size | 0.05–5, default 1 |
| Rotation | Rotation in degrees | −180 to 180, default 0 |
| Flip H / Flip V | Mirrors the clip | Off |
| Opacity | Clip opacity | 0–1, default 1 |
Audio (clips with sound)
| Control | What it does | Range / default |
|---|---|---|
| Volume | Clip level | 0–2, default 1 |
| Routing | Channel bed (multichannel / immersive bed) or Object (3D positioned) | Bed |
| Object X (L–R), Object Y (B–F), Object Z (height) | Object position | X −1 to 1 (0), Y −1 to 1 (1), Z 0–1 |
| Object size | Spreads the object over more speakers | 0–1, default 0 |
| Motion | Static or Orbit | Static |
| Orbit rate (Hz), Orbit radius, Orbit height | Orbit movement | rate 0–2 (0.1), radius 0–1.5 (1) |
Layer settings: transitions and autopilot
Select a layer header to see the layer settings.
| Control | What it does | Range / default |
|---|---|---|
| Opacity, Audio level (gain), Blend mode | Same as the layer strip | — |
| Transition → Type | How a new clip replaces the old one | Cut, Fade, Dissolve, Wipe Left, Wipe Up, Iris, Zoom, Blur Fade, Slide, Glitch (default Fade) |
| Duration (s) | Transition time | 0–10 s, default 0.5 |
| or beats | Transition time in beats instead | 0–32 |
| Autopilot → Mode | Plays clips automatically | Off, Next clip, Random clip |
| Advance | When autopilot moves on | When clip ends, Every N beats |
| Beats | N for Every N beats | 1–128, default 16 |
Layer effects are listed below these settings (see the next chapter).
Composition settings
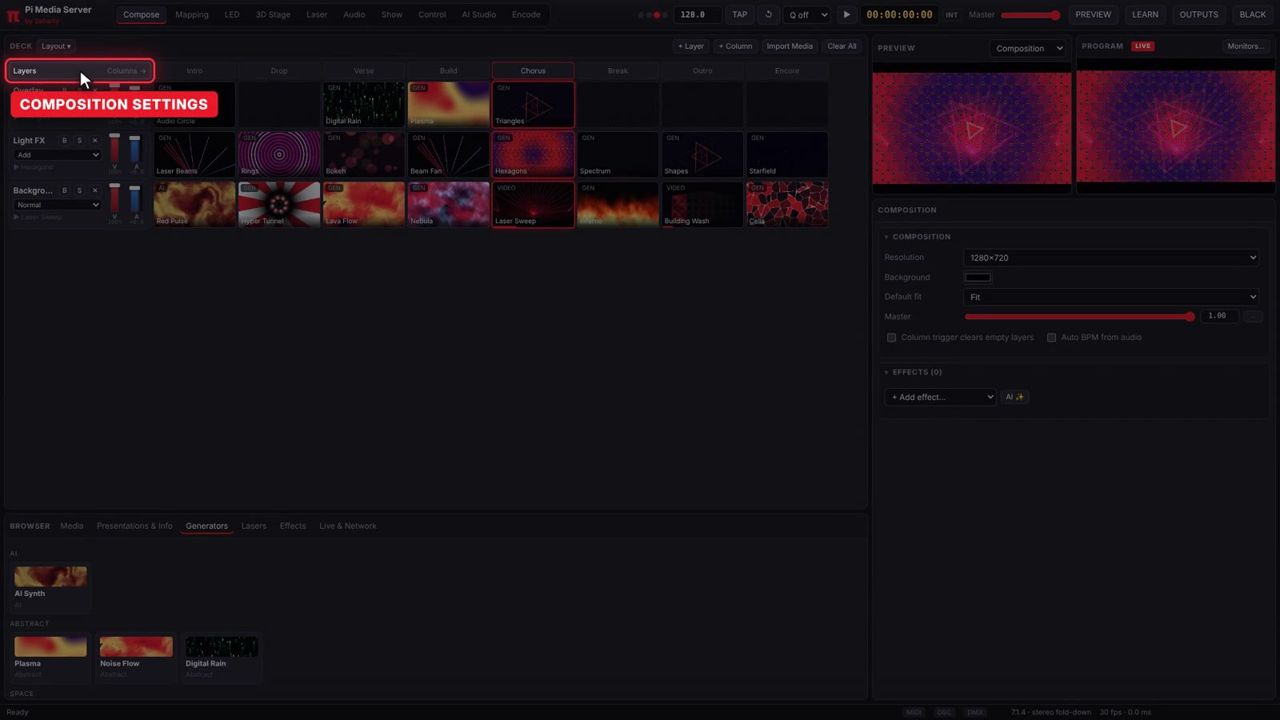
Click the Layers / Columns corner of the deck to open the composition settings.
| Control | What it does | Range / default |
|---|---|---|
| Resolution | Composition size, from 1280 × 720 to 15360 × 2160, or custom | 1920 × 1080 |
| Background | Background colour | Black |
| Default fit | Fit, Fill, Stretch or Native | Fit |
| Master | Master opacity (also in the top bar) | 0–1 |
| Column trigger clears empty layers | See above | Off |
| Auto BPM from audio | Follows the tempo of the audio analysis | Off |
The section also shows the GPU, its maximum texture size and whether the pipeline is 16-bit float or 8-bit.
Note: Above 8K (7680 × 4320) the composition switches to 8-bit buffers automatically so that 12K canvases fit in GPU memory. A resolution larger than the GPU's maximum texture size is refused. 12K needs a GPU with 16384-pixel textures.
Preview and TAKE
Press PREVIEW (Cmd/Ctrl+P). Compose now edits a copy of the show: you can trigger clips and change effects without touching the live outputs, and a small PROGRAM monitor keeps showing what is live. When the look is ready, press TAKE (Cmd/Ctrl+Enter). The look goes live using each layer's transition.
Tempo and quantise
Set the BPM by typing it, tapping TAP (or T), following MIDI clock (Control workspace), or turning on Auto BPM from audio. Choose Q beat or Q bar to make clip and column triggers land on the next beat or bar.
Effects, generators and modulation
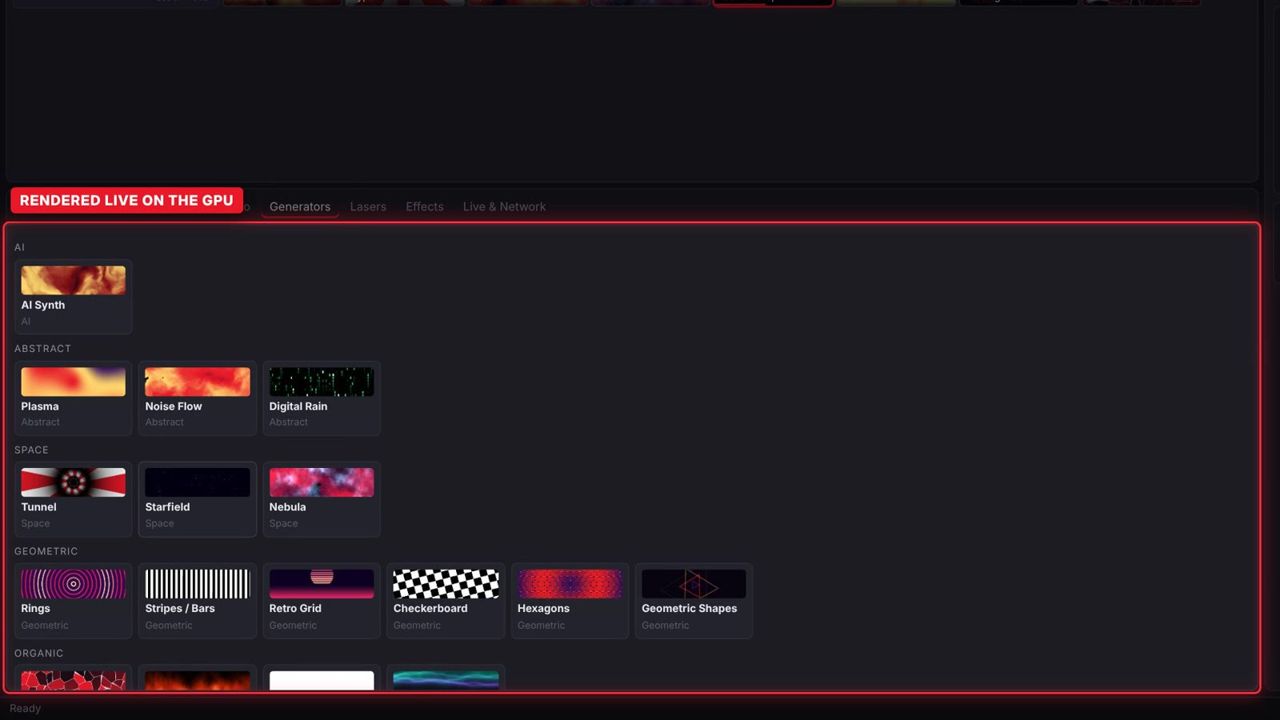
Generators
Open Browser → Generators and drag a generator onto a cell. There are 24: AI Synth, Plasma, Noise Flow, Tunnel, Starfield, Nebula, Rings, Stripes / Bars, Retro Grid, Checkerboard, Cells, Hexagons, Fire, Water Caustics, Aurora, Laser Beams, Bokeh Lights, Audio Spectrum, Audio Circle, Digital Rain, Gradient, Solid Color, Test Card and Geometric Shapes.
Generator clips have their own parameters plus Time speed (0–4) and Render res (Full resolution, Half resolution (faster), Quarter resolution).
AI Synth combines 16 pattern engines with warp, symmetry, palette, pulse and audio response.
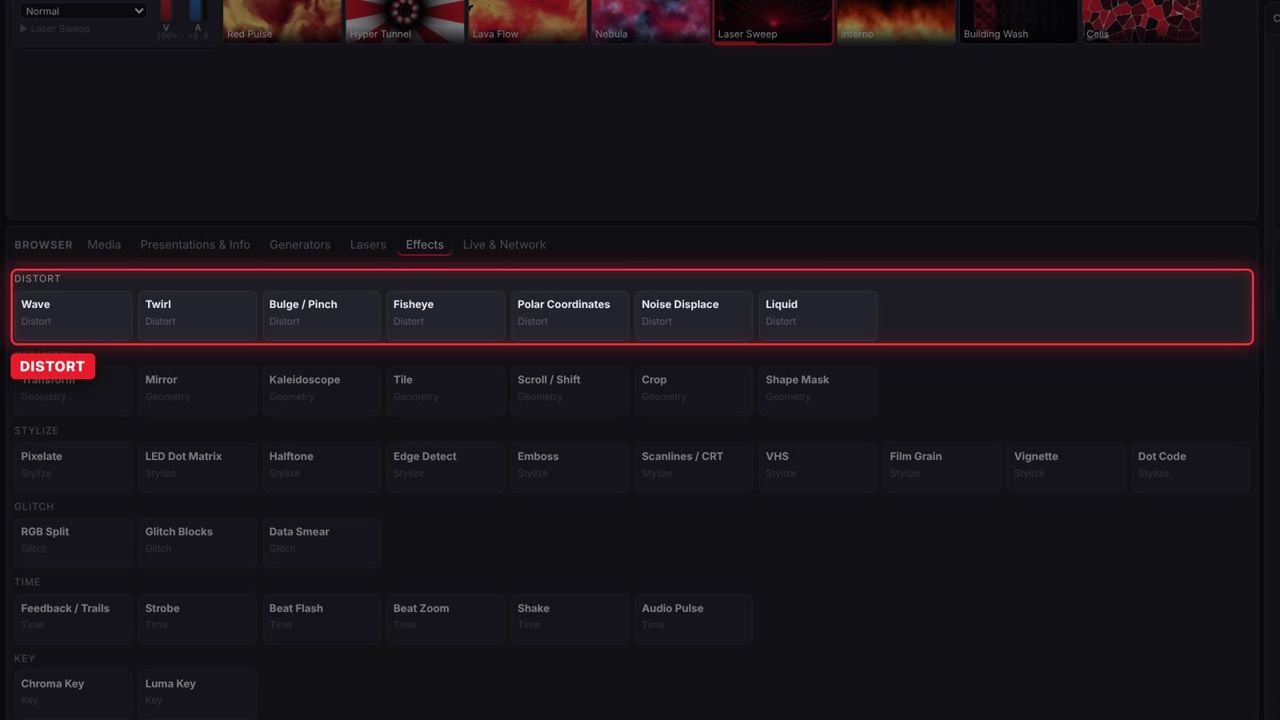
Effects
There are 51 GPU effects in eight groups:
| Group | Effects |
|---|---|
| Color | Brightness / Contrast, Hue Rotate, Levels / Gamma, Colorize, Duotone, Gradient Map, Invert, Threshold, Posterize, RGB Gain, Fade To Color |
| Blur | Blur, Glow / Bloom, Zoom Blur, Directional Blur, Sharpen |
| Distort | Wave, Twirl, Bulge / Pinch, Fisheye, Polar Coordinates, Noise Displace, Liquid |
| Geometry | Transform, Mirror, Kaleidoscope, Tile, Scroll / Shift, Crop, Shape Mask |
| Stylize | Pixelate, LED Dot Matrix, Halftone, Edge Detect, Emboss, Scanlines / CRT, VHS, Film Grain, Vignette, Dot Code |
| Glitch | RGB Split, Glitch Blocks, Data Smear |
| Time | Feedback / Trails, Strobe, Beat Flash, Beat Zoom, Shake, Audio Pulse |
| Key | Chroma Key, Luma Key |
To add an effect:
- Open Browser → Effects.
- Drag the effect onto a clip (clip effect), a layer header (layer effect) or the Preview monitor (composition effect).
- Select the clip, layer or composition to adjust the effect in the inspector. Every effect has a Mix control (0–1) and can be reordered.
Modulation
Most sliders have a small ~ button. Click it to cycle None → LFO → Audio → Beat. Right-click it for the settings:
| Setting | Applies to | Range |
|---|---|---|
| Depth | All | 0–1 |
| Beats / cycle | LFO, Beat | 0.25–64 |
| Shape | LFO | sine, tri, saw, square, random |
| Bipolar | LFO | On / off |
| Band | Audio | bass, mid, high, level |
| Decay | Beat | 1–20 |
The button shows LFO, AUD or BT when modulation is on. Audio modulation follows the analysis set up in the Audio workspace.
Tip: Double-click any slider to reset it to its default.
Text and tickers
Drag Text from the Generators tab, or right-click a cell and choose New Text Clip. Settings: text, Size (10–600), Color, Align, Weight, Font, Vertical position, Outline (0–30), Outline color and Ticker speed (0–5) for scrolling tickers.
Presentations, playlists and info clips
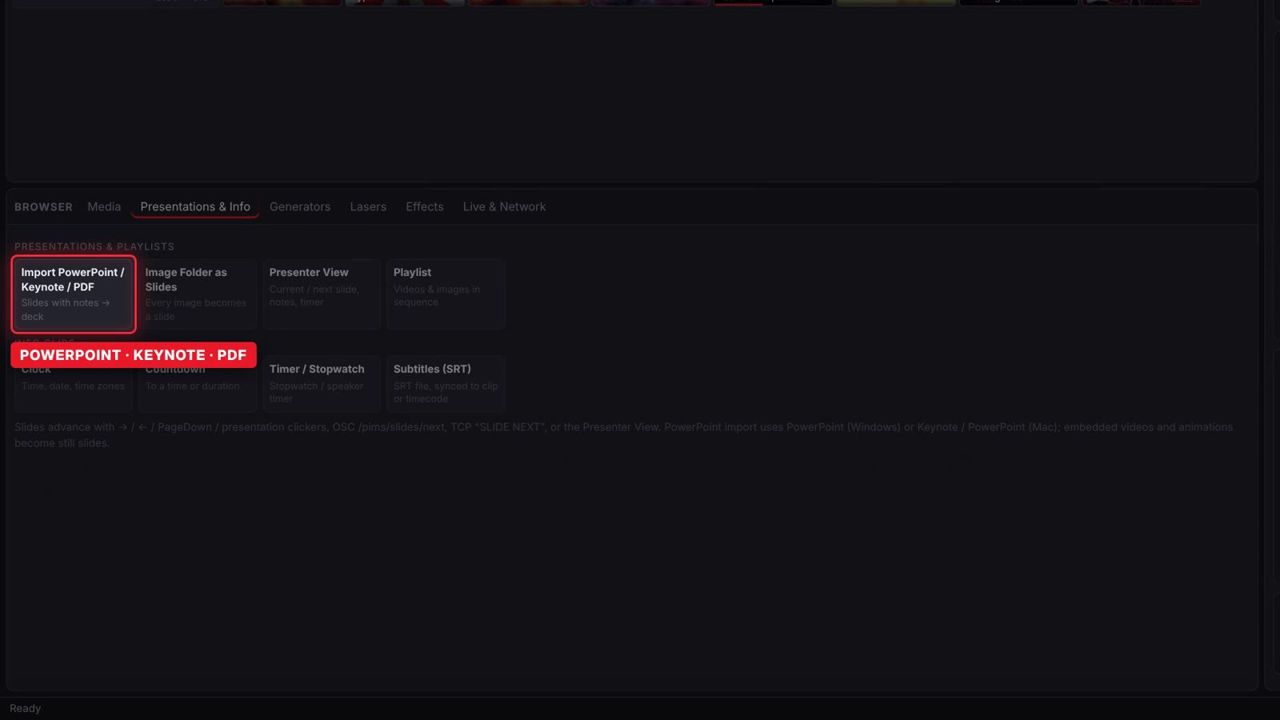
The Presentations & Info tab of the browser holds:
- Import PowerPoint / Keynote / PDF: each slide becomes part of one slide clip, with speaker notes. On Windows,
.pptximport uses the Microsoft PowerPoint installed on the computer; on a Mac it uses Keynote, or PowerPoint if Keynote is not available. PDFs import on any computer. Embedded videos and animations become still slides. Options include Skip hidden slides and Restart at slide 1 on trigger. - Image Folder as Slides: every image in a folder becomes a slide.
- Playlist: videos and images in sequence, with Image duration (s) (1–120), Crossfade (s), Transition, Shuffle and Loop playlist.
- Info clips: Clock (time zones, 24-hour, date), Countdown (to a duration of 5–7200 s or to a date and time, with Warn at (s), Warning colour, End text and Count negative after zero), Timer / Stopwatch, and Subtitles (SRT) synced to Clip time (from trigger), Show timecode or Manual (line by line), with an Offset (s).
Change slides with the arrow keys, PageUp / PageDown, a presentation clicker, OSC /pims/slides/next, TCP SLIDE NEXT, or the Presenter View window (Cmd/Ctrl+Shift+P), which shows the current slide, the next slide, notes, a clock and an elapsed timer.
Live and network sources
The Live & Network tab lists cameras and capture cards, Screen / window capture, NDI source and Network Stream. Network streams accept RTSP, RTMP, SRT, HLS, UDP and HTTP URLs. Options include RTSP over UDP, Low-bandwidth (proxy) stream and RTMP: listen for a push, which lets OBS push to rtmp://this-ip:1935/live/key.
Note: Network stream inputs carry video only. Route their audio through your sound interface.
Finger Paint clips
Drag Finger Paint onto a cell to draw live visuals. Draw in the paint pad with a mouse, pen or touch screen (several fingers paint at once), click Full-screen Pad, or open the web remote's paint page on phones and tablets (see Control).
| Control | Range / default |
|---|---|
| Brush | Neon glow, Pen, Soft marker, Spray, Ribbon, Sparkles, Eraser |
| Brush size | 0.002–0.15, default 0.02 |
| Colour, Rainbow ink | — |
| Glow | 0–2, default 0.6 |
| Opacity | 0.05–1, default 1 |
| Symmetry | None, Mirror left / right, Mirror top / bottom, Four-way, Kaleidoscope 6, Kaleidoscope 8 |
| Fade after (s, 0 = keep) | 0–30, default 0 |
| Background | Transparent (over lower layers), Black, White |
Undo and Clear work on the painting. Keep in Show stores the current painting in the show file.
Projection mapping
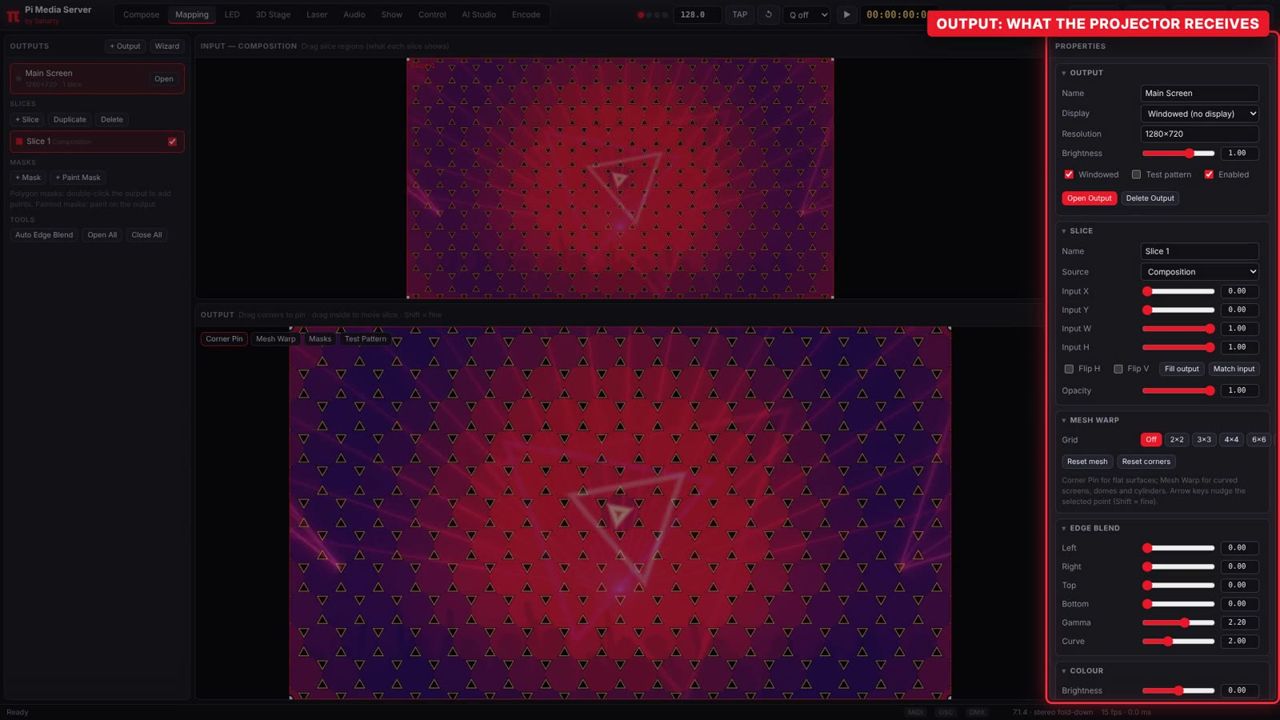
The Mapping workspace has three columns: Outputs (left), the Input — composition and Output canvases (centre), and Properties (right).
Outputs
An output is one physical display (projector, LED processor input, screen) or a window.
- Click + Output.
- In Properties → Output, choose the Display. The output takes that display's resolution. Choose Windowed (no display) to show it in a window instead.
- Click Open Output. Open All / Close All, the OUTPUTS button and Output → Open All Outputs (Cmd/Ctrl+Shift+O) work on every output.
| Control | What it does | Range / default |
|---|---|---|
| Name | Output name | Output 1 |
| Display | Target display | — |
| Resolution | Output size (type width x height) |
Display size |
| Brightness | Output brightness | 0–1.5, default 1 |
| Windowed | Window instead of full screen | Off |
| Test pattern | Shows a test pattern with slice labels | Off |
| Enabled | Output on / off | On |
Slices
Each output contains one or more slices. A slice takes part of a source and places it on the output.
- Click + Slice (or Duplicate an existing one).
- Choose its Source: Composition, any Layer, or a 3D Projector view from the 3D Stage.
- Drag the slice region in the Input canvas, or set Input X / Y / W / H (0–1).
- Use Fill output to stretch it over the whole output, or Match input to place it pixel-for-pixel where it sits in the composition.
Each slice also has Flip H, Flip V and Opacity.
Corner pin and mesh warp
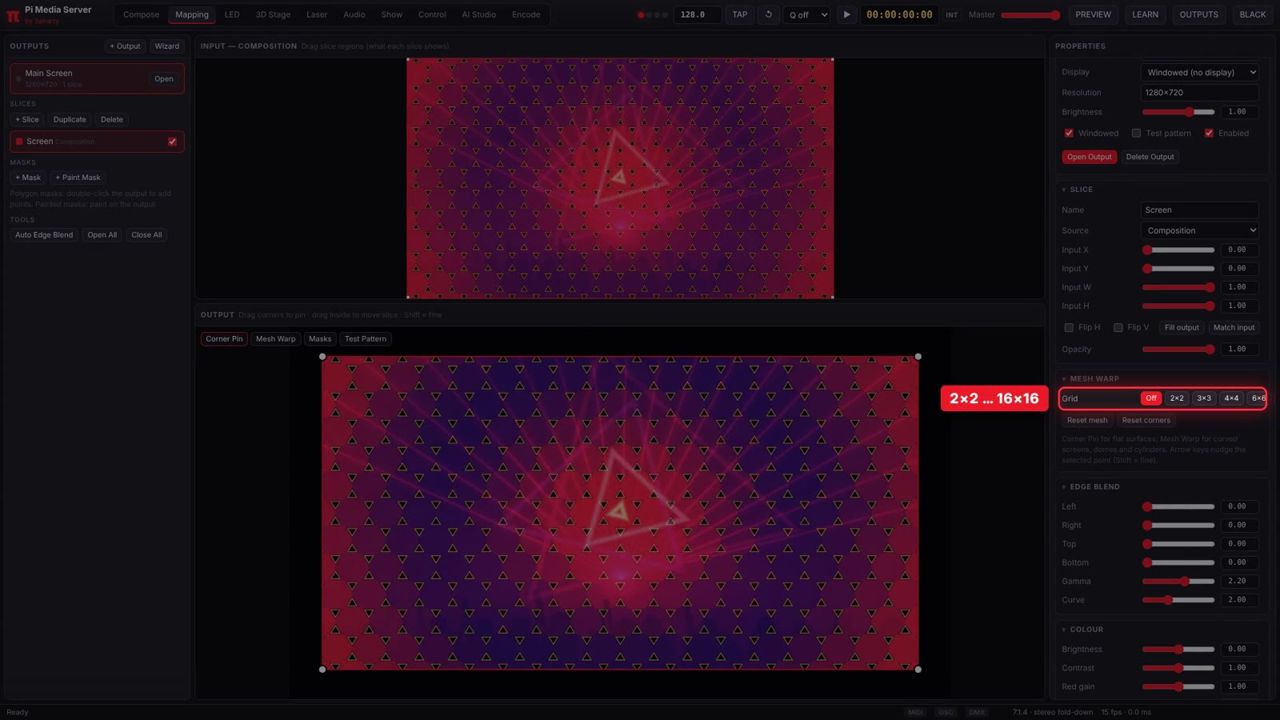
Choose Corner Pin above the output canvas for flat surfaces. Drag the four corners onto the surface, drag inside the slice to move it, and hold Shift for fine moves. The arrow keys nudge the selected point (Shift = finer).
For curved screens, domes and cylinders, choose a Mesh Warp grid of 2×2, 3×3, 4×4, 6×6, 8×8, 12×12 or 16×16. Drag the mesh points; the surface between them bends smoothly (bicubic). Reset mesh and Reset corners start again; Off returns to corner pin.
Masks
- + Mask adds a polygon mask. Double-click the output to add points, double-click an edge to insert one, Alt+click to delete one.
- + Paint Mask adds a painted mask. Paint straight onto the output with a mouse, pen (pressure sets the width) or touch screen, hold Alt to erase, or click Paint Pad… for a large pad or paint from a phone.
Mask settings: Feather (0–1), Invert (show inside only) and Enabled. Painted masks also have Brush size (0.005–0.25) and Eraser.
Edge blending
For overlapping projectors, each slice has an Edge Blend section: Left, Right, Top and Bottom blend widths (0–0.5), Gamma (1–3, default 2.2) and Curve (1–4, default 2).
- Auto Edge Blend works out the blend zones from slices whose inputs overlap.
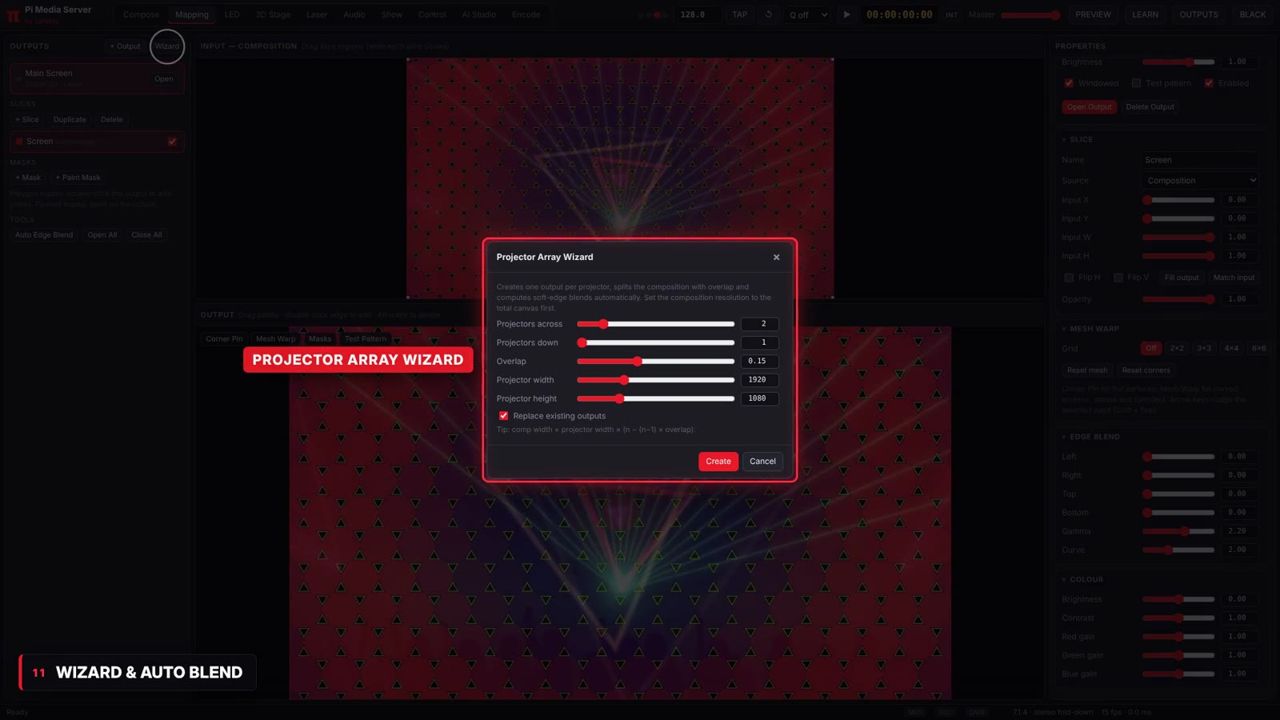
- Wizard (Projector array / blend wizard) builds an N × M blended setup in one step: Projectors across (1–8), Projectors down (1–4), Overlap (0–0.4, default 0.15), Projector width / height and Replace existing outputs.
Colour matching
Each slice has a Colour section to match projectors or panels: Brightness (−1 to 1), Contrast (0–2) and Red / Green / Blue gain (0–2).
Tip: Turn on Test Pattern (or Output → Test Pattern, Cmd/Ctrl+T) while you pin and blend. Slice labels make it easy to see which projector shows what.
3D Stage
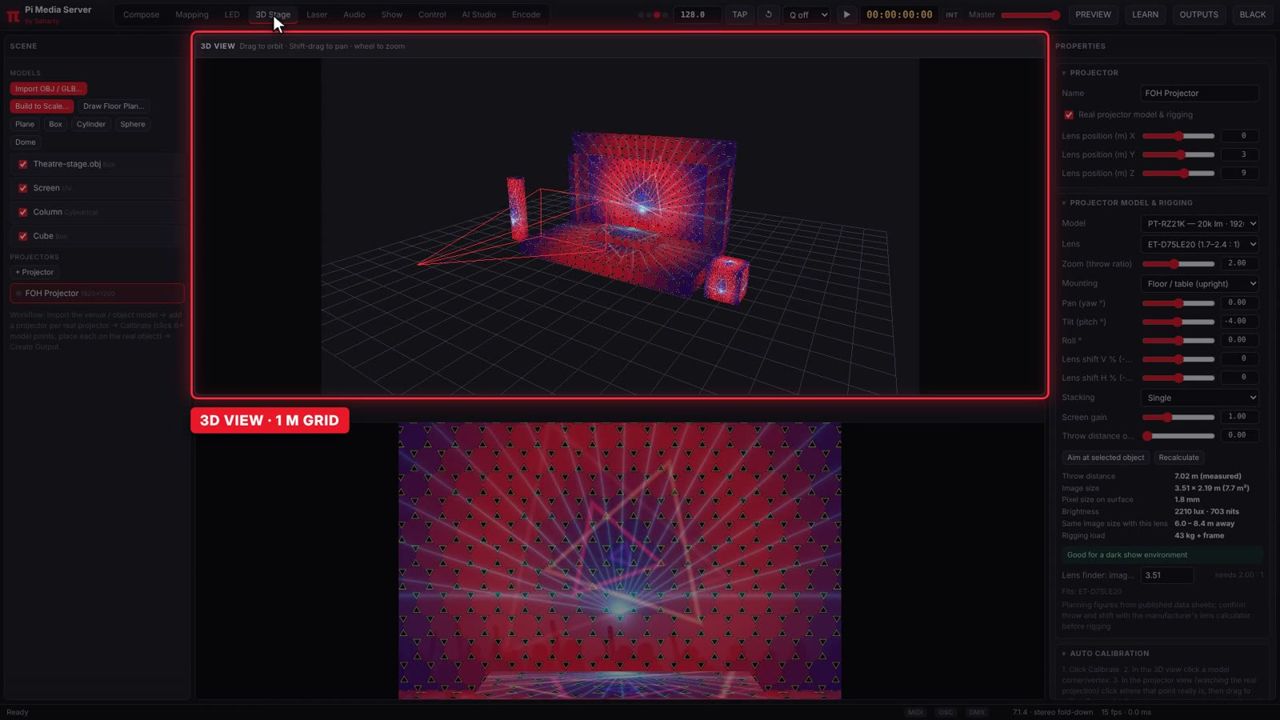
The 3D Stage shows your venue in 3D. You can map content onto models, plan projectors with real lenses and send each projector's view to an output.
Models
- Import OBJ / GLB… imports OBJ, glTF or GLB models. A model is scaled to about 2 units and placed on the floor; give it its real size in Real size (metres).
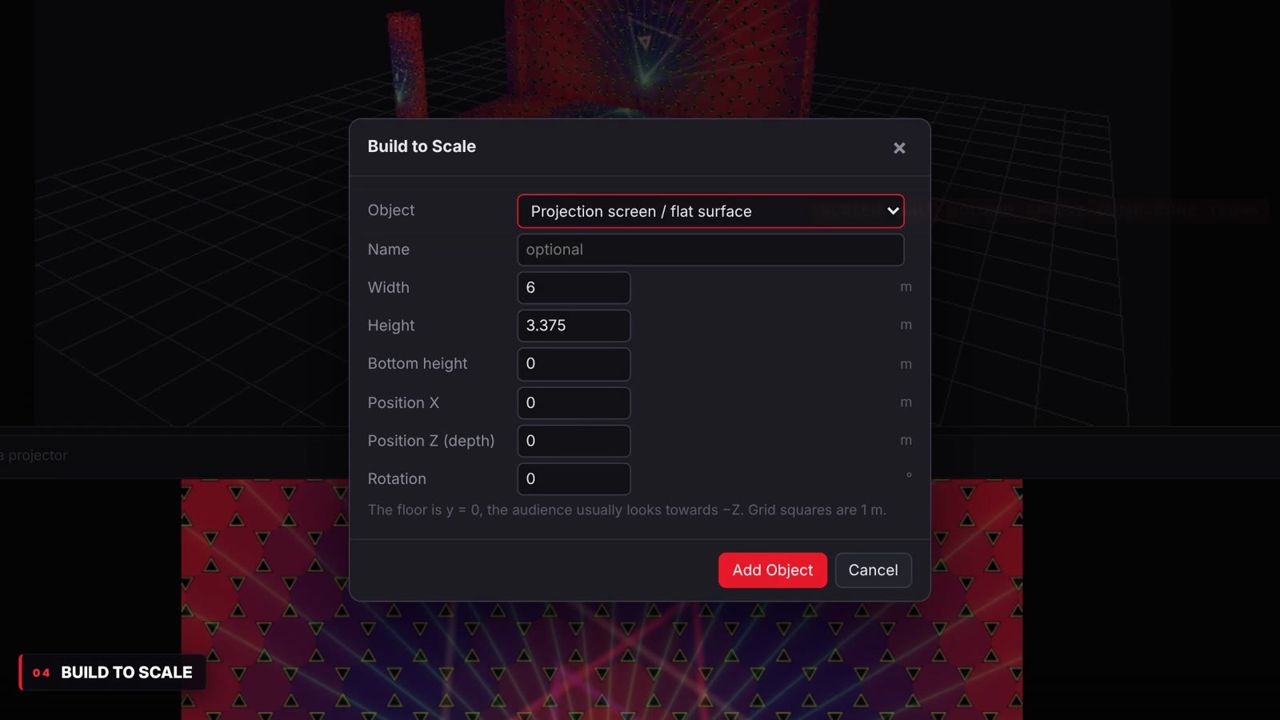
- Build to Scale… creates objects in metres: Projection screen / flat surface, Wall / box / riser, Cylinder / column, Sphere, Dome (hemisphere), Cone and Truss bar (0.29 m box).
- Draw Floor Plan… lets you draw any outline in plan view (snapping to 10 cm, with live edge lengths) and extrude it.
- Any object can be resized to its real width, height or depth (Keep proportions), set with Sit on floor or Centre.
Navigate the 3D view by dragging to orbit, Shift-dragging to pan and using the wheel to zoom.
Mapping content onto models
Select a model and set Content (the composition or any layer), Content X / Y / W / H and Texture mapping: UV, Planar, Box, Cylindrical, Spherical or Solid.
Projectors and rigging
Click + Projector. Each virtual projector has a position, aim (Aim at selected object), Vertical FOV, Lens shift H / V and a Resolution.
Under Real projector model & rigging, pick a real model (Panasonic, Barco, Christie, Epson, Sony, Sharp NEC or Custom) and a Lens, then set:
| Control | Range / default |
|---|---|
| Zoom (throw ratio) | Limits of the chosen lens |
| Mounting | Floor / table (upright), Ceiling (inverted), Truss hang (inverted), Portrait (rotated 90°) |
| Pan (yaw °) | −180 to 180 |
| Tilt (pitch °) | −90 to 90 |
| Roll ° | −45 to 45 |
| Stacking | Single, Double stack, Triple stack, Quad stack |
| Screen gain | 0.3–2.5, default 1 |
| Throw distance override (m) | 0–120, 0 = measured |
The panel reports the Throw distance (measured to the first object), Image size, Pixel size on surface, Brightness in lux and nits with a verdict, the distance range for the same image size, the Rigging load, and a Lens finder for a wanted image width.
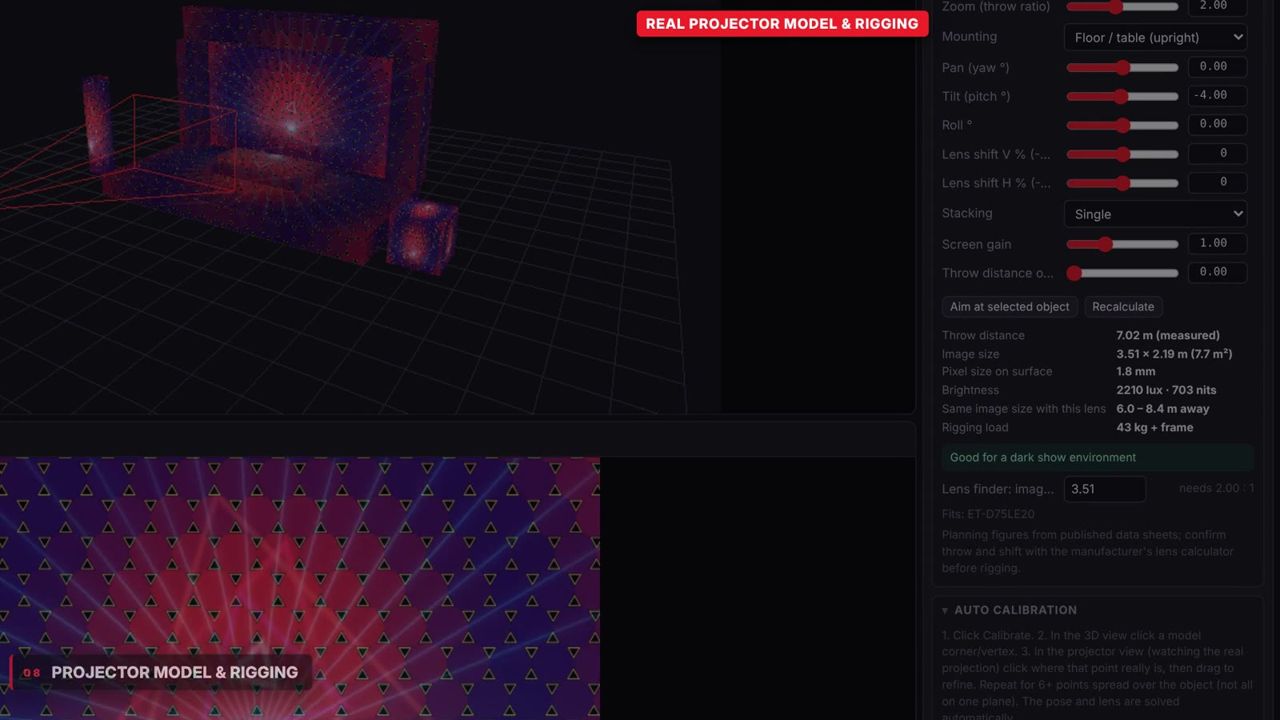
Note: These are planning figures from published data sheets. Confirm throw and shift with the manufacturer's lens calculator before rigging.
Projector view and outputs
Select a projector to see its Projector View. Click Create Output for Projector to send that view to a new output, or choose 3D Projector: name as a slice source in Mapping.
Point-pair auto calibration
- Select the projector and click Calibrate.
- Click a point on the model in the 3D view (Model point).
- Click where that point is on the real projection. Drag markers to refine.
- Repeat for at least 6 points. The projector's pose and lens are solved automatically and the error in pixels is shown.
- Use solved pose applies the result. Clear Points starts again; Finish Calibrating ends the session.
LED walls and pixel mapping
The LED workspace has Fixtures (left), the Pixel Map with a DMX Monitor (centre) and Properties (right).
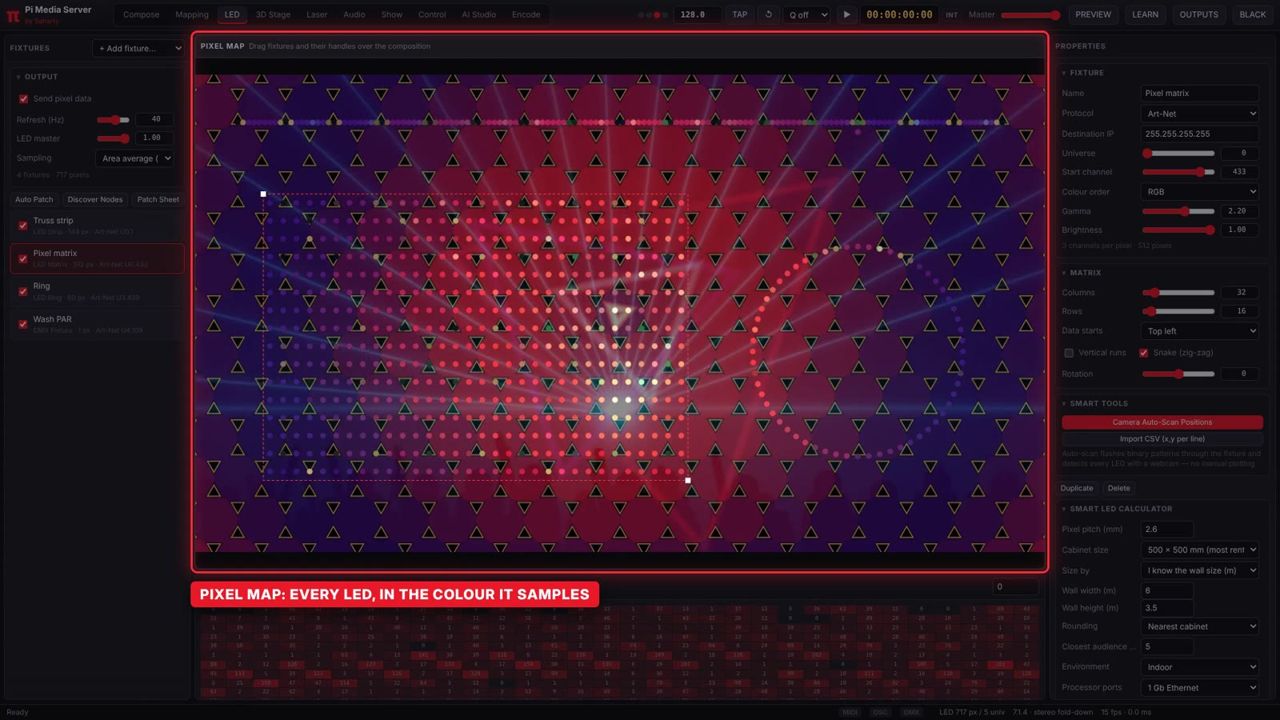
Pixel-mapped fixtures
- Choose + Add fixture…: LED Strip, LED Matrix, LED Ring, Custom / Scanned or DMX Fixture.
- Drag the fixture and its handles over the composition in the Pixel Map.
- Set the output protocol and address in Properties → Fixture.
| Control | What it does | Range / default |
|---|---|---|
| Protocol | Art-Net, sACN (E1.31), DDP (pixel controllers, WLED, Falcon…) | Art-Net |
| DDP start pixel | First pixel for DDP | 0–65535 |
| Destination IP | Controller address, broadcast or multicast | — |
| Universe | Start universe | 0–32767 |
| Start channel | Start channel | 1–512 |
| Colour order | RGB, GRB, BRG, RBG, GBR, BGR, RGBW, GRBW, W, DRGB, RGBWAU | RGB |
| Gamma | Per-fixture gamma | 1–3, default 2.2 |
| Brightness | Per-fixture brightness | 0–1, default 1 |
Type-specific settings: strips have Pixels (1–2048), + Point / − Point and Reverse; matrices have Columns and Rows (1–256), Snake (zig-zag), Vertical runs and Data starts (Top left, Top right, Bottom left, Bottom right); rings have Pixels, Radius, Start angle and Clockwise.
Patching and output
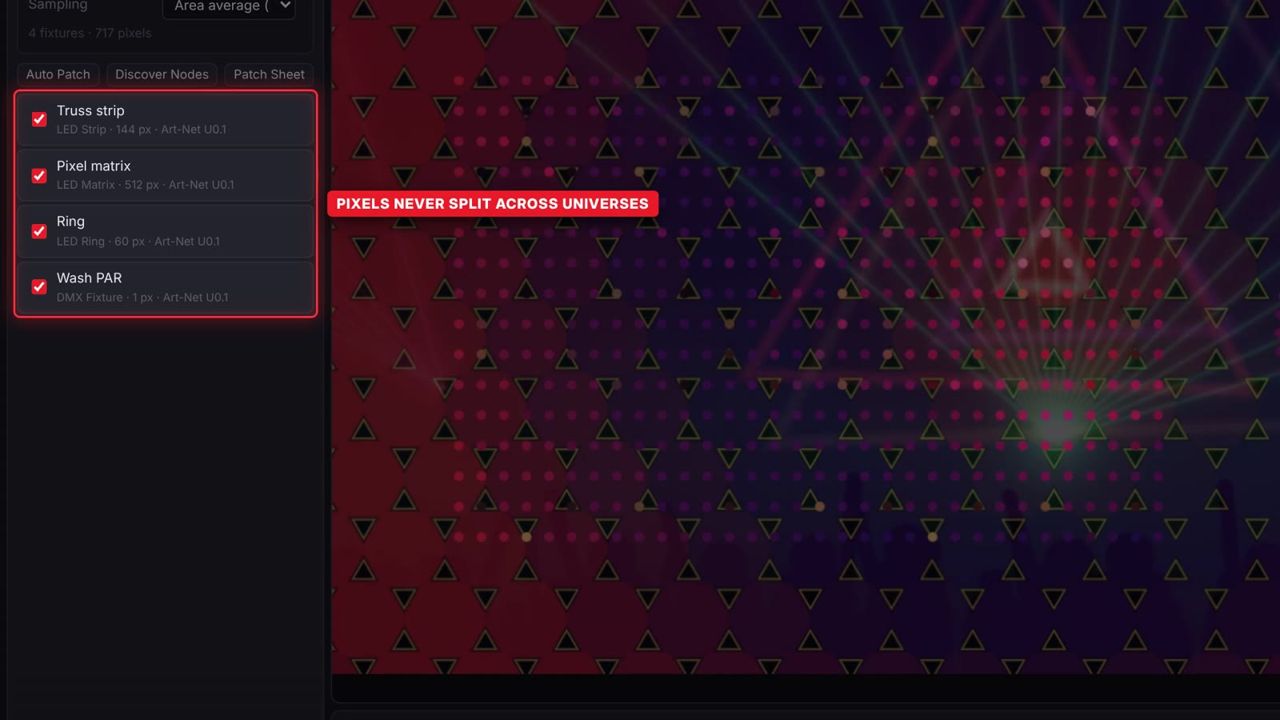
- Auto Patch assigns universes in sequence so a pixel never splits across two universes.
- Patch Sheet shows every fixture with its pixels, channels, start and end addresses, protocol and destination.
- Discover Nodes finds Art-Net nodes on the network.
- The DMX Monitor shows the live values of any universe.
- Send pixel data turns LED output on. LED master (0–1) sets the overall level, Refresh (Hz) (10–60, default 40) sets the send rate, and Sampling chooses Point sampling, Area average (smooth) or Wide average.
Camera auto-scan
Camera Auto-Scan Positions finds the real position of every LED. Point a webcam at the whole fixture, darken the room, make sure LED output is enabled and patched, and click Start Scan. The app flashes binary patterns and builds the pixel positions from what the camera sees. You can also Import CSV (x,y per line).
LED Wall Designer
Set Cabinets across (1–64) and down (1–32), Cabinet px W / H (16–1024), Pixel pitch (mm) (0.9–20), Port capacity (1G, 1G at high fps, 5G or 10G fibre), Ports / processor (1–40) and Wiring (Snake by columns or Snake by rows). The designer reports the Raster, Physical size, Cabinets / port, Ports and Processors, and draws the wiring path.
- Create LED Output creates an output named "LED Wall" at the raster size. Assign it to the processor's display in Mapping.
- Export Cabinet Map PNG saves a cabinet map at the raster size.
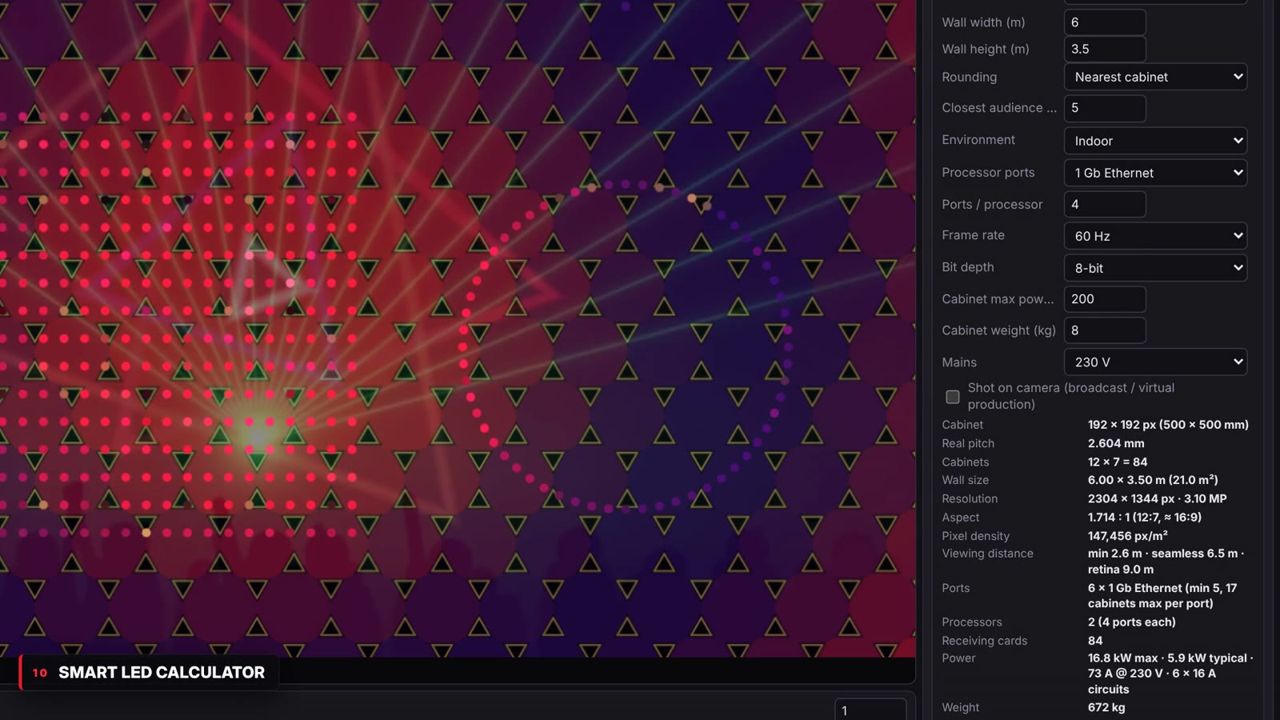
Smart LED Calculator
Enter what you know and the calculator works out the rest.
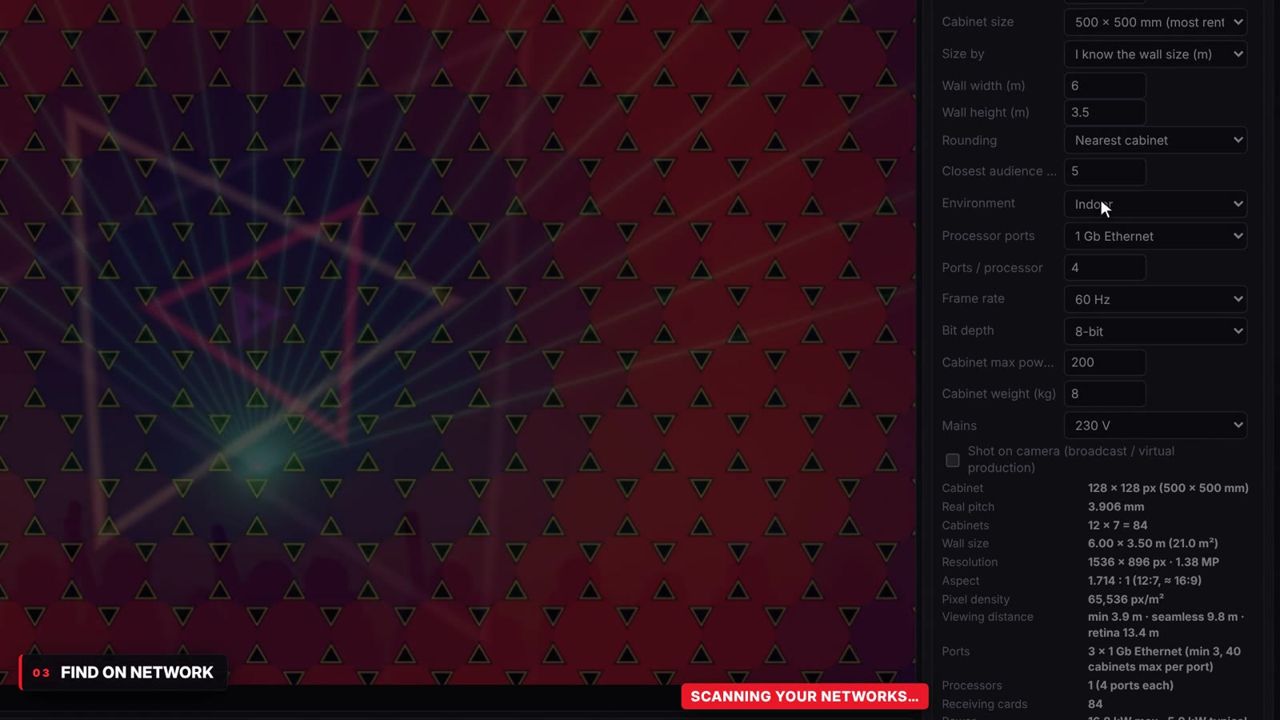
Inputs: pixel pitch, cabinet size, the wall size in metres (with Rounding to the Nearest cabinet, Fit inside the opening or Cover the opening) or the cabinet count, Closest audience (m), Environment, processor ports, frame rate (50–120 Hz), bit depth, cabinet power and weight, Mains voltage and Shot on camera (broadcast / virtual production).
Results: real pitch, cabinet count, wall size, resolution and aspect ratio, minimum / seamless / retina viewing distances, ports, processors and receiving cards, power (kW, amps, 16 A circuits), weight and the best content canvas, with warnings when a size and pitch don't divide.
Buttons: Apply to Wall Designer, Composition = native raster, Create LED Output and Add Test Card.
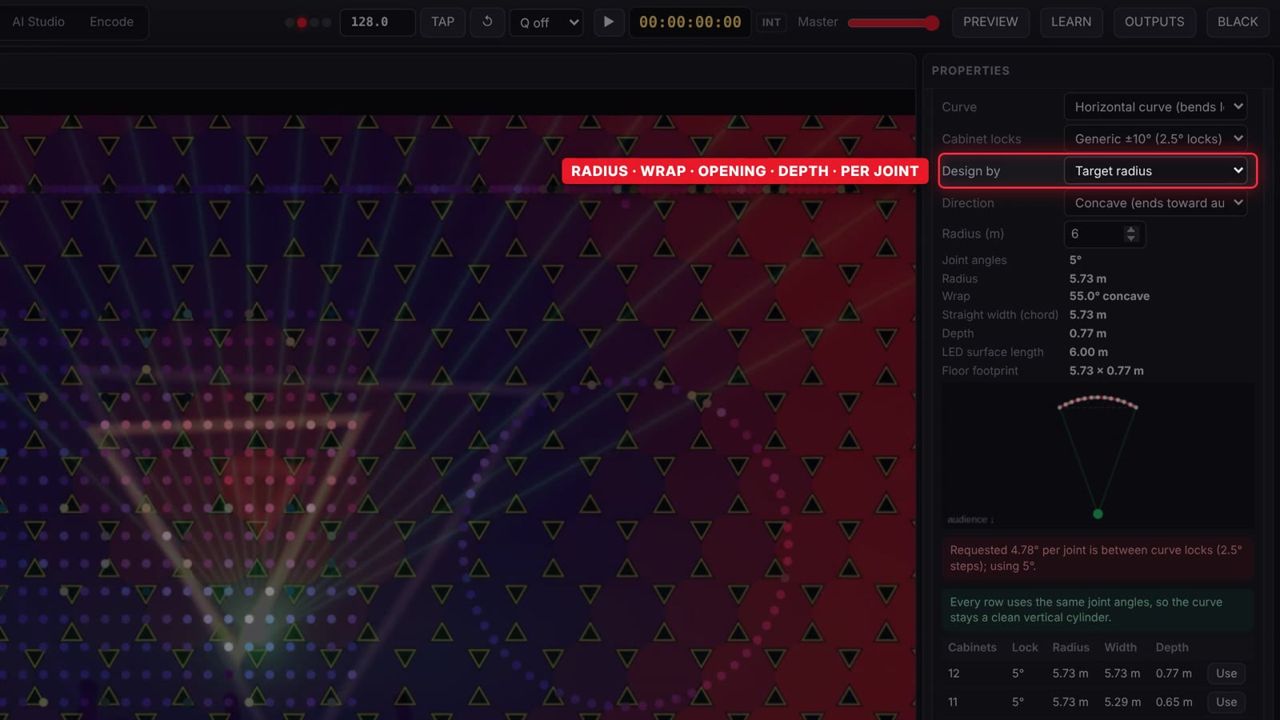
Curved LED walls
Turn on Curved wall and choose:
- Curve: Horizontal curve (bends left / right) or Vertical curve (bends top / bottom).
- Cabinet locks: Generic ±10° (2.5° locks), Generic ±5° (1° locks), ROE Black Pearl BP2V2, ROE Ruby-C, Unilumin Upad IV, Leyard / Planar LN, Free angle (flexible / no detents) or Custom range… (Min °, Max °, Lock step °).
- Design by: Target radius, Total wrap angle, Fit an opening width (chord), Maximum depth, Angle per joint or Custom joint list (S-curves) (for example
5,5,5,0,-5,-5; + is concave, − is convex). - Direction: Concave (ends toward audience) or Convex (bulges toward audience).
Angles snap to the cabinet's locks, with a warning when the target falls between locks or outside the cabinet's range. The panel shows the joint angles, radius, wrap, straight width (chord), depth, LED surface length, floor footprint and a plan view, plus a table of suggestions (cabinet count and lock angle) with a Use button.
- Audience sweet spot: Across (m), Eye height (m) above the wall's bottom edge, and Distance (m) from the straight line between the wall's ends.
- Add to 3D Stage builds the wall at real size from the cabinet geometry.
- Correct for Sweet Spot warps the LED output so flat content looks straight from the sweet spot, scaling the picture down only as much as needed so nothing is cropped. Reset it in Mapping → Mesh Warp.
- Build Sheet (CSV) saves a joint-by-joint list for the crew.
Warning: Curve-lock angles differ between cabinet models. Confirm the step and range on the cabinet data sheet before building.
LED processors
The LED Processors section (LED workspace) connects to processors and drives them from the show.
Connecting
- Click Find on Network. The app scans the local networks for NovaStar COEX, Megapixel HELIOS and Brompton Tessera processors.
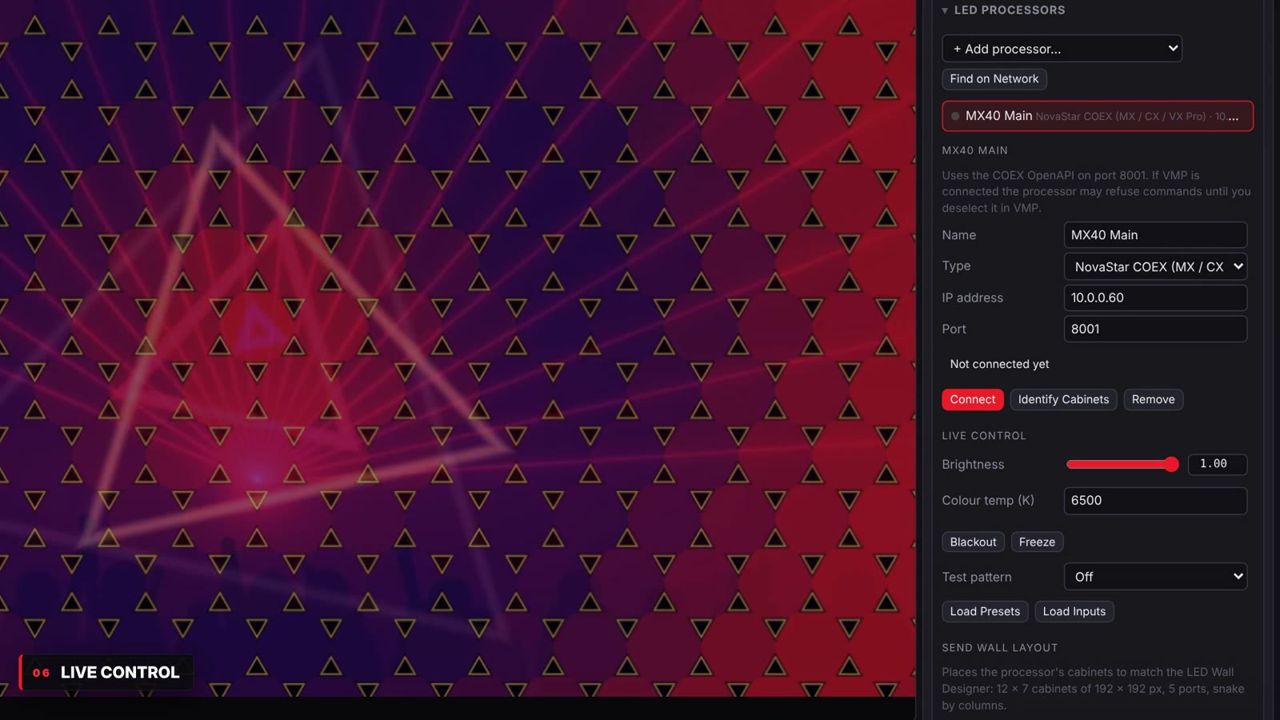
- Or add one by hand: choose the Type (NovaStar COEX (MX / CX / VX Pro), Megapixel HELIOS, Brompton Tessera or Other brand (custom commands)) and enter the IP address. - NovaStar uses port 8001 (OpenAPI). If the processor has several screens, choose the Screen. - HELIOS needs an API user and Password if one is set. - Tessera: enter Wall max (nits) so brightness can be shown in nits.
- Click Connect. The panel shows vendor, model, name, serial, firmware, cabinets and brightness.
Live control
| Control | What it does |
|---|---|
| Brightness | 0–1, sent live |
| Colour temp (K) | Colour temperature |
| Blackout / Un-Blackout | Blacks out the wall |
| Freeze / Unfreeze | Freezes the picture |
| Test pattern | Off, Red, Green, Blue, White, Grid, Checkerboard, Horizontal lines / steps, Vertical lines / steps, Diagonal, Gradient / grey, Colour bars |
| Identify Cabinets | Shows cabinet IDs on the wall |
| Load Presets | Lists the processor's presets as buttons to recall |
| Load Inputs | Lists the inputs so you can switch with Input |
An All processors row applies brightness, blackout and freeze to every processor at once. OSC: /pims/ledproc/{n|all}/brightness f, /blackout i, /freeze i, /test s, /preset s and /cct f.
Sending the wall layout
Send Layout… places the processor's cabinets (NovaStar) or tiles (HELIOS) to match the wall designer's grid, ports and wiring, with an optional Canvas X / Y offset. On NovaStar it repositions the cabinets of a screen that already exists; on HELIOS it sets each tile's position in output-port and chain order. Check the result in the processor's own software.
Tessera's IP control has no layout commands, so use the exports: Cabinet CSV, Layout JSON (including the curve) and the cabinet map PNG work with any processor software.
Other brands
For Colorlight, Linsn, Kystar, Absen, older NovaStar and others, choose Other brand (custom commands). Set the Protocol (TCP, UDP or HTTP (METHOD /path body)), Port, Brand / model and Preset count, then enter the commands from the maker's control protocol for Brightness, Colour temperature, Blackout on/off, Freeze on/off, Test pattern on/off, Recall preset {value} and Select input {value}.
Placeholders: {pct} 0–100, {byte} 0–255, {value} raw value, {k} kelvin. Start a command with hex: to send bytes, for example hex:55 AA 01 {byte}.
Lasers
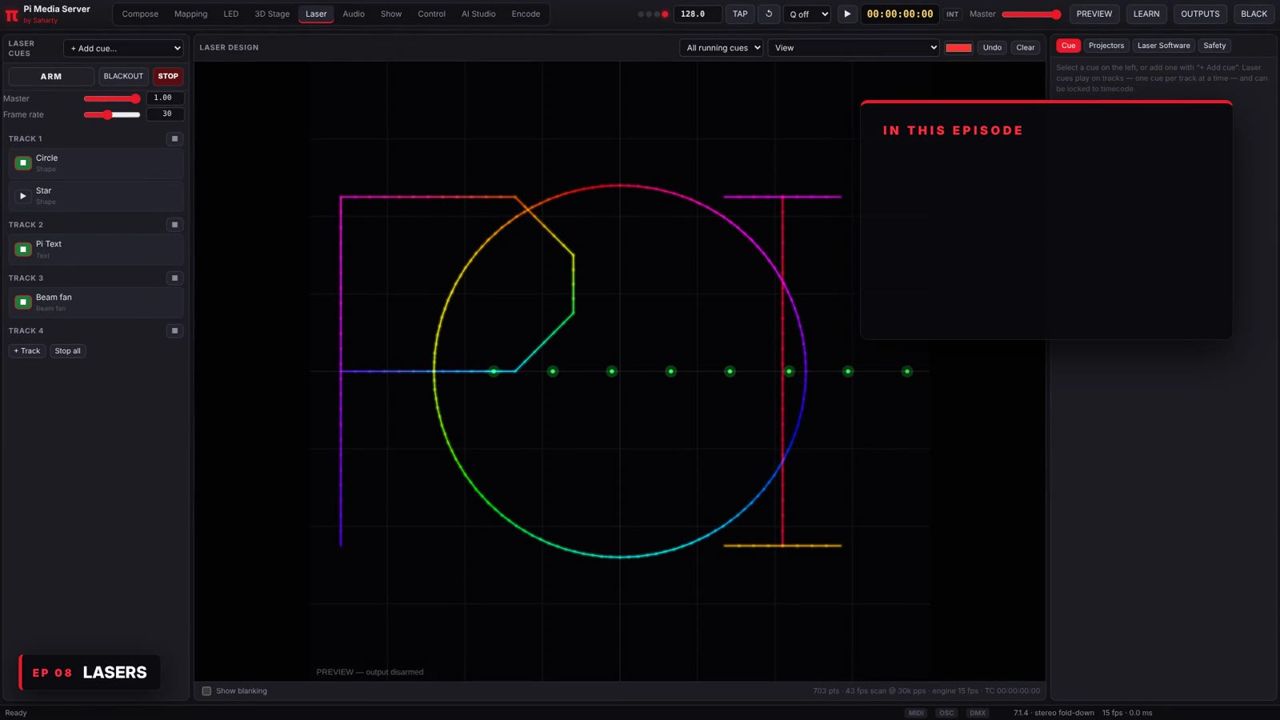
The Laser workspace runs laser cues on tracks, previews them, and sends them to laser DACs or to external laser software.
Laser cues
Cues sit on tracks like clips on layers: one cue per track plays at a time. Click + Track to add a track. Cue types:
Shape (Circle, Square, Triangle, Polygon, Star, Line, Cross, Heart, Flower, Dot (beam)), Text (single-stroke laser font), Beam fan, Tunnel, Wave lines, Spiral, Lissajous, Grid / lattice, Drawing, Auto trace (edges of media), ILDA file (formats 0, 1, 2, 4, 5) and External trigger only.
Each cue has Transform (Size, Size X / Y, Position X / Y, Rotation (°), Spin (°/s), Mirror X), Colour (Solid, Gradient, Rainbow along path, Colour cycle, Change on beat, File / media colours) and Effects (Wave, Beat pulse, Audio size, Strobe (per beat), Dashes, Draw-on rate).
Drawing and auto trace
- Choose a drawing tool: Pen (click points, double-click to finish), Freehand, Line, Rectangle or Ellipse. Undo and Clear edit the drawing.
- Auto trace draws the edges of the composition, a layer or an image live. Detect chooses Edges (all detail) or Outline (shapes by brightness), with Edge strength, Smoothing, Analysis width (px) and Trace rate (fps).
- Freeze into a drawing cue turns the current trace into an editable drawing. Trace image… traces a picture straight into a drawing cue.
Timecode lock and export
Turn on timecode lock for a cue and set its Start TC, Length (s) and Offset (frames). The cue triggers when the show timecode reaches its start, animates in step with the timecode (frozen when it stops, exact after jumps) and stops when the range ends (Stop when timecode leaves the range).
Export cue as ILDA… writes ILDA format 5 frames that most laser show software can load.
Laser projectors
On the Projectors tab, click Find DACs to search the network for Ether Dream, LaserCube and IDN devices, or add one with + Projector and set the Protocol and IP address (and IDN channel for IDN).
| Section | Controls |
|---|---|
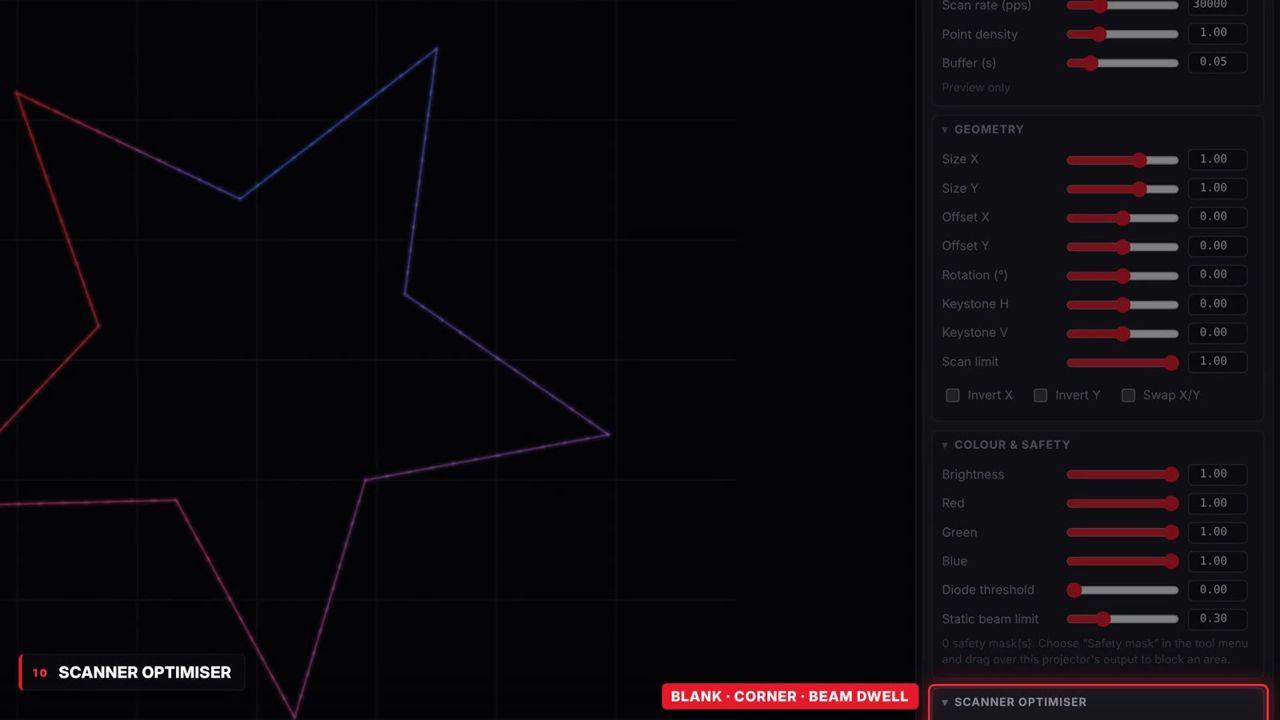
| Scanner optimiser | Scan rate (pps) 5000–100000 (30000), Point budget 50–3000 (900), Blank dwell 0–30 (5), Corner dwell 0–20 (3), Beam dwell 4–200 (40), Point density 0.3–3 (1) |
| Geometry | Size X / Y, Offset X / Y, Rotation (°), Keystone H / V (−0.5 to 0.5), Invert X / Y, Swap X/Y, Scan limit (0.1–1) |
| Colour & safety | Red / Green / Blue balance, Diode threshold (0–0.4), Brightness, Static beam limit (0–1, default 0.3), safety masks |
Safety
- Nothing leaves the DACs unless you arm the output: click ARM (it reads ARMED while armed). Every session starts disarmed.
- STOP or Esc is an emergency stop that stops output and disarms.
- BLACKOUT blacks out all laser output.
- Safety masks: choose Safety mask (projector) in the tool menu and drag over a projector's output to block an area (stage edges, balconies, cameras).
- Static beam limit caps brightness when content collapses into dots or beams.
- If frames stop arriving (crash, cable pulled), the drivers blank within 0.4 s.
- Remote arming over OSC, TCP, the web remote or sync is off unless you turn on Allow arming the lasers remotely on the Safety tab.
Warning: Audience scanning needs the appropriate variance or permit and must stay below the maximum permissible exposure at every position. Use a hardware emergency stop and a qualified laser safety officer for public shows. LaserCube network firmware may keep scanning its last data on packet loss: use a wired connection and physical masking.
External laser software
On the Laser Software tab, add actions that fire when a cue starts or stops (On start / On stop):
- + OSC: start / stop cues by name or page + cue, blackout and BPM sync in laser show software.
- + MIDI: note, control change or program change to Laser MIDI out.
- + DMX: Art-Net or sACN values for laser controllers and DMX lasers.
Under Timecode to laser software, send MTC to the Control tab's MIDI output, or generate LTC on an audio output channel, so the laser software chases the same timecode.
Lasers in the deck
Drag a cue from Browser → Lasers onto a cell. The clip draws the laser on screens and LED walls as glowing beams (Beam width, Glow, Intensity, Render scale, Fit) and, with Fire the physical laser cue while this clip is live, fires the real laser cue in sync. All laser output clips mirror exactly what the lasers draw.
Immersive audio
The Audio workspace shows the Speaker & Object View, the Analysis panel and Audio Setup.
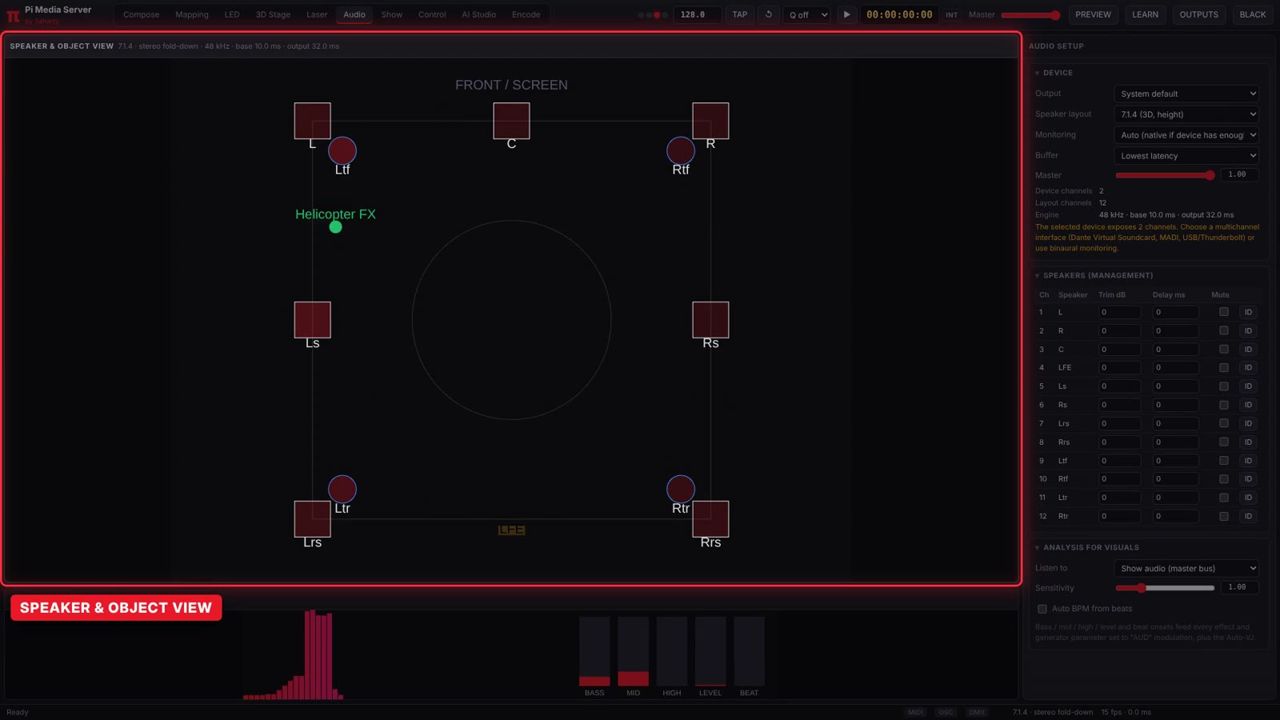
Device and layout
| Control | What it does | Options / default |
|---|---|---|
| Output | Audio device | System default |
| Speaker layout | 1.0, 2.0, 2.1, 3.0, 4.0, 5.1, 7.1, 5.1.2, 5.1.4, 7.1.2, 7.1.4, 7.1.6, 9.1.4, 9.1.6 | 7.1.4 |
| Monitoring | Auto (native if device has enough channels), Native multichannel, Binaural headphones (HRTF), Stereo fold-down | Auto |
| Buffer | Lowest latency or Safe (larger buffer) (applies after restart) | Lowest latency |
| Master | Audio master | 0–1 |
The panel shows the device's channel count and the layout's channel count. If the device has fewer channels than the layout, choose a multichannel interface (Dante Virtual Soundcard, MADI, USB / Thunderbolt) or binaural monitoring.
Speaker management
The Speakers (management) table has, per speaker: Trim dB (−40 to +12), Delay ms (0–1000), Mute and ID (pink noise on that speaker for line checks).
Beds, objects and ADM masters
- Set a clip's Routing to Channel bed to send its channels to the matching speakers, or Object (3D positioned) to place it in the room with distance-based panning across floor and height layers. Objects appear as green dots in the view.
- ADM BWF / BW64 / RF64 object-based masters play natively: beds go to their speakers and objects follow their own time-varying position metadata. Multichannel WAV files with more than 8 channels (16, 24 or 32-bit) also play.
Analysis for visuals
Listen to chooses the show audio (master bus) or any audio input. Sensitivity (0.1–4, default 1) sets the response. The panel shows BASS, MID, HIGH, LEVEL and BEAT, which drive every parameter set to AUD modulation and the Auto-VJ. Auto BPM from beats follows the tempo.
Note: Encoded immersive streams that need a licensed decoder are not decoded. Export an ADM BWF master from your DAW or renderer instead: it plays with full object metadata.
Show control and timecode
The Show workspace has four tabs: Cue List, Timeline, Plan (conference) and Schedule.
Cue List
- GO (or Space) fires the next cue, BACK goes back, STOP stops.
- + Cue adds a cue. Record Current State creates a cue from the current look.
- Each cue has a Number, Name, Pre-wait (s) (0–60) and Auto-follow (s, -1 off) (−1 to 120).
Cue actions: Trigger Clip, Trigger Column, Clear Layer, Clear All, Set / Fade Parameter, Set BPM, Send OSC, Send MIDI, Set DMX Channel, Blackout, Fade Master, Fade Audio Master, Timecode Play, Timecode Stop and AI Generate Look.
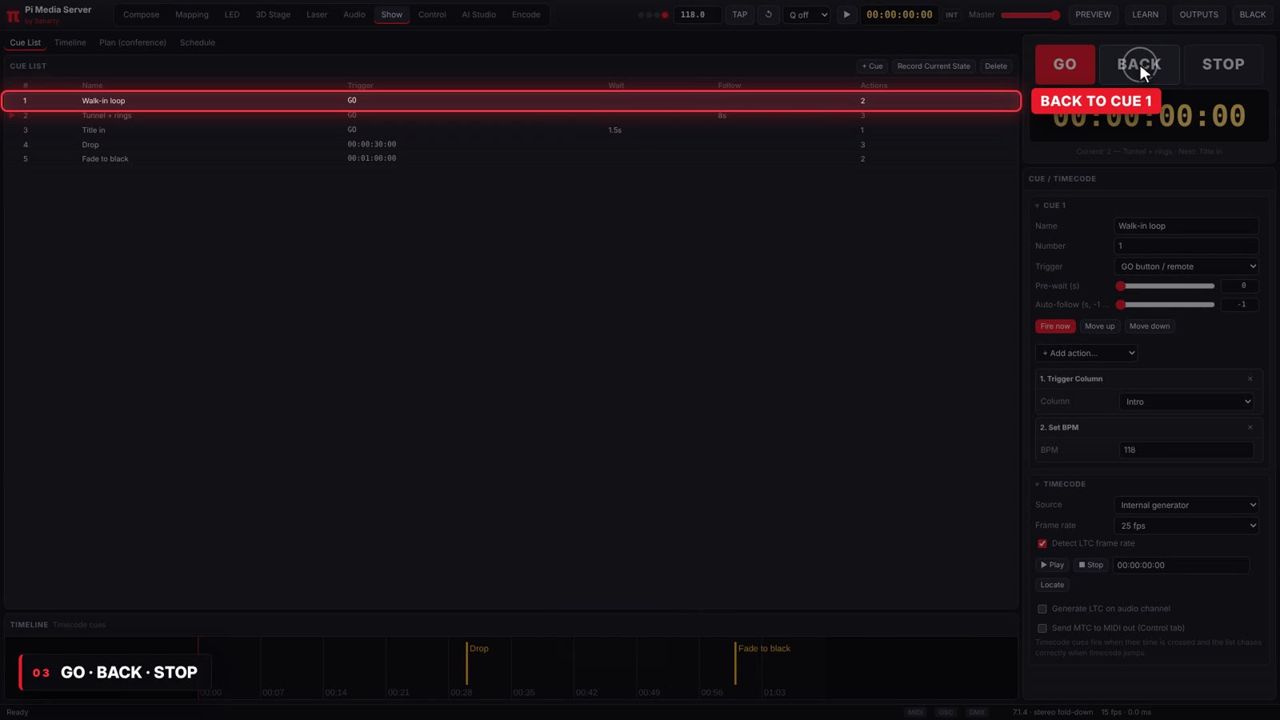
Timecode
Click the timecode display in the top bar to choose the Source:
| Source | Notes |
|---|---|
| Internal generator | Play / stop with ▶ or Shift+Space; ⏮ Zero and Locate |
| LTC (audio input) | Choose the LTC input and Input channel; Detect LTC frame rate |
| MTC (MIDI in) | From the MIDI input |
| Art-Net timecode | Received on UDP 6454 |
| OSC /pims/timecode | "hh:mm:ss:ff" strings |
Frame rate: 24, 25, 29.97 DF or 30 fps (default 25). Pi Media Server can also Generate LTC on audio channel and Send MTC to MIDI out.
Cues chase correctly when the timecode jumps.
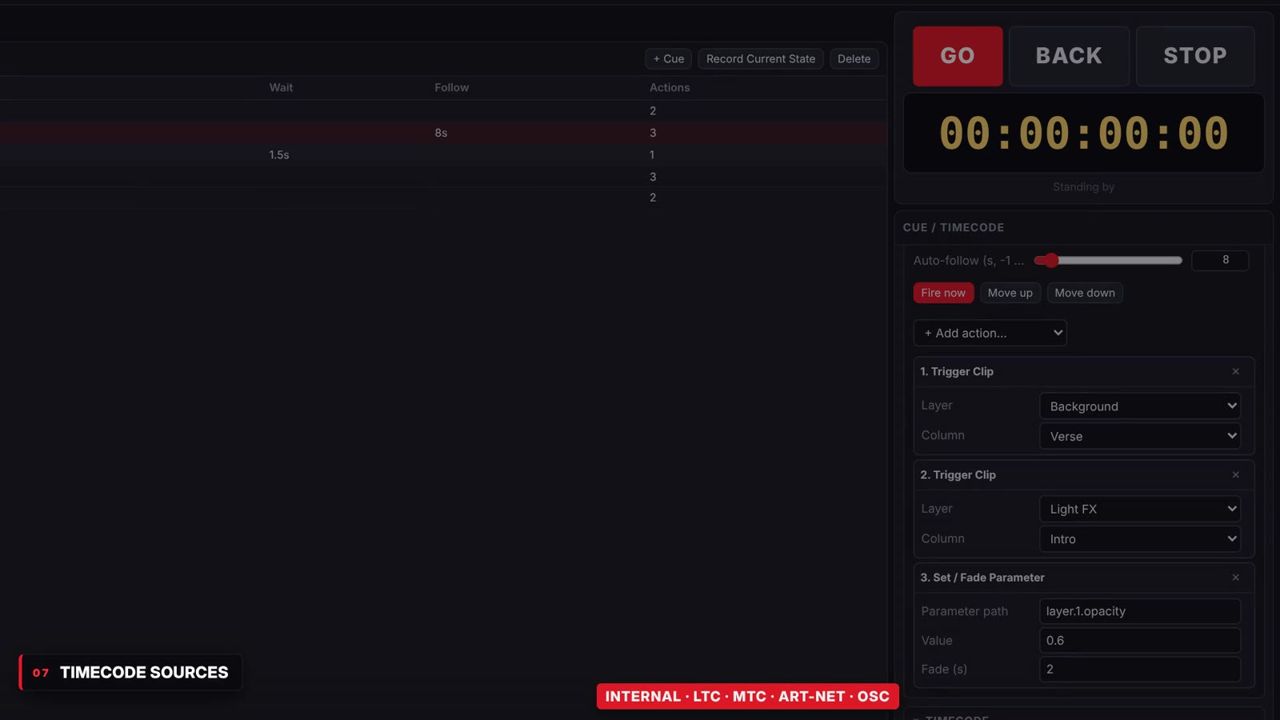
Clips on timecode
Right-click a clip and choose Timecode: Lock to Current TC, or open the clip's Timecode section:
| Control | Range / default |
|---|---|
| Start TC | hh:mm:ss:ff (Set to current) |
| Length override (s) | 0–3600, 0 = clip length |
| Offset (frames) | −500 to 500 |
| Free-wheel (s) | 0–10, default 1 |
| Hold frame when TC stops | On / off |
| Trigger when TC enters, Clear when TC leaves | On / off |
The clip triggers itself when the show timecode reaches its start. It chases frame-accurately (seeking on jumps and nudging the rate on drift), holds its frame when the timecode stops, free-wheels through dropouts and clears its layer at the end. Locked clips show a TC tag in the deck.
Timelines
Click + New on the Timeline tab. Add:
- + Clip track: frame-accurate clips (video positions locked to the timeline). Drag to move, drag the right edge to trim, right-click for Set exact start / length….
- + Parameter track: keyframes for any parameter path (for example
comp.opacity,layer.1.opacity,bpm; Learn mode shows paths). Click the lane to add a key; right-click for Ease: linear, smooth, in, out or hold. - + Cue track: fires cues from the Cue List.
Timeline options: Loop, Clear layer in gaps and Chase timecode from a start time.
Plan (conference mode)
Add sessions with + Session. Each row has Start, Title, Speaker, Min, L3 (lower third) and Timer (speaker countdown). Use current look captures the current deck state for that session. Choose the Lower-third layer and Speaker-timer layer, drag rows to reorder, and run the day with ◀ Prev, Next ▶ or GO on a row. Remote: OSC /pims/plan/next, TCP PLAN NEXT.
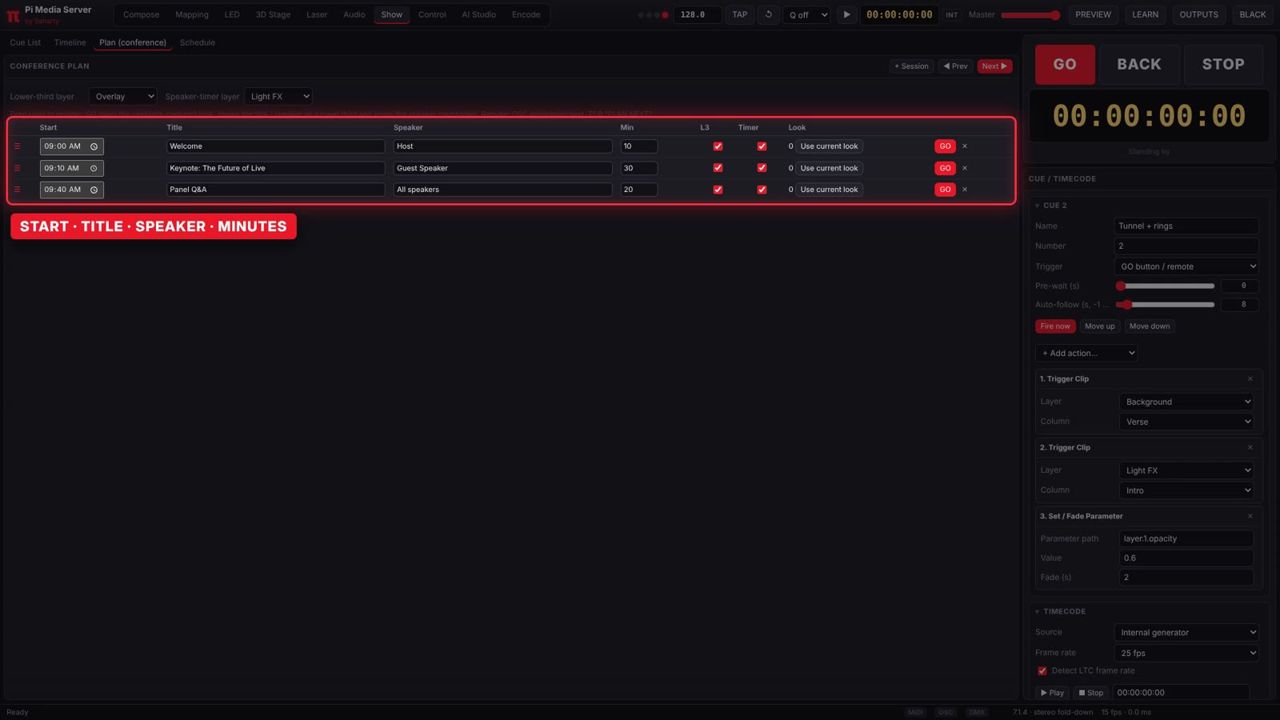
Schedule
+ Event runs an action at a set date and time (Once), Daily or Weekly on chosen weekdays. Actions: Cue GO (next), Fire cue #, Trigger column #, Play timeline, Stop timeline, Plan session #, Blackout, Open outputs, Close outputs and Clear all layers. Run now tests an event.
External monitors
Program → Monitors… opens monitor windows on any display (or windowed): multiview grids (2 side by side, 2 × 2, 1 big + 5, 2 big + 4, 3 × 3, 4 × 4) with Program, Preview, layers, outputs, laser outputs and a Clock / timecode tile, with red / green / orange tally borders (Labels and tally borders); or a Tabs view that switches full-window sources with tabs or keys 1–9.
Control
The Control workspace connects controllers, lighting desks, control systems, phones and other servers.
Learn mode
- Click LEARN in the top bar. Learnable controls are outlined in amber.
- Click a control (a fader, a clip, a column, a button).
- Move a MIDI fader, send an OSC message or change a DMX channel. The mapping is created and shown in Mappings.
- Press Esc or click LEARN again to exit.
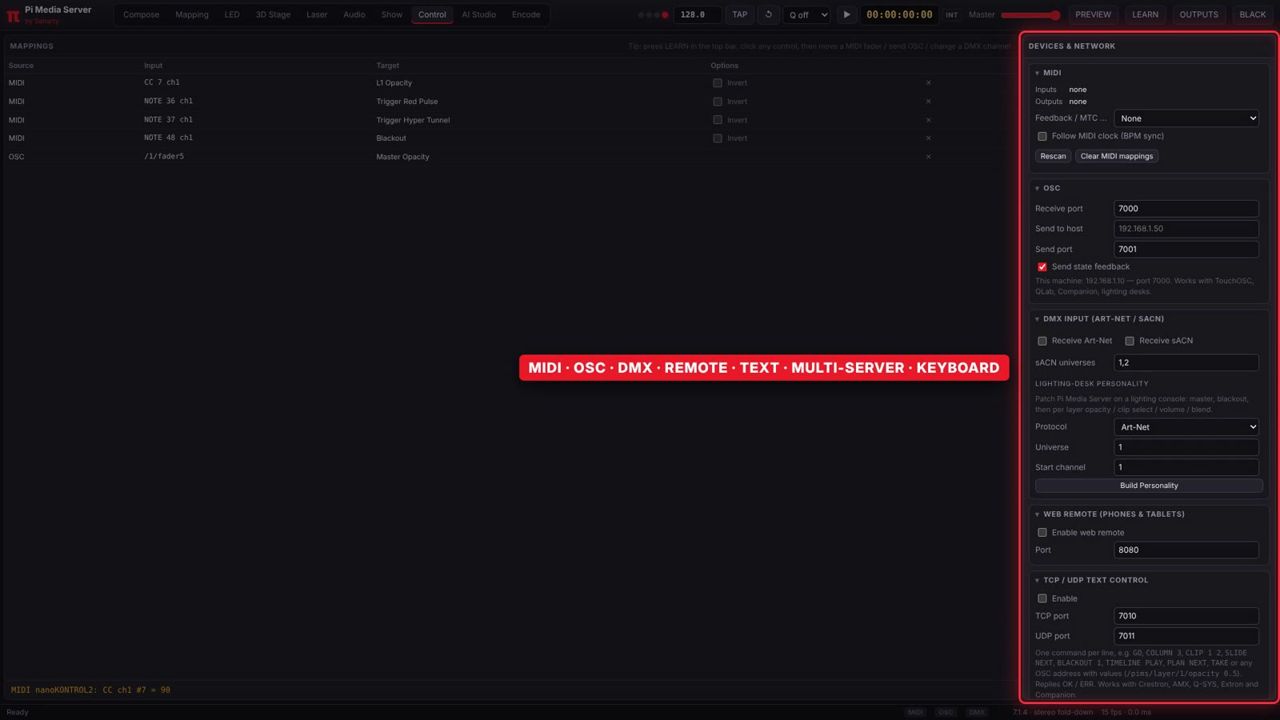
MIDI
- Choose the MIDI Input and Feedback / MTC out device.
- Notes, CC, pitch bend and program change can be learned.
- Follow MIDI clock (BPM sync) locks the tempo to an external clock.
- Feedback lights up pads mapped to clips: playing, filled and empty cells use different velocities.
- Clear MIDI mappings removes all MIDI mappings.
OSC
Receive port (default 7000), Send to host and Send port (default 7001) for feedback, with Send state feedback. The full address list is under Help → OSC Address Reference (see Remote control reference below).
DMX input
Turn on Receive Art-Net and/or Receive sACN (with sACN universes). Learn any control from a DMX channel, or build a Lighting-desk personality: set Universe, Start channel and Protocol, then click Build Personality. It maps the master and blackout, then four channels per layer (opacity, clip select, audio level and blend mode).
Web remote
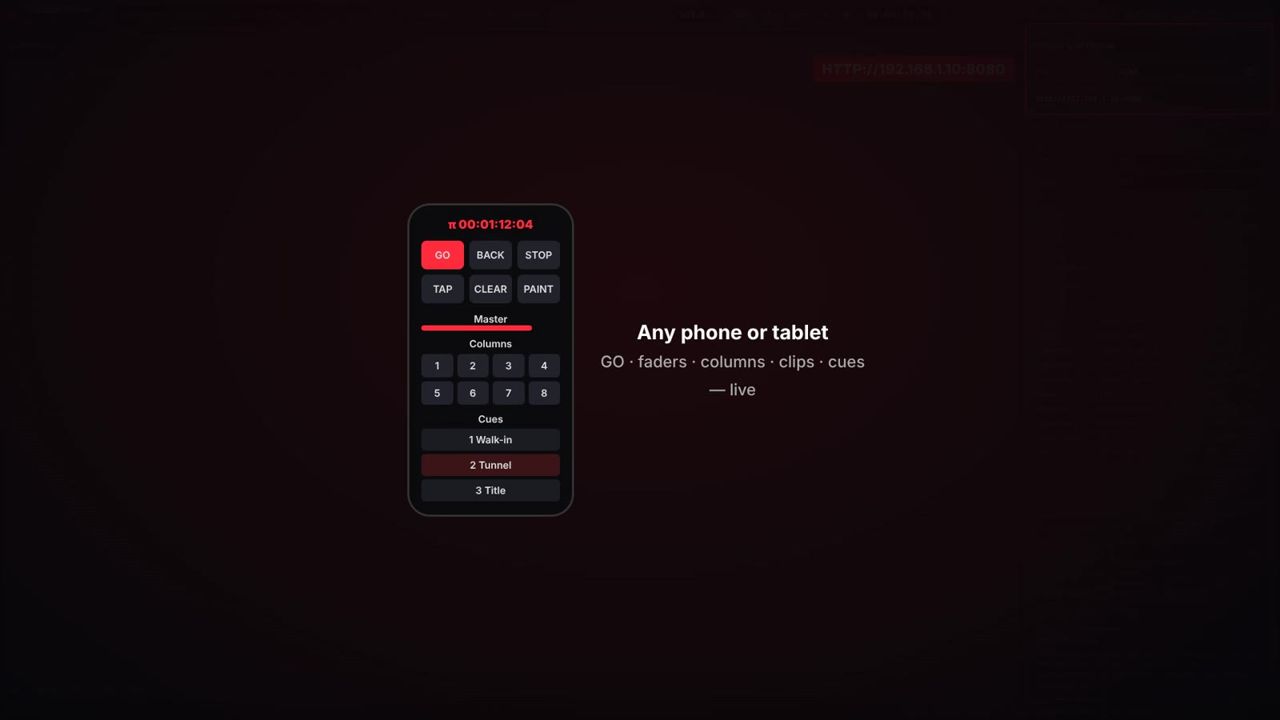
Turn on Enable web remote (default port 8080). Any phone or tablet on the network can open http://<ip>:8080 for GO / Back, column triggers, layer faders, master and tap. http://<ip>:8080/paint is a full-screen finger-painting pad for paint clips and painted masks. The same OSC addresses work over HTTP: GET /api/osc/pims/...?v=value.
TCP / UDP text control
Turn on text control (default TCP port 7010, UDP port 7011). Send one command per line; the server replies OK or ERR <reason>. Commands: GO, BACK, STOP, TAP, RESYNC, TAKE, BLACKOUT 1, COLUMN 3, CLIP 1 2 (layer, clip), CLEAR / CLEAR 2, OPACITY 1 0.5, MASTER 0.5, VOLUME 0.8, BPM 128, CUE 4, SLIDE NEXT / PREV / n, TIMELINE PLAY / STOP / PAUSE / n, PLAN NEXT / PREV / n, TIMER START, TEST 1, PROMPT text, or any OSC address with arguments. Works with Crestron, AMX, Q-SYS and Extron.
Stream Deck and Bitfocus Companion
The Stream Deck / Bitfocus Companion section lists suggested button commands for a Companion Generic TCP or Generic OSC connection. Pi Media Server sends feedback to Companion.
Multi-server
Turn on Enable multi-server and choose This server:
- Main — controls the show
- Backup — mirrors main, takes over automatically
- Render node — mirrors main for extra outputs
Settings: Show group name, Sync UDP port (default 7020), Peer IPs (blank = broadcast), Failover after (s) (default 1.5) and On failover send OSC (for example to a video switcher). The main sends triggers, levels, tempo, timecode, video positions, slides and timelines 10 times per second. The backup takes over when the main goes silent and returns to standby when it comes back. Push Show & Media to Peers sends the show file and every media file it uses; peers keep their own outputs and audio devices.
NDI and stream outputs
- + NDI Output: send the composition, any layer or any mapped output as NDI 6. NDI sources also appear as inputs in the browser.
- + Stream Output: RTMP (YouTube, Facebook, Twitch, vMix), SRT, or Browser (any device on the network), viewable at
http://<ip>:8091/view. Set the Source, Resolution, Frame rate and Video kbps. Streams are encoded with the bundled FFmpeg (H.264 + AAC); show audio is mixed to stereo.
AI Studio, encoding and performance
Offline AI looks
The offline AI engine needs no internet or API keys.
- Type a prompt (colours, moods, motion, energy, shapes, effects, quoted text), or click one of the Ideas.
- Choose the Target layer.
- Click ✨ Generate Look (Cmd/Ctrl+Enter). A live generative shader with a modulated effect chain lands on the layer.
Other buttons: 4 Variations (four looks in free cells), Generate Effect for Selection (an effect chain for the selected clip or layer) and Render to Video Clip (saves a WebM file, Video length (s) 2–120). From OSC: /pims/layer/{n}/prompt "text".
Auto-VJ
Turn on Let the AI perform (follows music energy & phrasing) in the Auto-VJ section and set Phrase (beats) (4–64). Auto-VJ triggers columns and gradually changes the looks with the music.
Cloud AI (your own keys)
Open AI Preferences… (or Preferences…) and enter keys for the providers you use: Google Gemini API, fal.ai, Runway, Luma, OpenAI, Black Forest Labs and Stability AI, or a custom HTTP endpoint. Keys are stored only on this computer; prompts go to the provider you choose and are billed to your account.
- Video: Google Veo 3.1 and Gemini Omni, Kling, Seedance, Hailuo, Wan, FLUX and Grok through fal.ai, Runway Gen-4.5 and Luma Ray 2, at 720p, 1080p or 4K (where supported), 4–15 s long. Convert finished clips to DXV3 for GPU playback is available.
- Images: Nano Banana, GPT Image 2, FLUX.2, Seedream, Stability AI and others.
Click 🎬 Generate Video (cloud) or 🖼 Generate Image (cloud). Jobs run in the background (video usually takes 1–5 minutes) and land in the deck.
Mode: Offline engine + cloud on demand, or Cloud only (online), where Generate Look renders photoreal video while the computer is online. Offline, the built-in engine always takes over.
Encode workspace
Convert media into show formats in batches.
- Drop files or folders, or click + Files… / + Folder….
- Choose the Format: DXV3 Normal Quality, DXV3 Normal Quality + Alpha, DXV3 High Quality, DXV3 High Quality + Alpha, HAP, HAP Alpha, HAP Q, HAP Q Alpha, H.264 (hardware encoder), H.265 / HEVC (hardware encoder), AV1 (hardware encoder) or WAV 24-bit (audio only, all channels).
- Set Resolution (keep, up to 12K or custom), Frame rate (keep, or 23.976–60), Quality (H.264 / H.265 / AV1: Standard, High (show playback), Maximum) or Encoder threads (DXV / HAP).
- Choose the delivery options: Keep audio (PCM in .mov, AAC in .mp4), Protect (encrypt): plays only in Pi Media Server (
.pimx), Replace the originals in the deck when done and Add finished files to the selected layer. - The queue shows progress, speed and time left. Stop all and Clear finished manage it.
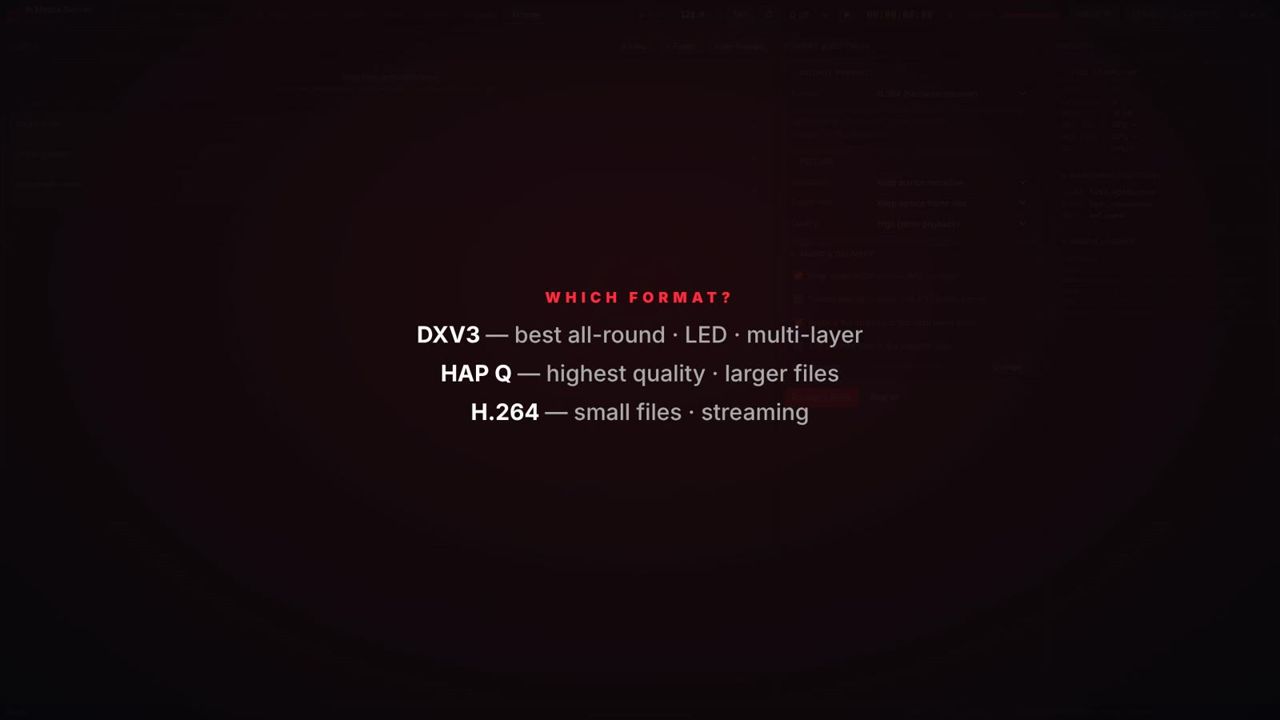
| Format | Best for |
|---|---|
| DXV3 | Best all-round choice: LED, multi-layer, frame-accurate, up to 12K |
| HAP Q | Highest image quality, larger files |
| H.264 / H.265 / AV1 | Small files and streaming; hardware decoding stops at about 4K (H.264) or 8K (H.265) |
GPU & Performance
Open it from Preferences → GPU & Performance… or by clicking the GPU name in the status bar. It shows the GPUs found, renderer, driver, GPU codecs (DXT1/3/5, BC4/BC5, BC6H/BC7), maximum texture size, float buffers, CPU and GPU frame time, late frames and estimated render memory, with tips.
| Setting | Options |
|---|---|
| Use the high-performance (discrete) GPU | On / off |
| Graphics API | Automatic, or a specific API for your system (Direct3D 11, Direct3D 11 on 12, Vulkan, Metal, OpenGL) |
| Sync | V-sync on — tear-free, locked to the display or V-sync off — lowest latency, may tear |
| GPU memory budget | Driver default, 4, 8, 12, 16 or 24 GB |
| Composition precision | Automatic (float up to 8K, 8-bit above), 16-bit float (best gradients), 8-bit (half the memory, fastest) |
| UI preview quality | Full, Half, Quarter |
| Render rate cap | Follow the output display, 120, 60, 50 or 30 |
| DXV / HAP decode threads | Automatic, or 2–16 |
Auto-tune measures the show and picks the fastest settings that keep the display's frame rate. Graphics API, GPU selection, V-sync and memory limit take effect after a restart.
Settings & preferences
Open Preferences… with Cmd+, (macOS, under the app menu) or Ctrl+, (Windows, File menu).
| Section | Settings |
|---|---|
| AI — cloud mode | When online, use only cloud AI |
| AI — provider keys | Keys for Google Gemini API, fal.ai, Runway, Luma, OpenAI, Black Forest Labs, Stability AI |
| AI — realistic video | Video provider, Video model, Resolution, Length, loops, auto-convert to DXV3 |
| AI — realistic images | Image provider, Image model, custom endpoint (URL, key, header, JSON body, result field) |
| AI — design model | Use an OpenAI model to design looks & effect chains, Design model |
| Performance | Prevent display sleep while outputs are open, GPU & Performance… |
Click Save to apply. Preferences and panel layouts are stored per computer; the show itself (deck, mapping, LED, 3D, laser, audio, cues and mappings) is stored in the .pims file.
Keyboard shortcuts / remote control
Keyboard shortcuts
| Key | Action |
|---|---|
| Space | Cue GO |
| Shift+Space | Play / stop internal timecode |
| 1 – 9 | Trigger column |
| T | Tap tempo |
| B / Cmd/Ctrl+B | Blackout |
| Cmd/Ctrl+T | Test pattern on all outputs |
| Cmd/Ctrl+Shift+O | Open all outputs |
| Cmd/Ctrl+Shift+W | Close all outputs |
| Cmd/Ctrl+N / O | New show / Open show |
| Cmd/Ctrl+S / Shift+S | Save / Save as |
| Cmd/Ctrl+I | Import media |
| Cmd/Ctrl+Z / Shift+Z | Undo / Redo |
| Delete | Remove selected clip |
| Alt-drag clip | Copy clip |
| Double-click slider | Reset to default |
| Right-click ~ button | Modulation settings |
| Esc | Exit learn mode; emergency stop in the Laser workspace |
| → / PageDown, ← / PageUp | Next / previous slide |
| Cmd/Ctrl+P | Preview mode |
| Cmd/Ctrl+Enter | TAKE (preview → live) |
| Cmd/Ctrl+Shift+P | Presenter View |
| Arrow keys (Mapping) | Nudge the selected point (Shift = fine) |
OSC address reference (default receive port 7000)
Layers and columns are numbered from 1.
| Address | Action |
|---|---|
/pims/layer/{n}/clip/{m}/connect |
Trigger clip m on layer n |
/pims/layer/{n}/clear |
Clear layer |
/pims/layer/{n}/opacity f · /volume f |
0–1 |
/pims/layer/{n}/bypass i · /solo i |
0 / 1 |
/pims/layer/{n}/blend i |
Blend mode index |
/pims/layer/{n}/select f |
0–1 selects a clip |
/pims/layer/{n}/prompt s |
AI-generate a look on layer n |
/pims/column/{m}/connect |
Trigger column |
/pims/composition/opacity f · /clear |
Master · clear all |
/pims/blackout i |
0 / 1 |
/pims/bpm f · /pims/tap · /pims/resync |
Tempo |
/pims/cue/go · /back · /stop · /pims/cue/{n}/go |
Cue list |
/pims/audio/master f |
Audio master |
/pims/timecode s |
"hh:mm:ss:ff" when the source is OSC |
/pims/slides/next · /prev · /goto n |
Presentations |
/pims/take · /pims/preview i |
TAKE · preview mode |
/pims/timeline/play · /pause · /stop · /seek f · /{n}/play |
Timeline |
/pims/plan/next · /prev · /{n}/go |
Conference plan |
/pims/timer/start · /stop · /reset · /toggle |
Timer and countdown clips |
/pims/param s f |
Any parameter path, normalised value |
/pims/output/test i |
Test pattern |
/pims/ledproc/{n|all}/brightness f · /blackout i · /freeze i · /test s · /preset s · /cct f |
LED processors |
/pims/paint/clear · /color s · /size f · /brush s |
Finger Paint |
/pims/laser/go "name"|n · /stop · /arm 0|1 · /blackout 0|1 · /master f |
Lasers (arming only when allowed) |
Feedback: /pims/layer/{n}/clip/{m}/connected i |
Sent to the OSC output host |
Network ports
| Service | Default |
|---|---|
| OSC in / feedback out | 7000 / 7001 |
| Web remote | 8080 |
| Browser stream output | 8091 |
| TCP / UDP text control | 7010 / 7011 |
| Multi-server sync | 7020 |
| Art-Net (and Art-Net timecode) | UDP 6454 |
| RTMP listen input | 1935 |
Tips for live/studio use
- Play DXV3 or HAP for heavy shows. They decode on the GPU, frame-accurately, with instant cueing and smooth reverse. Use Encode to DXV3 / HAP… from a clip's right-click menu or the Encode workspace. ProRes and other formats the GPU can't decode are not played directly: convert them first.
- Match the composition to the wall. On LED shows, use Composition = native raster in the Smart LED Calculator so every pixel maps 1:1.
- Rehearse in PREVIEW. Build the next look privately, then press TAKE on the musical change.
- Use quantise for clean drops. Q bar makes column triggers land exactly on the next bar.
- Lock critical cues to timecode. Clips, timelines and laser cues chase LTC, MTC or Art-Net timecode, hold on stop and free-wheel through short dropouts (Free-wheel (s)).
- Keep a backup server. With multi-server sync, a backup takes over automatically after Failover after (s) and can switch your video switcher with On failover send OSC.
- Leave headroom. Use Auto-tune in GPU & Performance during rehearsal, and set displays to their native refresh rate.
- Large ADM masters are loaded into memory. Masters over about 30 minutes with 100+ tracks need plenty of free RAM.
- Lasers: stay disarmed until the show and keep a hardware e-stop within reach.
- Use NDI to share video with other apps such as Resolume, TouchDesigner, OBS and vMix.
- Save often (Cmd/Ctrl+S). Saving is available once the app is activated.
Troubleshooting
| Symptom | Cause | Fix |
|---|---|---|
| Only the licence window appears at launch | No activation and no running trial | Activate your key, start the trial, or use offline activation |
| "Saving shows is not available in the free trial" | Trial mode | Activate a licence to save shows |
| Pictures show a watermark | Free trial | Activate a licence; the watermark disappears |
| Banner with a countdown | Licence moved, trial ending or deactivated | Everything works during the 24-hour notice; reactivate or move the licence back |
| "The licence system is not available" | The licence helper is missing or damaged | Reinstall Pi Media Server |
| "This licence is active on another computer" | Machine limit | Click Move it here, or deactivate the other computer |
| Output does not appear on the projector | Output not opened or wrong display | Choose the Display in Mapping and click Open Output (or OUTPUTS) |
| "This GPU supports textures up to … px" | Composition larger than the GPU allows | Use a smaller composition, split across outputs, or use a GPU with 16384 px textures |
| Video stutters with several layers | Codec not GPU-decoded, or beyond the hardware decoder's size | Convert to DXV3 or HAP in Encode; run Auto-tune |
| ProRes file does not play | Format the GPU can't decode | Convert it in the Encode workspace |
| LED fixtures stay dark | LED output off, wrong IP or universe | Turn on Send pixel data, check Destination IP, run Auto Patch, watch the DMX Monitor |
| LED processor not found | Different subnet or blocked port | Add it by hand with its IP; check the network and firewall |
| Tessera layout not sent | Tessera IP control has no layout commands | Use Cabinet CSV / Layout JSON / PNG exports |
| No laser output | Not armed, or no DAC configured | Configure a projector, then click ARM |
| Laser cannot be armed remotely | Remote arming is off | Turn on Allow arming the lasers remotely on the Safety tab |
| Only 2 channels of a 7.1.4 layout play | Device has fewer channels than the layout | Choose a multichannel interface, or Binaural headphones |
| Clips do not follow timecode | Wrong source or frame rate | Check the timecode Source and Frame rate; turn on Detect LTC frame rate |
| Phones cannot open the web remote | Remote off or different network | Turn on Enable web remote and use the computer's IP on the same network |
| Cloud AI job fails | Missing or invalid key, or offline | Check the key in Preferences; offline, use the built-in engine |
| macOS blocks the first launch | Gatekeeper | Right-click the app, choose Open, then Open again |
| Windows SmartScreen warning | New publisher check | Click More info → Run anyway |
Specifications & system requirements
Specifications
| Item | Specification |
|---|---|
| Version | 1.4.4 |
| Composition | Custom resolutions up to 12K (15360 × 2160 preset); Preview and Program monitors |
| Rendering | GPU-accelerated, 16-bit float pipeline (8-bit automatically above 8K) |
| Video playback | DXV3 and HAP / HAP Alpha / HAP Q / HAP Q Alpha decoded on the GPU; H.264, H.265, VP9 and AV1 hardware decoding |
| Mapping | Unlimited outputs, corner pin and mesh warp up to 16 × 16, edge blending with auto blend and array wizard, polygon and painted masks |
| LED | Art-Net, sACN and DDP pixel output; flat and curved wall designer; NovaStar COEX, Megapixel HELIOS and Brompton Tessera control; custom command templates |
| 3D stage | OBJ, glTF and GLB models; build to scale; projector and lens catalogue; point-pair auto calibration |
| Laser | Ether Dream, LaserCube and IDN output; ILDA formats 0, 1, 2, 4, 5; OSC, MIDI and DMX to external laser software |
| Audio | Layouts up to 9.1.6; ADM BWF / BW64 / RF64 object-based masters; binaural monitoring; stereo fold-down |
| Control | MIDI, OSC, DMX (Art-Net / sACN in), SMPTE (LTC, MTC, Art-Net, OSC), TCP / UDP text, web remote, Stream Deck / Companion |
| Network video | NDI 6 in and out (runtime included); RTMP / SRT / browser stream outputs; network stream inputs |
| Multi-server | Main, backup and render nodes with automatic failover |
| Show file | .pims |
System requirements
macOS
| Minimum | Recommended | |
|---|---|---|
| OS | macOS 12 Monterey | Latest macOS |
| Processor | Apple silicon or Intel (native builds for both) | Apple M2 Pro or later |
| Memory | 8 GB | 16 GB or more |
| Disk | 1 GB + media | 1 GB + media |
| Graphics | Integrated GPU, 1080p output | Dedicated GPU, multiple outputs; 16384 px textures for 12K |
| Network | — | Gigabit for NDI, LED pixel output and multi-server |
Windows
| Minimum | Recommended | |
|---|---|---|
| OS | Windows 10 64-bit | Windows 11 64-bit |
| Processor | Intel Core i5 / AMD Ryzen 5, 4 cores | Intel Core i7 / AMD Ryzen 7, 8 cores |
| Memory | 8 GB | 16 GB or more |
| Disk | 1 GB + media | 1 GB + media |
| Graphics | DirectX 12 GPU, 1080p output | Dedicated GPU (NVIDIA / AMD), multiple outputs; 16384 px textures for 12K |
| Network | — | Gigabit for NDI, LED pixel output and multi-server |
Linux is not supported.
Compatibility notes
- Spout and Syphon are not included yet: use NDI.
- Helios USB laser DACs are not driven directly yet. DACs with closed protocols are controlled through their own laser software over OSC, MIDI, DMX and timecode.
- Brompton Tessera's IP control cannot change panel layout.
NDI® is a registered trademark of Vizrt NDI AB. All other product, codec and brand names belong to their owners and are used only to describe compatibility; Pi Media Server is not affiliated with or endorsed by them.
Support
- Email: support@pi-ware.com
- Website: www.pi-ware.com (downloads, free updates, your account and licences)
- Tutorials: the 12-part Pi Media Server tutorial series on youtube.com/@pibysaharty
- In the app: Help → Keyboard Shortcuts, Help → OSC Address Reference, Help → Licence Agreement… and Help → Open-Source Licences…
When you contact support, include the version and GPU shown in About Pi Media Server, your operating system and the steps that lead to the problem.
© 2026 Pi by Saharty. All rights reserved.