Pi Live
Welcome
Pi Live by Saharty is a dedicated plug-in host for live sound. It runs your VST3 and Audio Unit plug-ins on the multichannel audio coming from your digital console (over Dante, MADI, USB, AVB or any interface with a Core Audio or ASIO driver) and sends the processed audio straight back. You can process everything on the computer in front of you, or move heavy racks to one or more Pi Live Server computers on the network, while you keep editing every plug-in from front-of-house.

Pi Live is built for front-of-house, monitor and system engineers who want studio plug-ins on a live console without giving up stability. Racks are never delayed unless you ask, crashing plug-ins are caught while the show goes on, scenes follow your setlist, console, MIDI, OSC or timecode, and a second computer can take over by itself.
What's in version 1.0.0
Version 1.0.0 is the first release of Pi Live, with every feature described in this manual.
Both installers contain two applications: Pi Live (the host you mix from) and Pi Live Server (the remote-processing application for a second Mac or Windows computer).
Quick start
- Install Pi Live from the macOS
.dmgor the Windows Setup.exe(see Installation). - Launch Pi Live. The licence window opens by itself: enter your licence key and click Activate, or click Start 15-day free trial.
- Click SETTINGS (top right) and open the Audio tab. Choose your interface or console driver (Dante Virtual Soundcard, MADI card, USB console, ASIO...), set the sample rate and buffer size, then click ENABLE ALL CHANNELS.
- Open the Plug-ins tab and click SCAN FOR NEW PLUG-INS. Pi Live finds your VST3 and Audio Unit plug-ins.
- Back in the main window, click + ADD RACK (or use Racks > Add Mono Rack, Add Stereo Rack and so on).
- Click the rack's routing button (it shows the rack type and its routing) and choose its INPUTS and OUTPUTS.
- Click an empty slot (+) on the rack and choose a plug-in. Click the plug-in to open its window.
- In the SCENES tab on the right, click + NEW to store your first scene.
- Save your session with File > Save (Cmd+S on Mac, Ctrl+S on Windows).
Tip: Press F1 at any time for the built-in Quick Guide.
Installation
macOS
- Open the
PiLive-<version>-macOS.dmgdisk image. - Drag Pi Live onto the Applications folder. If you want to use the computer as a processing server, or you plan to set up a second computer as a server, drag Pi Live Server too.
- Eject the disk image.
The macOS build is Universal: it runs natively on Apple silicon and on Intel Macs, from macOS 11 Big Sur onward.
First launch on a Mac. If macOS says the app "can't be opened" or "is from an unidentified developer", open System Settings > Privacy & Security, scroll down and click Open Anyway. On older macOS versions, right-click the app and choose Open. You only need to do this once.
On first launch the Mac apps show the End User Licence Agreement; you accept it once (and again only when the agreement changes).
Windows
- Run
PiLive-<version>-Windows-Setup.exe. - Read and accept the licence agreement, then follow the steps.
- The installer adds both Pi Live and Pi Live Server.
Pi Live for Windows is a 64-bit application for Windows 10 and Windows 11. If Windows SmartScreen shows a warning, click More info, then Run anyway.
What gets installed
Pi Live is a standalone application, not a plug-in: it adds nothing to your plug-in folders and needs no extra runtimes. Sessions are saved in Documents/Pi Live/ by default and recordings in Documents/Pi Live/Recordings. The licence file is ~/Library/Application Support/Pi by Saharty/Licences/pi-live.pilic on macOS and %APPDATA%\Pi by Saharty\Licences\pi-live.pilic on Windows.
First launch
When Pi Live starts for the first time on a computer with no licence, the licence window opens by itself. After you activate (or start the trial), open SETTINGS > Audio to choose your audio device, then SETTINGS > Plug-ins to scan your plug-ins.
When Pi Live Server starts for the first time it asks Scan plug-ins? so it knows which plug-ins are installed on that computer. Click Scan.
Activation & licensing
Only the Pi Live host needs a licence. Pi Live Server has no licence check of its own: it only processes racks sent by a Pi Live host, so you can install it on as many processing computers as you need.
Buying and receiving your key
Buy Pi Live at pi-ware.com/products/pi-live. Your licence key arrives by email after purchase. It looks like XXXXX-XXXXX-XXXXX-XXXXX. Your purchase includes free updates.
Opening the licence window
- The licence window opens by itself at launch on a computer with no licence.
- Later, choose Help > Licence... or click the licence banner at the top of the main window.
The window shows the current status (for example "Activated to ... Every feature is on.") and the name of this computer.
Online activation
- Paste your key into the Licence key field.
- Click Activate.
If the licence is already active on another computer, Pi Live asks whether to Move it here. The other computer gets a 24-hour notice before it switches to limited features. The dialog also shows how many moves you have left this year.
Free trial
Click Start 15-day free trial. No payment details are needed, and every feature works during the trial. The licence status line shows the time left, and Pi Live warns you as the end of the trial approaches.
Offline activation
Use this when the show computer has no internet connection.
- Enter your licence key in the Licence key field.
- Click Offline activation. Pi Live shows a request code. Click Copy code.
- On any device with internet access, go to pi-ware.com/activate and paste the request code.
- Download the licence file the site gives you and copy it to the show computer.
- Click Load licence file... and choose the file.
Moving your licence to a new computer
One licence activates one computer. To change computers:
- click Deactivate this computer in Help > Licence... on the old computer, then activate the new one;
- or activate on the new computer and choose Move it here;
- or deactivate / reset computers from your account at pi-ware.com/account.
How Pi Live checks the licence
- Pi Live checks the licence whenever it finds an internet connection: at launch, then every hour (every 2 minutes while offline). It keeps working offline with no time limit.
- The 24-hour rule. Nothing is ever limited without at least 24 hours of notice on that computer, whatever the reason (licence moved, trial ended, deactivated from your account). During the notice every feature works and the banner shows the countdown.
- A running show is never cut. Once the live engine has started it keeps running until you quit Pi Live, even if the licence changes during the show. Audio device changes and driver resets do not stop it either. Any limit applies the next time Pi Live starts.
Limited mode
Without a licence (or after the notice period), Pi Live opens in limited mode:
- You can open, edit and save sessions: racks, plug-ins, routing and scenes.
- The live engine does not start: nothing is processed and every output stays silent. Inputs are still metered.
- The top bar shows LIVE ENGINE NOT STARTED.
As soon as you activate Pi Live or start the trial, the engine starts and the outputs fade in.
Interface tour
The main window has four areas: the top bar, the rack area, the side panel (SCENES, RECORDER, LATENCY) and the status bar at the bottom.
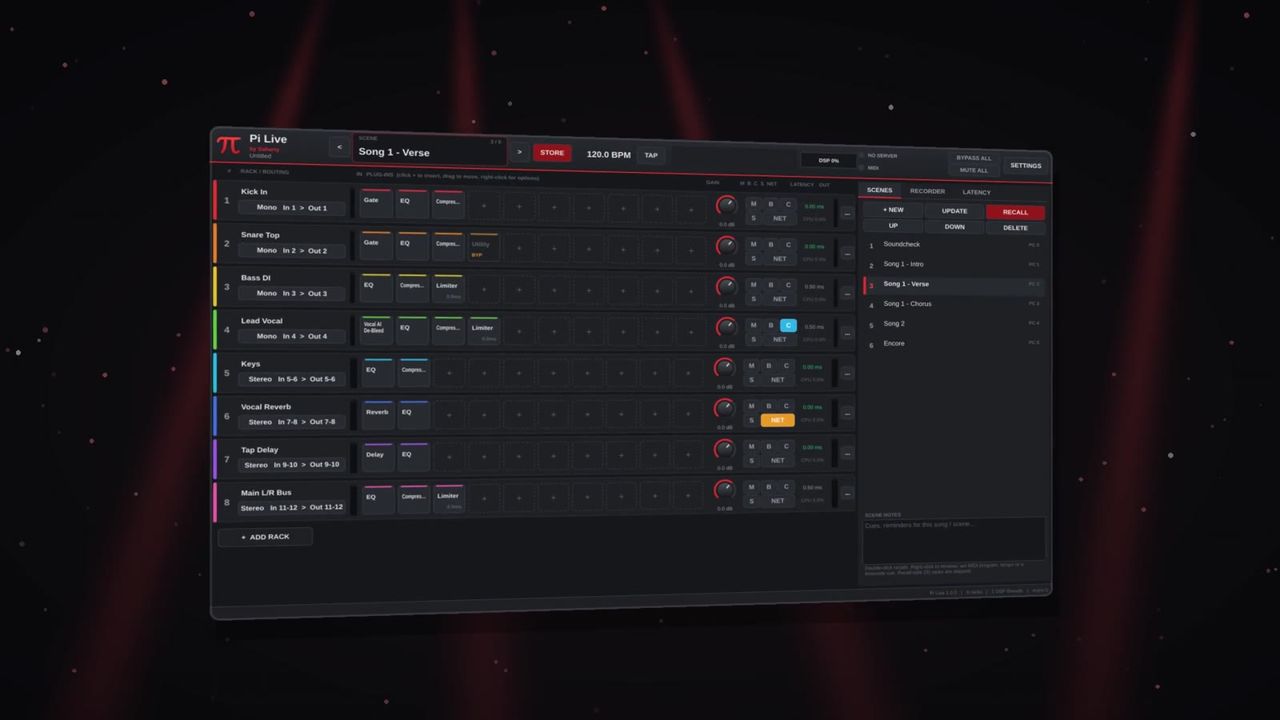
Top bar
| Control | What it does | Range / default |
|---|---|---|
| < / > | Recall the previous / next scene | Left arrow, Page Up / Right arrow, Space, Page Down |
| SCENE box | Name of the current scene and its position ("3 / 12"). A "*" means the scene has changed since it was recalled | — |
| STORE | Menu: Update " |
— |
| BPM display | Tempo sent to plug-ins (tempo-synced delays). Double-click to type a value. Shows the running timecode when timecode is received | 20 BPM and up |
| TAP | Tap tempo | T key, MIDI or OSC |
| DSP meter | Current and peak audio processing load | 0–100 % |
| Server LED / label | NO SERVER, SERVER |
— |
| BYPASS ALL | Bypasses every rack (latency is kept, so timing does not jump) | Off |
| MUTE ALL | Mutes all outputs | Off |
| SETTINGS | Opens the Pi Live Settings window | — |
Next to the tempo, the audio info area shows the device, sample rate, buffer, channel count and total latency in ms, or a state such as LIVE ENGINE NOT STARTED, BACKUP HOST - STANDBY or No audio device.
Rack area
The header of the rack area shows how many racks you have and the column titles: RACK / ROUTING, IN, PLUG-INS, GAIN, M B C S NET, LATENCY and OUT. The HORIZONTAL and VERTICAL buttons (under RACK LAYOUT) switch between one row per rack (plug-ins from left to right) and one column per rack (plug-ins from top to bottom, like a mixer).
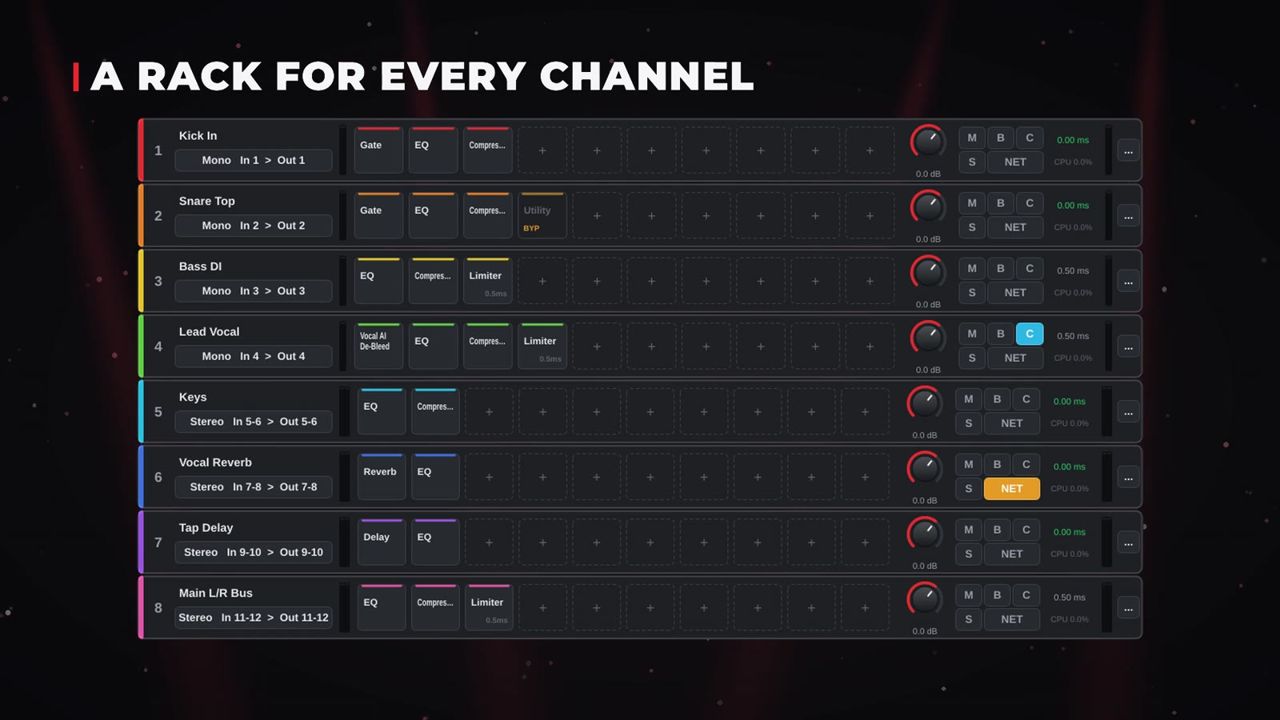
Each rack strip contains:
| Control | What it does | Range / default |
|---|---|---|
| Routing button | Shows the rack type and routing; click to open the routing panel (channels, inputs, outputs, sidechain key, alignment delay) | — |
| Plug-in slots | 10 slots. Click + to insert, click a plug-in to open it, right-click for options, drag to reorder | 10 per rack |
| GAIN knob | Rack output gain. Double-click resets to 0 dB | −60 to +12 dB, default 0 dB |
| M | Mute | Off |
| B | Bypass the whole rack (latency is kept) | Off |
| C | Cue: listen to this rack on the cue outputs | Off |
| S | Recall safe: scenes won't change this rack | Off |
| NET | Process this rack on a Pi Live Server (shows NET2, NET3... for other servers, + when a backup server is set, SAFE when the crash guard is on) | Off |
| Latency | Total rack latency (plug-ins + alignment + network) in ms | — |
| CPU | Share of the audio buffer time this rack's plug-ins use on this computer | — |
| ... | Rack menu (see below) | — |
The NET chip is green while the rack is processed on the server, and amber when you have asked for the server but the rack is still running locally (for example while the server connects).
A slot can show special states: NOT LOADED (the plug-in is missing on this computer; right-click to try again or remove it), CRASHED - OFF (the plug-in crashed and was switched off; its input passes through), BYP (bypassed) and SC (sidechain on).
Status bar
The status bar shows messages and, on the right, the version, number of racks, DSP threads and the xruns counter (audio dropouts since launch).
Connecting your console and audio interface
Pi Live works with any multichannel interface that has a Core Audio (macOS) or ASIO, WASAPI or DirectSound (Windows) driver. Dante Virtual Soundcard and Dante cards, MADI cards, USB consoles and AVB all appear as ordinary audio devices. Pi Live addresses up to 512 inputs and 512 outputs.
How to set up your audio device
- Click SETTINGS and open the Audio tab.
- Choose the device type (on Windows, choose ASIO for the lowest latency) and the device.
- Choose the sample rate and the buffer size. Smaller buffers give lower latency but use more CPU.
- Click ENABLE ALL CHANNELS. Pi Live confirms how many inputs and outputs are enabled.

Working with racks
A rack is a chain of up to 10 plug-ins processing one source or a group of channels. You can have up to 256 racks.
Rack types
| Type | Channels | Typical use |
|---|---|---|
| Mono | 1 in, 1 out | Vocal mics, kick, bass DI |
| Mono > Stereo | 1 in, 2 out | Mono source into stereo effects (reverb, delay, stereo widening) |
| Stereo | 2 in, 2 out | Keys, playback, stereo buses, master |
| 4 / 6 / 8 / 12 / 16 Channels | 4–16 in and out | Drum groups, multitrack stems, surround buses |
How to add racks
- One rack: click + ADD RACK, or use Racks > Add Mono Rack (Cmd/Ctrl+1), Add Stereo Rack (Cmd/Ctrl+2), Add Mono > Stereo Rack (Cmd/Ctrl+3) or Add 8-Channel Rack (Cmd/Ctrl+4).
- Many racks at once: click + ADD SEVERAL... or choose Racks > Add Several Racks... (Cmd/Ctrl+Shift+R). Enter How many (1–64), the Channels type and a Name, then click ADD RACKS. The racks are numbered ("Vocal 1", "Vocal 2"...) and take the next free inputs one after another.
- From a preset: use Load rack preset... in the add menu, or drag a
.pirackfile onto the window.
The rack menu
Click ... on a rack to open its menu: Rename..., Colour (10 rack colours), Channels (change the rack type), Routing..., Notes..., Process on Pi Live Server (same as NET), Crash guard (plug-ins in a protected process), Server (1–4), Backup server (runs in parallel), MIDI Learn (Gain, Mute, Bypass, Cue), Duplicate rack, Save rack preset... (.pirack), Clear all plug-ins, Move up / Move down and Delete rack.
How to route a rack
Click the rack's routing button to open the routing panel.
- CHANNELS: the rack type.
- INPUTS: one source per rack channel, chosen from Device inputs or Internal buses.
- OUTPUTS: for every rack channel, any number of device outputs or internal buses. Clear removes all output routes for a channel.
- SIDECHAIN KEY INPUT: the source for plug-ins with a sidechain input (tick Stereo key for a stereo key).
- ALIGNMENT DELAY: a manual delay for time alignment, 0 to 500 ms.
Pi Live has 64 internal mono buses. Use them to build sends: for example, route several vocal racks' outputs to buses 1–2 and feed a stereo reverb rack from buses 1–2.
Using plug-ins
How to scan your plug-ins
- Open SETTINGS > Plug-ins (or Options > Plug-in Manager...).
- Click SCAN FOR NEW PLUG-INS.
Scanning runs in a separate process, so a plug-in that crashes during the scan cannot take Pi Live down. The list shows each plug-in's Name, Manufacturer, Format, Category, Version and Safety test result.
RESCAN ALL forgets the list and scans everything again (racks keep their plug-ins). CLEAR BLACKLIST retries failed plug-ins on the next scan, and UNBLOCK lets a blocked plug-in be tested again the next time it loads. Use ADD FOLDER... and SAVE FOLDERS (under SEARCH FOLDERS) for plug-ins in custom locations.

Plug-in safety test
Pi Live tests every new plug-in once, in a separate process, before it loads it. While this runs you see "Testing a new plug-in" (or "Testing new plug-ins (n of m)"). A plug-in that crashes during the test is blocked and can't take Pi Live down. Audio keeps running during the test.
How to insert a plug-in
- Click an empty slot (+) on a rack.
- Type in the search field ("Search plug-ins (name, maker, category)") to filter the list.
- Press Enter or double-click a plug-in to insert it.
Pi Live's own processors appear alongside your plug-ins.
Mono and stereo plug-ins on wider racks. If a plug-in only supports mono or stereo and you insert it on a wider rack, Pi Live runs linked copies of it, one per channel or per pair (for example "4x Stereo" on an 8-channel rack). You adjust one editor and all copies follow.
The plug-in window
Click a plug-in in a slot to open its window. The bar at the top contains:
| Control | What it does |
|---|---|
| BYPASS | Bypass this plug-in (shows BYPASSED when on) |
| EDITOR | Show the plug-in's own editor |
| KNOBS | Show Pi Live's knob view: a knob for every parameter |
| MIDI LEARN | Touch a control in the plug-in, click MIDI LEARN, then move a knob or fader on your MIDI controller |
| Presets | The plug-in's own factory programs |
| ON SERVER | Open this plug-in's window on the Pi Live Server computer (remote racks) |
The window title also shows the plug-in's latency and "on server" when the rack runs remotely. Racks > Close All Plug-in Windows (Cmd/Ctrl+Shift+W) closes every plug-in window.
Slot right-click menu
Right-click a plug-in for Open editor, Open knob view, Bypass, Replace..., Remove, Sidechain from rack key input (feed the plug-in's sidechain from the rack's key input), MIDI Learn bypass, Copy settings / Paste settings, Save preset file... / Load preset file... (.pipreset), Move left / Move right and, on remote racks, Open editor on server. On an empty slot the menu offers Insert plug-in..., Paste and Load preset file....
Pi's built-in processors
Pi Live's own processors run on every rack and every Pi Live Server with no installation or authorization. Most are zero latency.
Pi EQ (EQ)
A 6-band parametric EQ with high- and low-pass filters.
| Control | Range | Default |
|---|---|---|
| HPF On / HPF Freq / HPF Slope | On/Off, 20–1000 Hz, 12 or 24 dB/oct | On, 80 Hz, 12 dB |
| Low Gain / Low Freq (shelf) | −18 to +18 dB, 30–1000 Hz | 0 dB, 120 Hz |
| Low Mid, Mid, High Mid Gain / Freq / Q | −18 to +18 dB, 40 Hz–16 kHz, Q 0.1–10 | 0 dB; 350 Hz, 1.5 kHz, 4.5 kHz; Q 1.0 |
| High Gain / High Freq (shelf) | −18 to +18 dB, 1–20 kHz | 0 dB, 8 kHz |
| LPF On / LPF Freq | On/Off, 1–20 kHz | Off, 18 kHz |
| Output | −18 to +18 dB | 0 dB |
Pi Compressor (Dynamics)
A soft-knee compressor with a sidechain key filter.
| Control | Range | Default |
|---|---|---|
| Threshold | −60 to 0 dB | −18 dB |
| Ratio | 1:1 to 20:1 | 4:1 |
| Attack | 0.1–100 ms | 10 ms |
| Release | 5–2000 ms | 120 ms |
| Knee | 0–18 dB | 6 dB |
| Makeup | −12 to +24 dB | 0 dB |
| Mix | 0–100 % | 100 % |
| Key HPF | 20–500 Hz | 20 Hz |
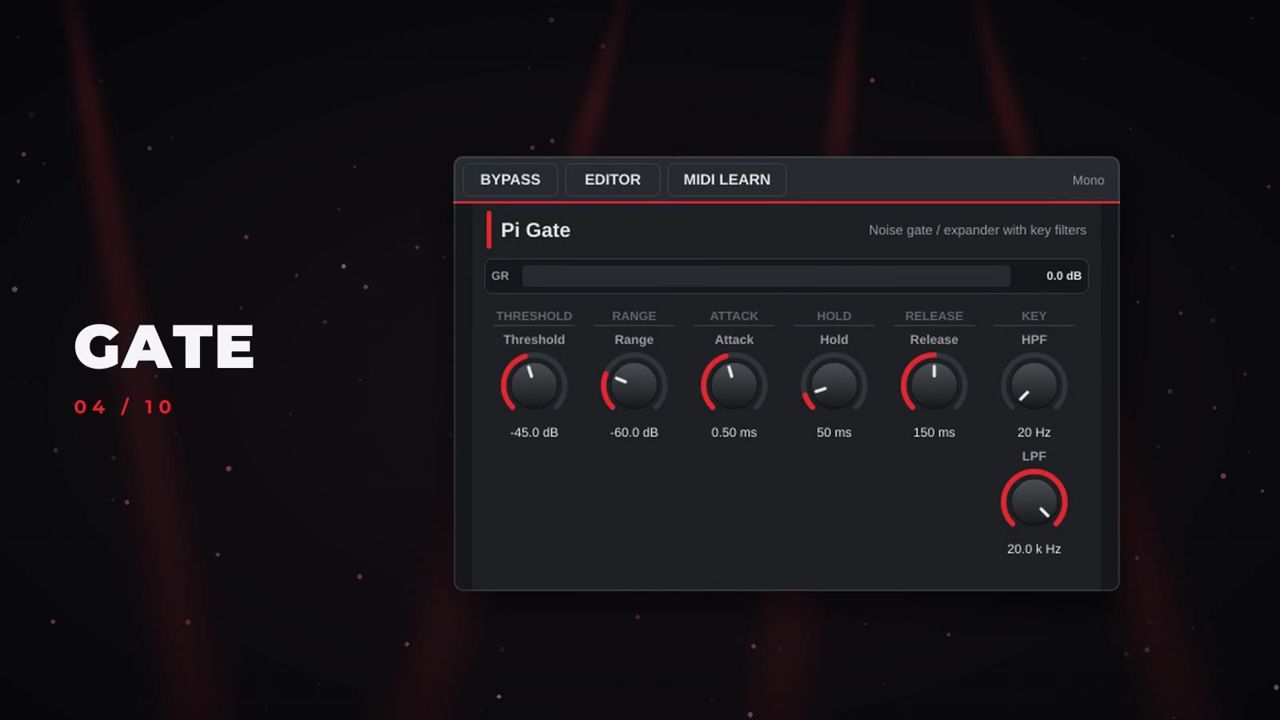
Pi Gate (Dynamics)
A noise gate / expander with key filters.
| Control | Range | Default |
|---|---|---|
| Threshold | −80 to 0 dB | −45 dB |
| Range | −80 to 0 dB | −60 dB |
| Attack | 0.01–50 ms | 0.5 ms |
| Hold | 0–500 ms | 50 ms |
| Release | 5–2000 ms | 150 ms |
| Key HPF / Key LPF | 20–2000 Hz / 1–20 kHz | 20 Hz / 20 kHz |
Pi Limiter (Dynamics)
A look-ahead brick-wall limiter.
| Control | Range | Default |
|---|---|---|
| Input Gain | 0–24 dB | 0 dB |
| Ceiling | −20 to 0 dB | −0.3 dB |
| Release | 1–1000 ms | 60 ms |
| Look-ahead | Off (0 ms), 0.25, 0.5, 1, 1.5, 3 ms | 0.5 ms |
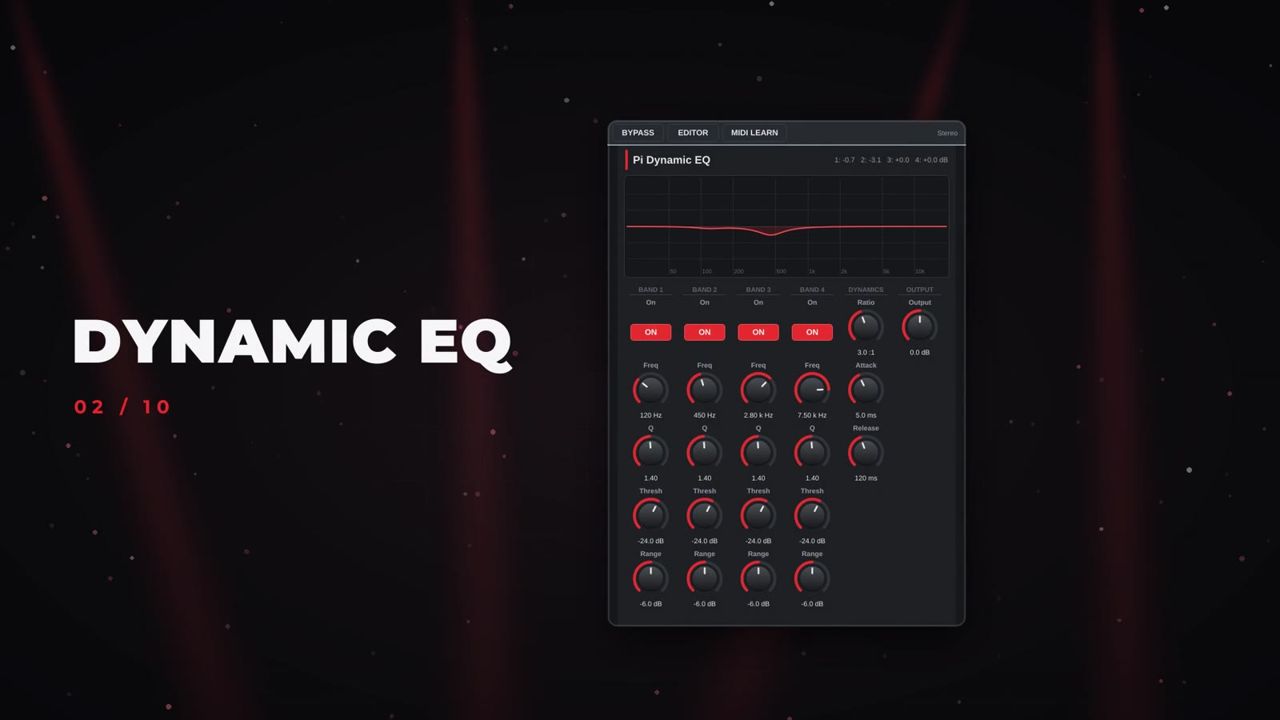
Pi Dynamic EQ (EQ)
Four bands that cut or lift only while their frequency range is over the threshold.
| Control (per band) | Range | Default |
|---|---|---|
| Band n On | On/Off | On |
| Band n Freq | 30 Hz–18 kHz | 120 Hz, 450 Hz, 2.8 kHz, 7.5 kHz |
| Band n Q | 0.3–10 | 1.4 |
| Band n Threshold | −60 to 0 dB | −24 dB |
| Band n Range | −24 to +12 dB (negative = cut, positive = lift) | −6 dB |
Shared controls: Ratio (1.2:1–20:1, default 3:1), Attack (0.3–100 ms, default 5 ms), Release (10–2000 ms, default 120 ms) and Output (−18 to +18 dB).
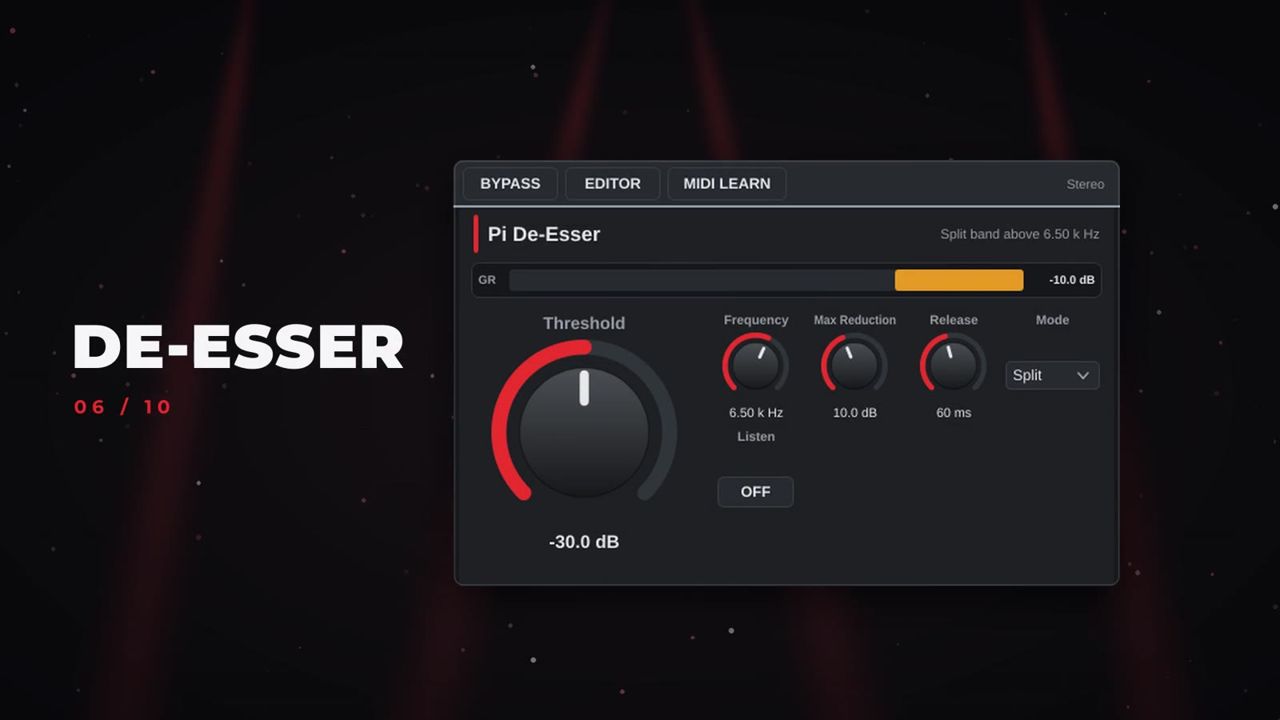
Pi De-Esser (Dynamics)
Sibilance control, split-band or wideband.
| Control | Range | Default |
|---|---|---|
| Threshold | −60 to 0 dB | −30 dB |
| Frequency | 2–14 kHz | 6.5 kHz |
| Max Reduction | 0–24 dB | 10 dB |
| Release | 10–500 ms | 60 ms |
| Mode | Split, Wide | Split |
| Listen | On/Off — hear only what is being detected | Off |
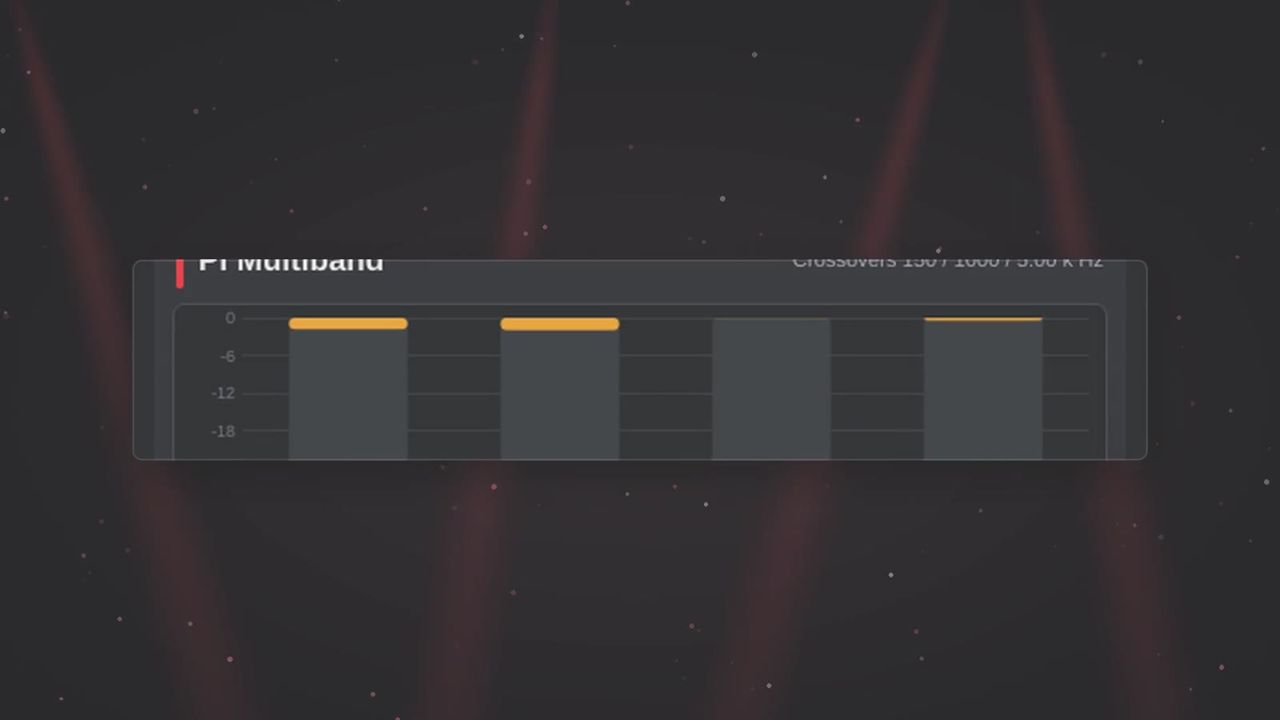
Pi Multiband (Dynamics)
A 4-band compressor with phase-coherent Linkwitz-Riley crossovers: with no compression the four bands add up to a flat response.
| Control | Range | Default |
|---|---|---|
| Crossover Low / Mid / High | 40–1000 Hz / 200–5000 Hz / 1–16 kHz | 150 Hz / 1 kHz / 5 kHz |
| Per band (Low, Low Mid, High Mid, High): Threshold | −60 to 0 dB | −20 dB |
| Ratio | 1:1 to 20:1 | 2.5:1 |
| Attack | 0.1–100 ms | 20 ms (Low), 8 ms (others) |
| Release | 5–2000 ms | 250 ms (Low), 120 ms (others) |
| Gain | −12 to +12 dB | 0 dB |
| Output | −18 to +18 dB | 0 dB |
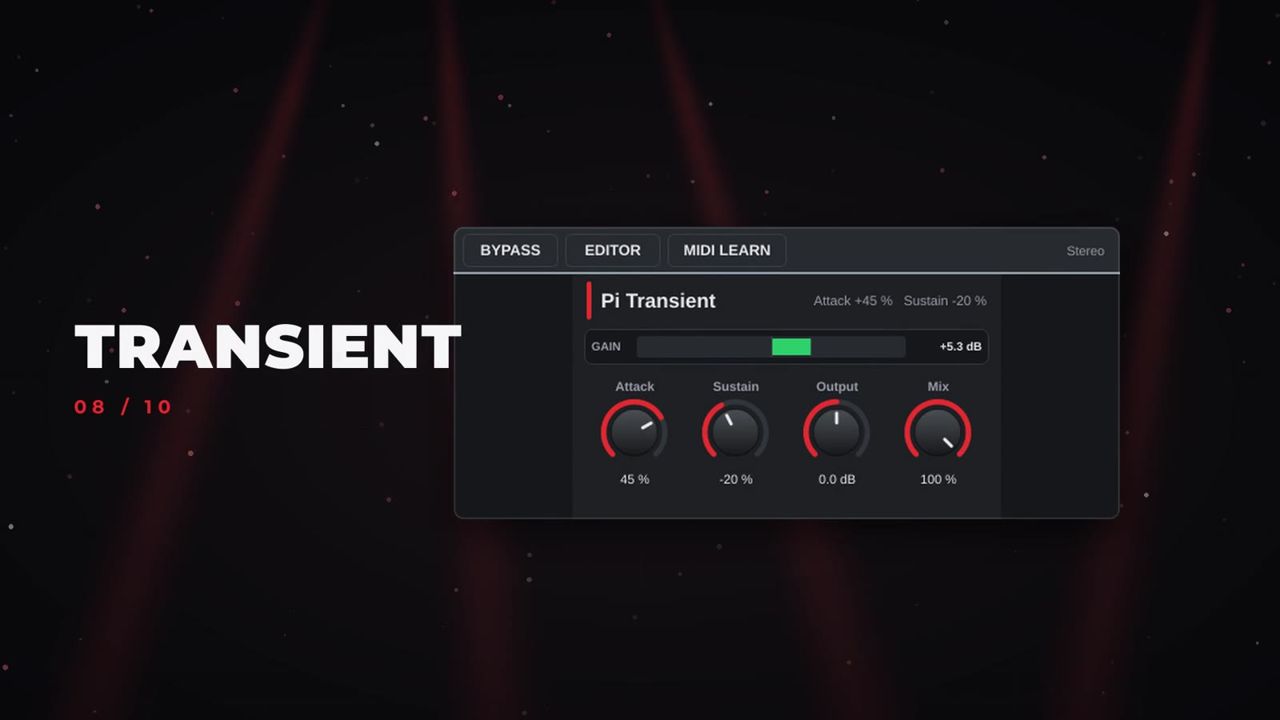
Pi Transient (Dynamics)
A transient shaper that works the same at any level.
| Control | Range | Default |
|---|---|---|
| Attack | −100 to +100 % | 0 % |
| Sustain | −100 to +100 % | 0 % |
| Output | −18 to +18 dB | 0 dB |
| Mix | 0–100 % | 100 % |
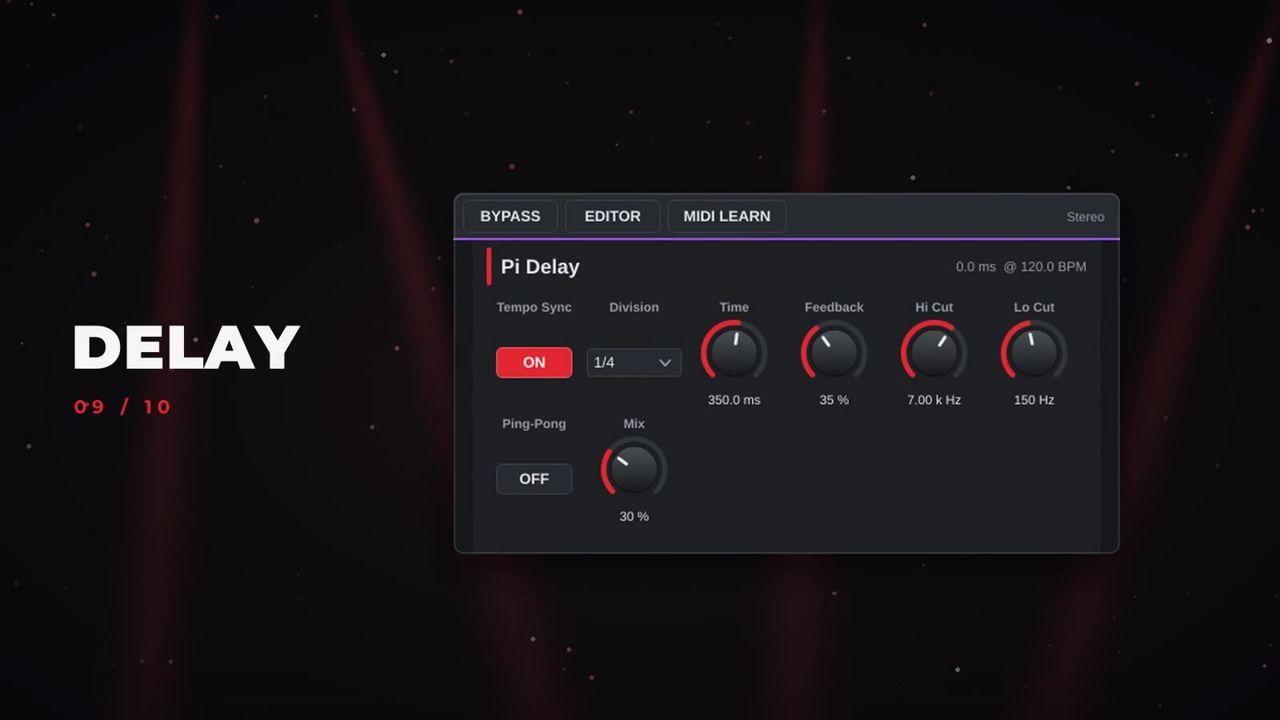
Pi Delay (Delay)
A tempo-synced stereo / ping-pong delay that follows tap tempo.
| Control | Range | Default |
|---|---|---|
| Tempo Sync | On/Off | On |
| Division | 1/1, 1/2, 1/2 D, 1/2 T, 1/4, 1/4 D, 1/4 T, 1/8, 1/8 D, 1/8 T, 1/16, 1/16 D, 1/16 T, 1/32 | 1/4 |
| Time (sync off) | 1–2000 ms | 350 ms |
| Feedback | 0–95 % | 35 % |
| Hi Cut / Lo Cut | 1–20 kHz / 20–2000 Hz | 7 kHz / 150 Hz |
| Ping-Pong | On/Off | Off |
| Mix | 0–100 % | 30 % |
Pi Reverb (Reverb)
An algorithmic reverb (8-line feedback delay network) or a zero-latency convolution reverb.
| Control | Range | Default |
|---|---|---|
| Engine | Algorithmic, Convolution | Algorithmic |
| Decay | 0.2–10 s | 1.8 s |
| Size | 0–100 % | 60 % |
| Pre-Delay | 0–250 ms | 20 ms |
| Damping | 1–20 kHz | 6 kHz |
| Lo Cut / Hi Cut | 20–1000 Hz / 1–20 kHz | 150 Hz / 12 kHz |
| Width | 0–100 % | 100 % |
| Mix | 0–100 % | 25 % |
| IR (convolution) | Hall, Chamber, Room, Plate, Church, Ambience, Your IR | Hall |
| IR Length | 10–100 % | 100 % |
Choose Your IR to load your own impulse response file. The IR is stored inside the session, so a Pi Live Server that runs the rack does not need its own copy.
Pi Utility (Utility)
| Control | Range | Default |
|---|---|---|
| Gain | −60 to +24 dB | 0 dB |
| Polarity Invert | On/Off | Off |
| Delay | 0–500 ms | 0 ms |
| Balance | −100 to +100 | 0 |
| Mono | On/Off | Off |
| Mute | On/Off | Off |
Pi Generator (Utility)
| Control | Range | Default |
|---|---|---|
| On | On/Off | Off |
| Signal | Sine, Pink Noise, White Noise | Sine |
| Frequency | 20 Hz–20 kHz | 1 kHz |
| Level | −80 to 0 dBFS | −18 dBFS |
Pi Vocal AI De-Bleed
Pi Vocal AI De-Bleed (category AI) uses a neural network to separate the voice from the bleed in a live vocal mic: drums, guitar amps, monitors and the PA. You can use it on up to two racks at the same time.
How to clean a vocal mic
- Insert Pi Vocal AI De-Bleed in the first slot of a vocal rack.
- While the band plays, turn INTENSITY up until the band and monitors disappear from the vocal mic.
- If the voice starts to sound thin, raise Voice Protect or lower Max Reduction.
- Turn on Listen Removed for a moment to hear only what is being removed. Turn it off before the show.
| Control | What it does | Range / default |
|---|---|---|
| Intensity | Overall amount of bleed removal | 0–100 %, 60 % |
| Max Reduction | The deepest the bleed is pulled down | −60 to −3 dB, −30 dB |
| Voice Protect | Protects the voice from being reduced | 0–100 %, 50 % |
| Reference | Amount of the bleed reference used (see below) | 0–100 %, 100 % |
| Latency | Zero or HQ 10 ms | Zero |
| Listen Removed | Hear the removed part only | Off |
| Output | Output level | −12 to +12 dB, 0 dB |
Zero latency mode applies the network's decisions through a minimum-phase filter, so the vocal is not delayed at all. HQ 10 ms gives a little more separation for 10 ms of latency (useful on a playback or broadcast feed, rarely on a lead vocal with in-ears).
Using a bleed reference
Feed a bleed reference (for example the drum overheads) into the rack's SIDECHAIN KEY INPUT and turn on Sidechain from rack key input on the slot. Pi Live learns the reference while the singer is silent and removes it while they sing; Reference sets how much is used.
Pi Feedback Guard
Pi Feedback Guard (category Feedback) finds ringing feedback by its spectral signature (a pure, dominant, steady tone with no harmonics that keeps growing) and drops narrow notches on it automatically. It is zero latency, and its notches are saved with the session.
| Control | What it does | Range / default |
|---|---|---|
| Sensitivity | How quickly a tone is treated as feedback | 0–100 %, 50 % |
| Max Depth | Deepest cut of each notch | 3–30 dB, 18 dB |
| Notch Width | 1/5, 1/10, 1/20 or 1/40 octave | 1/10 oct |
| Notches | Maximum number of notches | 1–12, 8 |
| Mode | Live (fade): notches fade out when no longer needed. Fixed: notches stay (for ringing out) | Live (fade) |
| Fade After | How long a Live notch stays before fading | 5–600 s, 60 s |
| Freeze | Stop adding or changing notches | Off |
| CLEAR NOTCHES | Remove all notches | — |
How to ring out monitors
- Insert Pi Feedback Guard on the monitor mix rack and set Mode to Fixed.
- Slowly raise the monitor level until feedback starts. Pi Feedback Guard notches each ringing frequency.
- When you are happy, turn on Freeze so the notches stay as they are.
During the show, use Live (fade) on vocal racks as a safety net: notches appear only when needed and fade after Fade After seconds.
Pi Analyzer
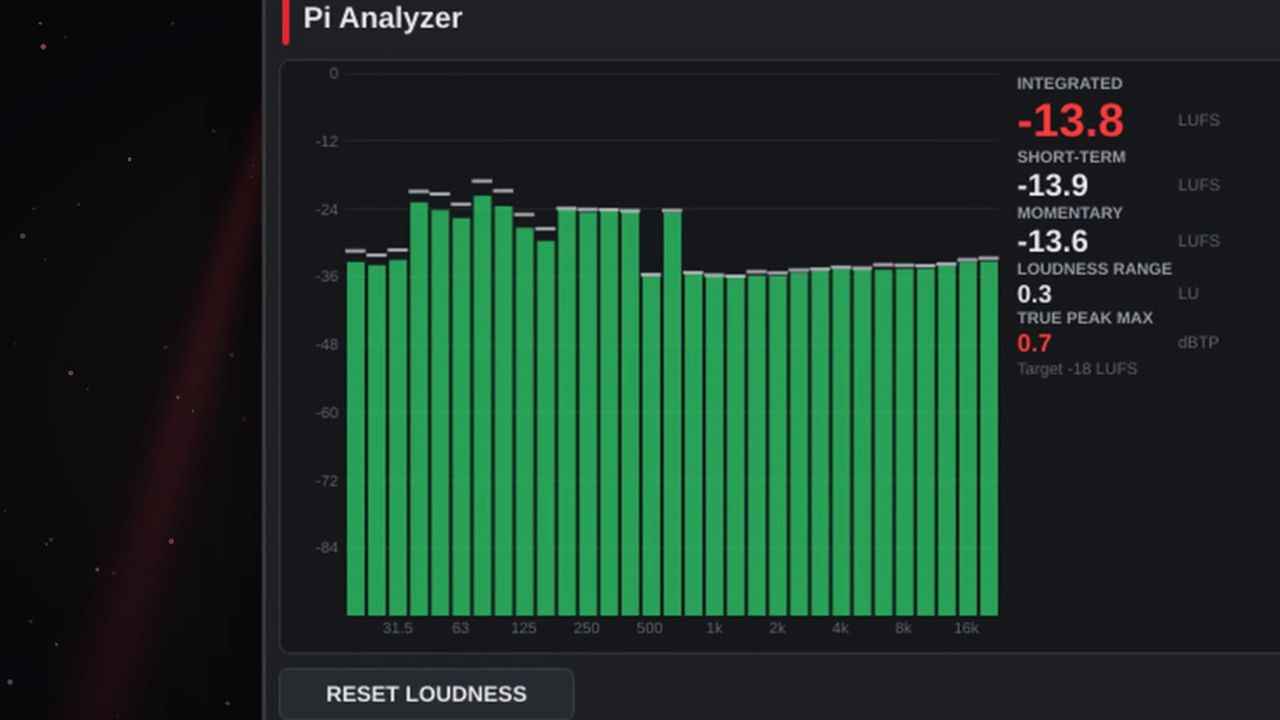
Pi Analyzer shows an RTA, loudness, true peak and phase. Insert it anywhere, for example in the last slot of your master rack. It passes the audio through untouched.
- RTA: RTA Bands 1/3, 1/6 or 1/12 octave (default 1/3); RTA Speed Fast, Medium or Slow (default Medium); with peak hold.
- Loudness to ITU-R BS.1770-4 / EBU R128: MOMENTARY, SHORT-TERM, INTEGRATED (LUFS) and LOUDNESS RANGE.
- Loudness Target: −14, −16, −18, −20, −23 (EBU R128) or −24 LUFS (ATSC A/85); default −18 LUFS.
- TRUE PEAK MAX: 4x oversampled true peak.
- Phase: correlation meter and goniometer.
- RESET LOUDNESS starts the integrated measurement again (for example at the start of the set).
Scenes
A scene stores, for every rack, the gain, mute and bypass state and the full state of every plug-in. Racks marked recall safe (S) are skipped on recall, so a vocal you have just rescued never jumps back.
How to store and recall scenes
- Store a new scene: click + NEW in the SCENES tab, choose STORE > Store as new scene in the top bar, or press Cmd/Ctrl+K. The new scene is placed after the current one.
- Update a scene: select it and click UPDATE, choose STORE > Update "
" , or press Cmd/Ctrl+U. - Recall: double-click a scene, select it and click RECALL, or use the arrows: Right arrow, Space or Page Down for the next scene, Left arrow or Page Up for the previous one.
- Reorder: UP / DOWN. Delete: DELETE (asks first).
The SCENE NOTES field holds cues and reminders for the selected song or scene.
Scene right-click menu
Right-click a scene for Recall, Update from current state, Rename..., Set MIDI program number... (0–127; empty = the scene's position), Set tempo on recall... (BPM; empty = keep the current tempo), Timecode cue... (hh:mm:ss:ff), Timecode cue at the current timecode, Remove timecode cue, MIDI Learn recall of this scene and Delete. The list shows each scene's program number (PC), timecode cue (TC) and tempo (BPM).
Show control: console link, timecode and tablet remote
Open SETTINGS > Show Control (or Options > Show Control (console, timecode, tablet)...).
Console link: follow the console's scenes
Pi Live can follow your console's scene recalls over the network, and can recall the console's scenes when you recall a scene in Pi Live.
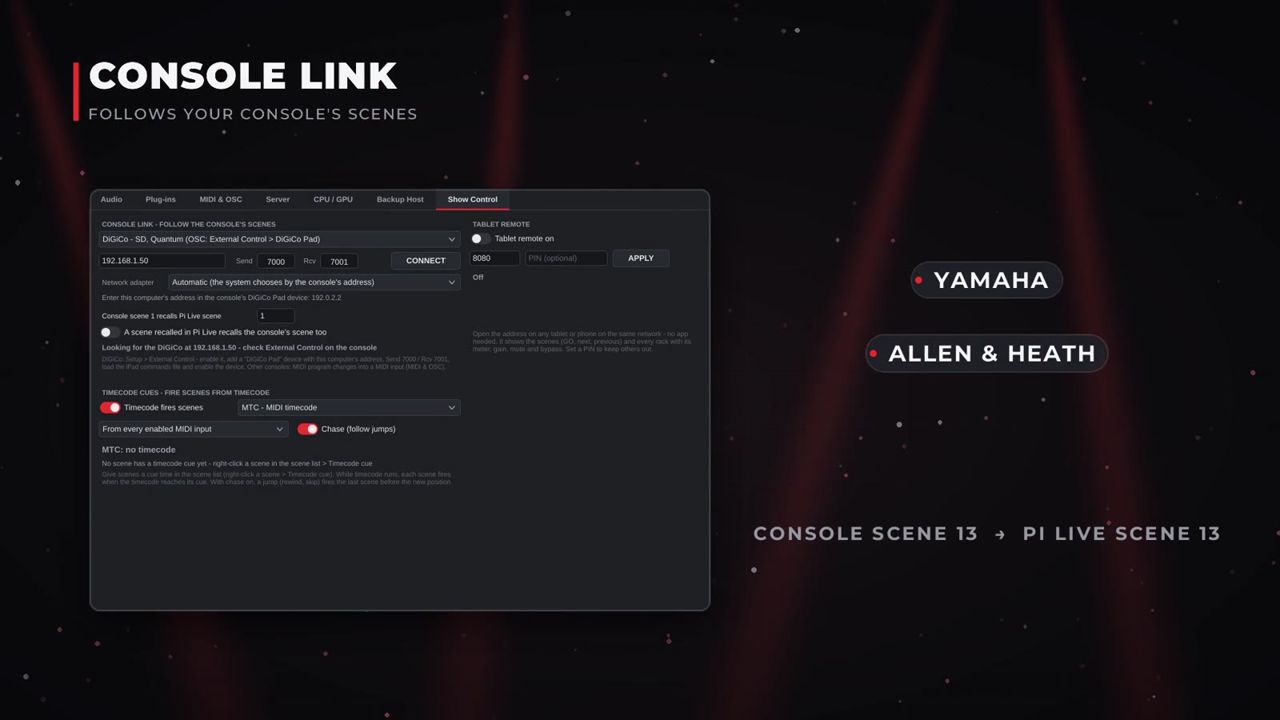
- Under CONSOLE LINK - FOLLOW THE CONSOLE'S SCENES, choose the console family: - Yamaha - CL, QL, TF, Rivage PM, DM3, DM7 (TCP 49280) - Allen & Heath - dLive, Avantis, SQ (MIDI over TCP 51325): also set MIDI ch to the console's MIDI channel (Utility > Control > MIDI on the console). - DiGiCo - SD, Quantum (OSC: External Control > DiGiCo Pad): set the Send and Rcv ports (default 7000 and 7001).
- Enter the Console IP address.
- Choose the Network adapter connected to the console network, or leave Automatic (the system chooses by the console's address).
- Set Console scene 1 recalls Pi Live scene (the offset between the console's scene numbers and Pi Live's). Scenes with a MIDI program number answer to that number instead.
- Tick A scene recalled in Pi Live recalls the console's scene too if you want two-way recall.
- Click CONNECT.
DiGiCo set-up: on the console, open Setup > External Control, enable it, add a "DiGiCo Pad" device with this computer's address (Pi Live shows it), set Send 7000 / Rcv 7001, load the iPad commands file and enable the device.
Other consoles: send MIDI program changes into a MIDI input (see Keyboard shortcuts / remote control).
Timecode cues

- Under TIMECODE CUES - FIRE SCENES FROM TIMECODE, tick Timecode fires scenes.
- Choose the source: MTC - MIDI timecode (from every enabled MIDI input or from one chosen input) or LTC - timecode on an audio input (choose the input).
- Tick Chase (follow jumps) if the playback may jump: on a rewind or skip, Pi Live fires the last scene before the new position.
- In the scene list, right-click each scene and set a Timecode cue....
While timecode runs, the top bar shows it next to the tempo, and each scene fires when the timecode reaches its cue. Pi Live reads 24, 25, 29.97 drop-frame and 30 fps. The Show Control page shows how many scenes have a cue and which one is next.
Tablet remote
A web page for any tablet or phone on the same network. No app is needed.
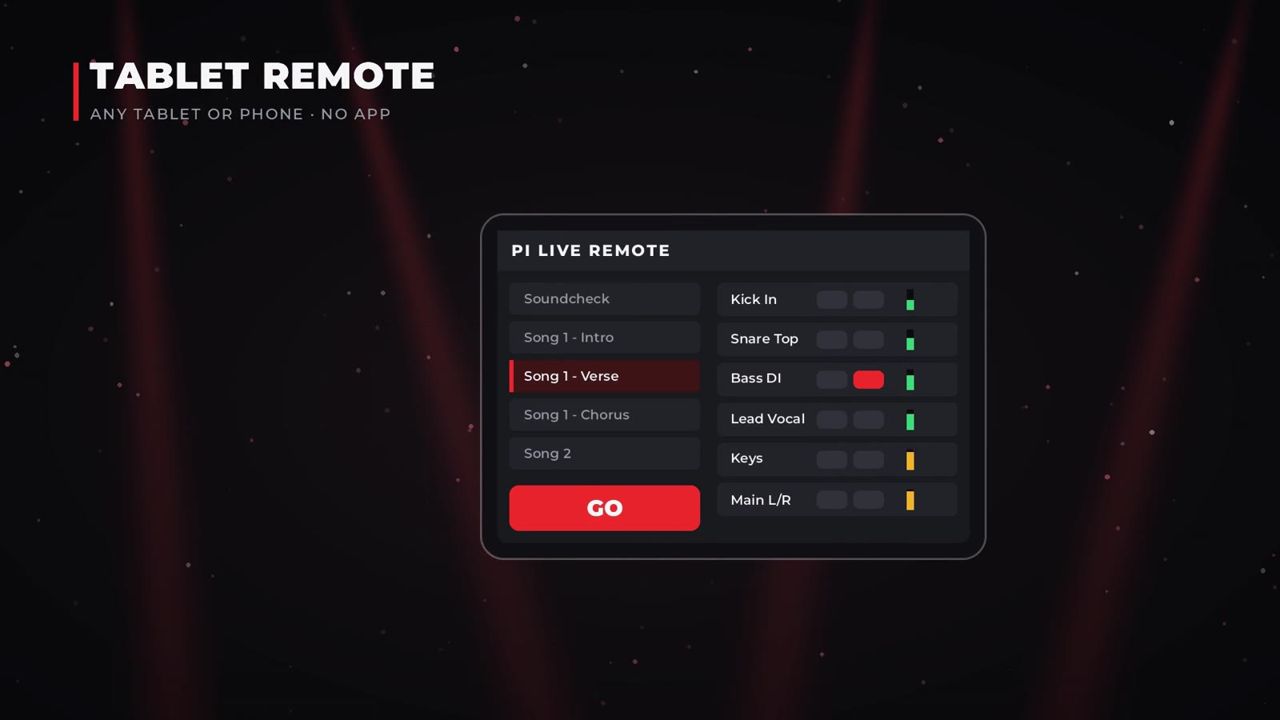
- Under TABLET REMOTE, tick Tablet remote on.
- Set the port (default 8080) and, optionally, a PIN of up to 8 digits.
- Click APPLY. Pi Live shows the address to open.
- Open the address in the browser of your tablet or phone. If you set a PIN, enter it and tap CONNECT.
The remote shows the current scene with PREV, GO and NEXT, the scene list, and every rack with its meter, gain, MUTE and BYPASS. It updates live.
Remote processing with Pi Live Server
Pi Live Server runs on a second Mac or Windows computer and processes racks for your Pi Live host over the network. You keep editing every plug-in on the host; the server does the processing. Up to 4 servers can be used at once.
How to set up a server
- Install Pi Live Server on the second computer (it is in the same installer).
- Install and authorize every plug-in you want to run there with its own installer (iLok, Waves, serial numbers, exactly as on any computer).
- Launch Pi Live Server and let it scan its plug-ins.
- Connect both computers to the same network. A direct Gigabit cable or a dedicated switch is best.
- On the host, open SETTINGS > Server. Servers found on the network are listed under PI LIVE SERVERS ON THE NETWORK. Select one and click CONNECT, or type its address under CONNECT MANUALLY.
- Click NET on each rack you want to move to the server.
Note: A Mac host with a Windows server needs the VST3 versions of your plug-ins on the Mac, because Audio Units only exist on macOS. Use the same plug-in format on both computers.
The Server page
Besides the server list and CONNECT MANUALLY, the page shows the CONNECTED SERVER (system, processor, cores, number of plug-ins), the NETWORK BUFFER setting, and PLUG-INS ON THE SERVER, which lists the plug-ins of your show that the server is missing. RESCAN ON SERVER makes the server scan again after you install new plug-ins.
Network buffer. 0 blocks is synchronous: no added latency, but the server must answer within the same audio buffer (direct cable, fast server). Each block adds one audio buffer of latency on remote racks. AUTO measures the real network round trip (average, 99 % and maximum) and uses the lowest safe setting. If you hear dropouts on remote racks, raise the buffer.
Choosing servers per rack
With several servers connected, open a rack's ... menu and choose Server (1–4). The NET chip shows the server number (NET2, NET3...).
Redundant server
A rack can also run on a Backup server (runs in parallel). Both servers process the rack at the same time: any audio block the main server misses is taken from the backup, and if the main server is lost the backup takes over with no gap and no switch to local processing. The NET chip shows a + (for example NET1+).
If a server disappears
A rack without a backup server falls back to local processing instantly, with the same settings, and Pi Live reconnects to the server by itself. While the rack waits for the server the NET chip is amber ("Waiting for Pi Live Server ... processing locally for now").
The Pi Live Server window
The server window shows its status, address, connected hosts and a HOSTED RACKS table (Host, Rack, Plug-ins, Latency, Load); double-click a rack to open its plug-in windows there. Under SERVER NAME / PORTS (TCP, UDP) you can rename the server and change its ports.
Backup host
Run Pi Live on a second computer as a hot spare. The backup host copies the show from the main host (racks, plug-ins, routing, scenes, MIDI / OSC set-up) and then follows every change as it happens: knobs, mutes, scene recalls. If the main host stops answering, the backup takes over within 1.5 seconds.
How to set up a backup host
- Give both computers the same inputs (for example the same Dante flows) and patch both outputs to the console or to a switch.
- Install the same plug-ins on both computers.
- On the main computer, open SETTINGS > Backup Host and choose Main host - a backup host may follow this computer. Note the address it shows.
- On the backup computer, choose Backup host - follow the main host, enter the IP address of the main host and click FOLLOW.
- Tick Keep this computer's outputs silent until it takes over if both outputs feed the same console inputs.
While it waits, the backup's top bar shows BACKUP HOST - STANDBY. Use TAKE OVER NOW to switch by hand and BACK TO STANDBY to return. Each computer uses its own Pi Live Servers.
Crash protection
Pi Live protects the show from misbehaving plug-ins at three levels:
- Safety test. Every new plug-in is tested once in a separate process before it loads; one that crashes is blocked.
- Crash catching. A plug-in that crashes while running is switched off (its input passes through) and blocked; the slot shows CRASHED - OFF.
- Crash guard (per rack). Turn on Crash guard (plug-ins in a protected process) in the rack menu. The rack's plug-ins run in a protected process on the same computer, with no added latency, and the chip shows SAFE. If a plug-in crashes, only that process goes down: the rack plays dry for a moment, the plug-in that crashed is named and bypassed, the process restarts and Pi Live keeps running. Plug-in windows of guarded racks open from the protected process.
Pi Live also mutes invalid audio (NaN / Inf) from any plug-in before it reaches the outputs.
To give a blocked plug-in another chance, select it in SETTINGS > Plug-ins and click UNBLOCK, then use Try loading it again on the slot.
Latency and alignment
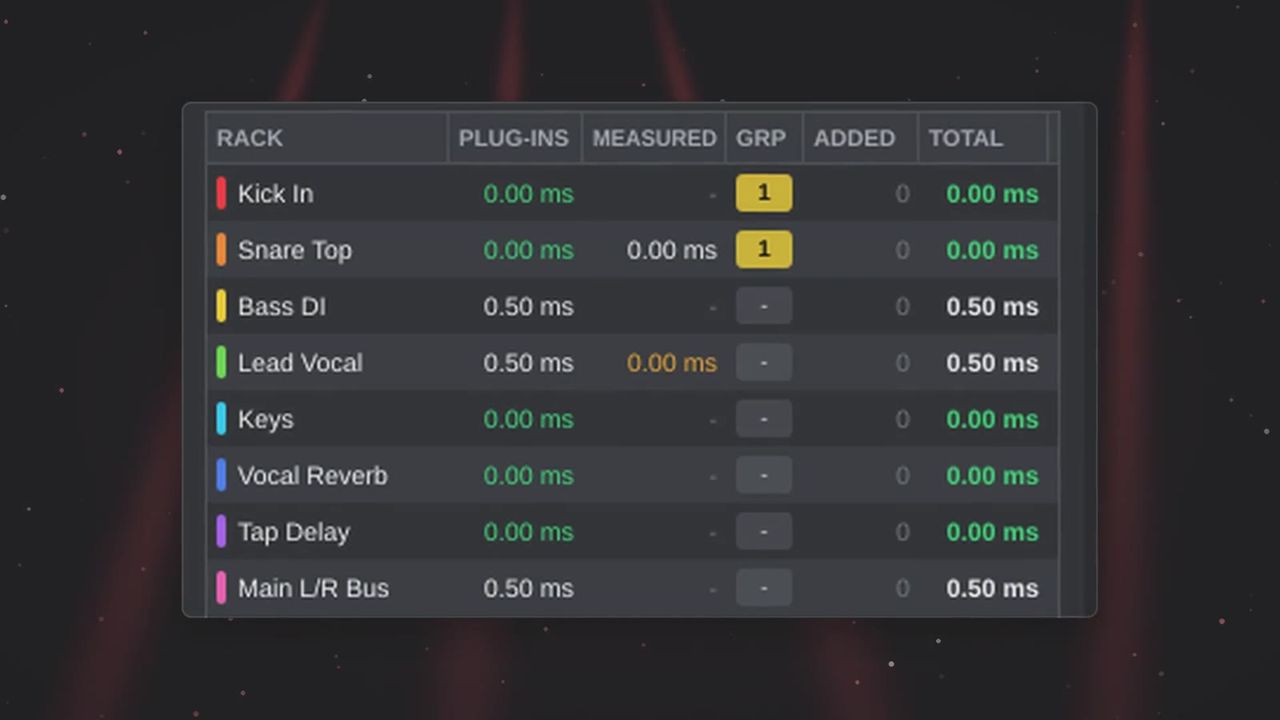
Pi Live puts minimum latency first: racks are never delayed unless you put them in the same align group (or choose to align everything). Every rack shows its own latency, and the LATENCY tab gives you the full picture.
The LATENCY tab
The LATENCY PER RACK table has these columns:
| Column | Meaning |
|---|---|
| RACK | Rack name ("(server)" for remote racks) |
| PLUG-INS | Latency reported by the plug-ins (+ network for remote racks) |
| MEASURED | Latency measured through the rack |
| GRP | Alignment group. Click to set it; None (never delayed) or Group 1, 2... |
| ADDED | Delay added by latency compensation, plus the manual alignment delay |
| TOTAL | Total latency the rack adds |
Under COMPENSATION, choose:
- Align: off (lowest latency everywhere)
- Align: groups only (recommended)
- Align: every rack to the slowest
and tick Compensate with measured latency to use measured values instead of what plug-ins report.
How to align racks that are summed together
- In the LATENCY tab, click GRP on each rack that is mixed together: a drum kit's mics, a stereo pair, a source and its parallel compression rack.
- Give them the same group number.
- Only those racks are delayed to line up with the slowest of the group. Every other rack keeps its own minimum latency.
How to measure real latency
Some plug-ins report their latency wrongly. Pi Live can measure it.
- Select a rack in the table and click MEASURE SELECTED, or click MEASURE ALL.
- Pi Live sends a short noise burst through the rack and finds the real latency by cross-correlation. The rack's outputs are muted for about 4 seconds.
- If the result differs from the reported value, Pi Live tells you; turn on Compensate with measured latency.
CLEAR removes all measurements. Right-click a rack in the table for Measure this rack and Clear measurement.
Warning: Measuring mutes the rack for a few seconds. Do it at soundcheck, not during the show.
I/O round trip
Under I/O ROUND TRIP (LOOP AN OUTPUT BACK TO AN INPUT), choose an Output and an Input that are physically connected (a loop cable, or a loop through your console or network), then click MEASURE ROUND TRIP. This measures your converters and network. USE FOR ALL INPUTS applies the result to every input.
The bottom of the tab shows your audio device's buffer (samples, kHz and ms) and the input + output latency the driver reports.
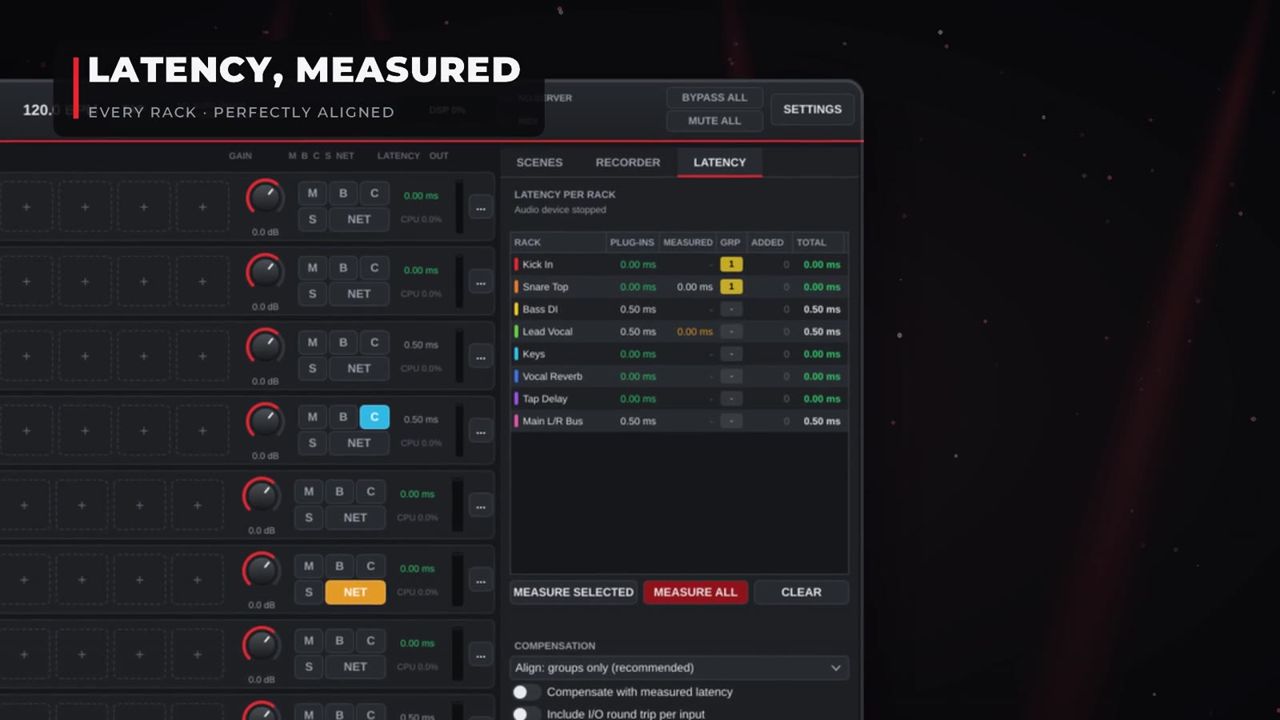
Bypassing a rack or a plug-in keeps its latency constant, so timing never jumps when you bypass.
Recorder and virtual soundcheck
The RECORDER tab records every input to one WAV file per channel, and plays a take back in place of the live inputs, so you can tune your racks when the band isn't there.
How to record a multitrack
- Open the RECORDER tab.
- Under MULTITRACK RECORDER, choose the channels (All device inputs, or Inputs 1 - 2 up to Inputs 1 - 128) and the format (24-bit WAV or 32-bit float WAV).
- Click RECORD. Click STOP RECORDING to finish. The elapsed time is shown while recording.
- Click SHOW FILES to open the recordings folder (
Documents/Pi Live/Recordings). Each take is a folder named with its date and time.
How to run a virtual soundcheck
- Under VIRTUAL SOUNDCHECK PLAYBACK, click LOAD TAKE... and choose a take folder.
- Click PLAY. The take replaces the live inputs, and every rack processes it as if the band were playing.
- Tick Loop to repeat it. Click PAUSE to stop.
When no take is loaded, the panel shows "No take loaded - inputs are live".
Warning: Always check that playback is stopped before the show starts, or your racks will hear the recording instead of the stage.
Sessions and presets
| File | Contents |
|---|---|
.pilive |
A complete session: racks, plug-ins and their states, routing, scenes, MIDI / OSC mappings, latency groups, server choices |
.pirack |
One rack with all its plug-ins |
.pipreset |
One plug-in's state |
- File > New Session (Cmd/Ctrl+N), Open Session... (Cmd/Ctrl+O), Save (Cmd/Ctrl+S), Save As... (Cmd/Ctrl+Shift+S) and Open Recent.
- Drag a
.piliveor.pirackfile onto the window to open it. - Autosave and crash recovery. Pi Live saves your work automatically in the background. If it did not shut down properly, it asks Restore session? at the next launch: click Restore to continue where you were, or Start fresh.
If a session opens on a computer where some plug-ins are missing, Pi Live opens it with warnings and marks those slots NOT LOADED, keeping their settings so nothing is lost.
Settings & preferences
Open SETTINGS in the top bar (or Cmd/Ctrl+,). The Pi Live Settings window has the tabs Audio, Plug-ins, MIDI & OSC, Server, CPU / GPU, Backup Host and Show Control; each is described in its own chapter. This chapter covers CPU / GPU.
CPU / GPU
| Setting | Options | Default |
|---|---|---|
| CPU - DSP THREADS | Automatic (n helper threads), Off (single core, lowest overhead), or a fixed number of helper threads | Automatic |
| DSP THREAD WAKE-UP | Efficient - threads sleep between buffers, Balanced - poll 0.25 ms before sleeping, Lowest jitter - poll 1 ms (uses more CPU) | Efficient |
| Pin DSP threads to their own CPU cores | On/Off (Windows; macOS does this through audio workgroups) | Off |
| High-performance mode (high priority, no power throttling) | On/Off | — |
| GPU - INTERFACE RENDERING | Automatic (system GPU compositing), GPU - OpenGL (lowest CPU for meters), CPU - software rendering (the GPU option on Windows uses Direct2D) | Automatic |
| Meters | 15 fps (least CPU), 30 fps, 60 fps (smoothest) | 30 fps |
| LATENCY ALIGNMENT | Off / Align groups only (recommended) / Align all racks to the slowest one | — |
| CUE OUTPUTS | Left and right outputs for the C (cue) buttons, e.g. your headphone amp | — |
| INTERFACE SIZE | 80 % to 200 % | 100 % |
Racks are processed in parallel on all CPU cores. Helper threads benefit sessions with many racks most. The page also shows the live DSP load, the number of DSP threads, the buffer in samples and ms, and the xruns count.
Note: Audio plug-ins always run their DSP on the CPU. The GPU setting only moves the drawing of the interface and meters to the graphics card, leaving more CPU for audio.
Keyboard shortcuts / remote control
Keyboard shortcuts
On Windows, use Ctrl where the table says Cmd.
| Shortcut | Action |
|---|---|
| Cmd+N | New Session |
| Cmd+O | Open Session... |
| Cmd+S | Save |
| Cmd+Shift+S | Save As... |
| Cmd+1 | Add Mono Rack |
| Cmd+2 | Add Stereo Rack |
| Cmd+3 | Add Mono > Stereo Rack |
| Cmd+4 | Add 8-Channel Rack |
| Cmd+Shift+R | Add Several Racks... |
| Cmd+D | Duplicate Selected Rack |
| Cmd+Backspace | Delete Selected Rack |
| Right arrow / Space / Page Down | Next Scene |
| Left arrow / Page Up | Previous Scene |
| Cmd+U | Update Current Scene |
| Cmd+K | Store New Scene |
| T | Tap Tempo |
| Cmd+Shift+B | Bypass All Racks |
| Cmd+Shift+M | Mute All Outputs |
| Cmd+Shift+W | Close All Plug-in Windows |
| Cmd+, | Audio Settings... |
| F1 | Quick Guide |
MIDI
Open SETTINGS > MIDI & OSC.
- MIDI INPUTS: enable the MIDI inputs Pi Live listens to.
- PROGRAM CHANGE > SCENE RECALL: tick Recall scenes and choose Any channel or a specific channel. A program change recalls the scene with that program number, or the scene at that position if no number is set.
- MIDI LEARN: buttons to learn NEXT SCENE, PREV SCENE, TAP TEMPO, BYPASS ALL and MUTE ALL. The list shows all mappings; REMOVE SELECTED and CLEAR ALL remove them.
How to MIDI learn any control:
- Right-click a knob and choose MIDI Learn (or use a rack, slot or scene MIDI Learn item; for a plug-in's own editor, touch the control, then click MIDI LEARN in the plug-in window).
- Move a knob or fader (or press a button / note) on your controller. Pi Live confirms "MIDI mapping saved".
Mappings are saved with the session.
OSC
Under OSC REMOTE CONTROL, tick Enable OSC, set the port (default 8000) and, optionally, a feedback IP and port (default 9000) to receive feedback. Click APPLY.
| Address | Arguments | Action |
|---|---|---|
/pilive/scene/next |
— | Next scene |
/pilive/scene/prev |
— | Previous scene |
/pilive/scene/recall |
n (1 = first scene) | Recall scene n |
/pilive/scene/name |
text | Recall the scene with that name |
/pilive/tap |
— | Tap tempo |
/pilive/tempo |
bpm | Set the tempo |
/pilive/bypass |
0 / 1 | Bypass all |
/pilive/mute |
0 / 1 | Mute all |
/pilive/rack/<n>/gain |
dB | Rack n gain |
/pilive/rack/<n>/mute |
0 / 1 | Rack n mute |
/pilive/rack/<n>/bypass |
0 / 1 | Rack n bypass |
/pilive/rack/<n>/cue |
0 / 1 | Rack n cue |
/pilive/rack/<n>/slot/<m>/bypass |
0 / 1 | Bypass slot m of rack n |
/pilive/rack/<n>/slot/<m>/param/<k> |
0..1 | Set parameter k of the plug-in in slot m |
Feedback: Pi Live sends /pilive/scene/current <n> <name> whenever the scene changes. Rack, slot and parameter numbers start at 1.
Tips for live/studio use
- Keep latency low where it matters. Leave racks out of align groups unless they are summed with another rack. A lead vocal in in-ear monitors should have no group and only zero-latency processing (Pi processors are zero latency; use Look-ahead Off on Pi Limiter and Zero on Pi Vocal AI De-Bleed).
- Use the smallest stable buffer. Watch the xruns counter in the status bar during soundcheck. If it climbs, raise the buffer, add helper threads, choose a more active DSP THREAD WAKE-UP, or move heavy racks to a server with NET.
- Mark rescue racks recall safe. When you fix a problem mid-show, press S on that rack so the next scene doesn't undo it.
- Use the crash guard on racks with plug-ins you don't fully trust, for example a new third-party plug-in on the lead vocal.
- Measure at soundcheck. Use MEASURE ALL once on a new system; some plug-ins report latency incorrectly, and the measurement tells you.
- Keep BYPASS ALL and MUTE ALL in mind. They are always on screen and work with Cmd/Ctrl+Shift+B and Cmd/Ctrl+Shift+M. BYPASS ALL keeps latency, so it is a safe A/B of your whole processing.
Troubleshooting
| Symptom | Cause | Fix |
|---|---|---|
| Top bar shows LIVE ENGINE NOT STARTED, no audio out | Pi Live is not activated (limited mode) | Open Help > Licence... and activate or start the trial. The engine starts and outputs fade in |
| Top bar shows "No audio device" | No device chosen or the device is unavailable | Open SETTINGS > Audio and choose your interface |
| Clicks, dropouts, xruns counter rising | Buffer too small, CPU overloaded, or network buffer too low on remote racks | Raise the buffer size, use automatic helper threads and high-performance mode, move racks to a server, or set NETWORK BUFFER to AUTO |
| A plug-in doesn't appear | Not scanned, or in a custom folder | SCAN FOR NEW PLUG-INS; add its folder with ADD FOLDER... |
| Slot shows NOT LOADED | The plug-in is not installed (or not authorized) on this computer | Install / authorize it, then right-click the slot > Try loading it again |
| NET chip stays amber | The server is not connected or not answering | Check SETTINGS > Server, the network cable, and that Pi Live Server is running |
| Server is missing plug-ins | Plug-ins not installed on the server, or a different format | Install and authorize them on the server, use VST3 for a Mac host with a Windows server, then RESCAN ON SERVER |
| MIDI program changes do nothing | MIDI input disabled or scene recall off | Enable the input and tick Recall scenes in SETTINGS > MIDI & OSC; check the channel |
| A plug-in is blocked or shows CRASHED - OFF | It crashed in its safety test or during the show | Update it, click UNBLOCK in SETTINGS > Plug-ins, or turn on the rack's crash guard |
| Scenes don't follow the console | Wrong console type, IP, adapter or ports | Check SETTINGS > Show Control |
| Mac says the app can't be opened | Gatekeeper check | System Settings > Privacy & Security > Open Anyway |
Specifications & system requirements
Specifications
| Item | Specification |
|---|---|
| Product | Pi Live by Saharty, version 1.0.0 |
| Type | Standalone live plug-in host, plus Pi Live Server for remote processing |
| Hosted plug-in formats | VST3 (macOS, Windows), Audio Units (macOS). AAX and VST2 are not hosted |
| Audio drivers | Core Audio (macOS); ASIO, WASAPI, DirectSound (Windows) |
| Audio I/O | Up to 512 inputs / 512 outputs |
| Racks | Up to 256; Mono, Mono > Stereo, Stereo, 4 / 6 / 8 / 12 / 16 channels |
| Plug-in slots | 10 per rack |
| Servers | Up to 4 Pi Live Servers at once, plus a backup server per rack |
| Network ports | UDP 47800 discovery, TCP 47801 control, UDP 47802 audio, TCP 47803 backup host |
System requirements
| macOS minimum | macOS recommended | |
|---|---|---|
| OS | macOS 11 Big Sur | Latest macOS |
| Processor | Apple silicon or Intel (Universal) | Apple M1 Pro or better |
| Memory | 8 GB | 16 GB |
| Disk | 100 MB | 100 MB |
| Audio | Core Audio interface or console | Multichannel interface, USB / MADI / network card |
| Server | Optional | Dedicated processing computer on a direct network link |
| Windows minimum | Windows recommended | |
|---|---|---|
| OS | Windows 10 64-bit | Windows 11 64-bit |
| Processor | Intel Core i5 / AMD Ryzen 5, 4 cores | Intel Core i7 / AMD Ryzen 7, 8 cores |
| Memory | 8 GB | 16 GB |
| Disk | 100 MB | 100 MB |
| Audio | ASIO driver | Multichannel ASIO interface or console |
| Server | Optional | Dedicated processing computer on a direct network link |
Pi Live Server has the same requirements; use a wired Gigabit network for remote processing.
Support
- Email: support@pi-ware.com
- Website, downloads and your account: www.pi-ware.com
- Video tutorials: youtube.com/@pibysaharty